Graphical User Interface Examples
Tip
You can adapt the font size of the GUI in the browser by pressing Ctrl and + (or Cmd and + on macOS) to increase the font size, or Ctrl and - (or Cmd and - on macOS) to decrease it.
Including a custom aptamer
This tutorial will demonstrate how to adapt an aptamer from the literature (or from your own SELEX experiment) for use in pyFuRNAce. We will use the Orange Broccoli aptamer as an example (Song et. al., Nat. Chem. Biol. 2017).
1) Import the tRNA-aptamer sequence
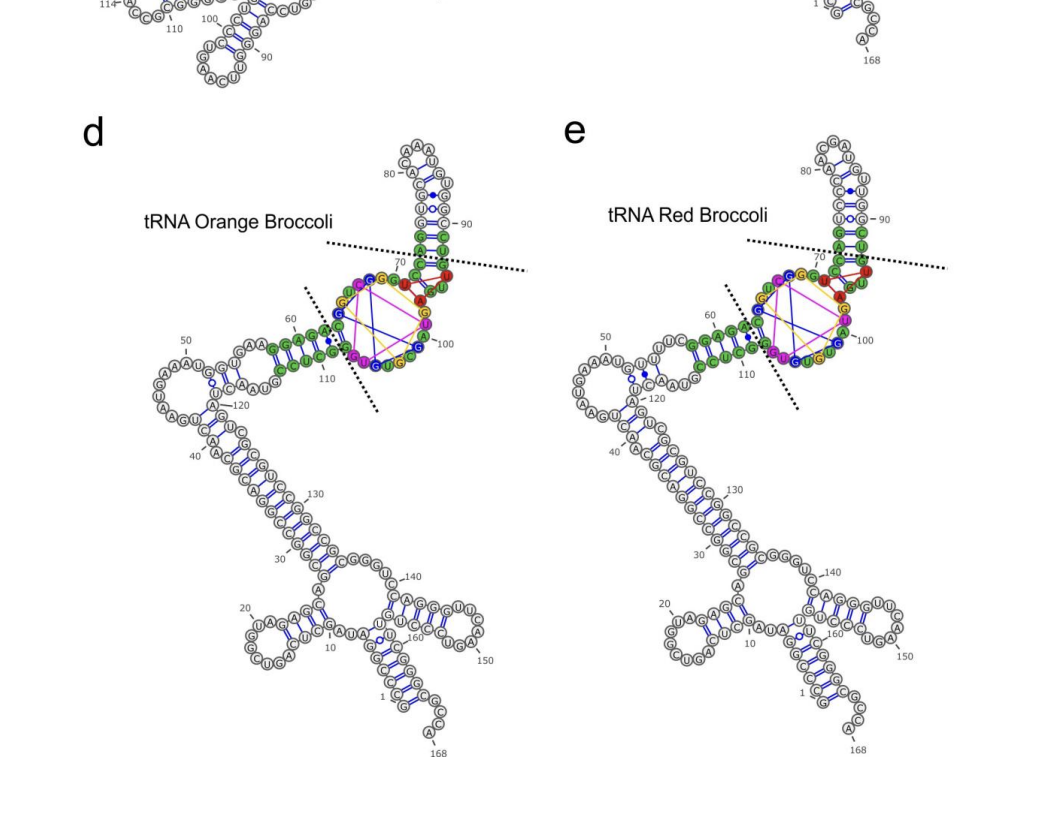
In Supplementary Figure 12 of the paper, the authors provide the sequence and structure of the Orange Broccoli aptamer:
While in Supplementary Table 1, they provide the sequence with the integrated aptamer:
GCCCGGAUAGCUCAGUCGGUAGAGCAGCGGCCGGACGCAACUGAAUGAAAUGGUGAAGGAGACGGUCGGGUCCAGGUGCACAAAUGUGGCCUGUUGAGUAGCGUGUGGGCUCCGUAACUAGUCGCGUCCGGCCGCGGGUCCAGGGUUCAAGUCCCUGUUCGGGCGCCA
We can import the sequence in the Homepage of pyFuRNAce to build an approximate origami blueprint:
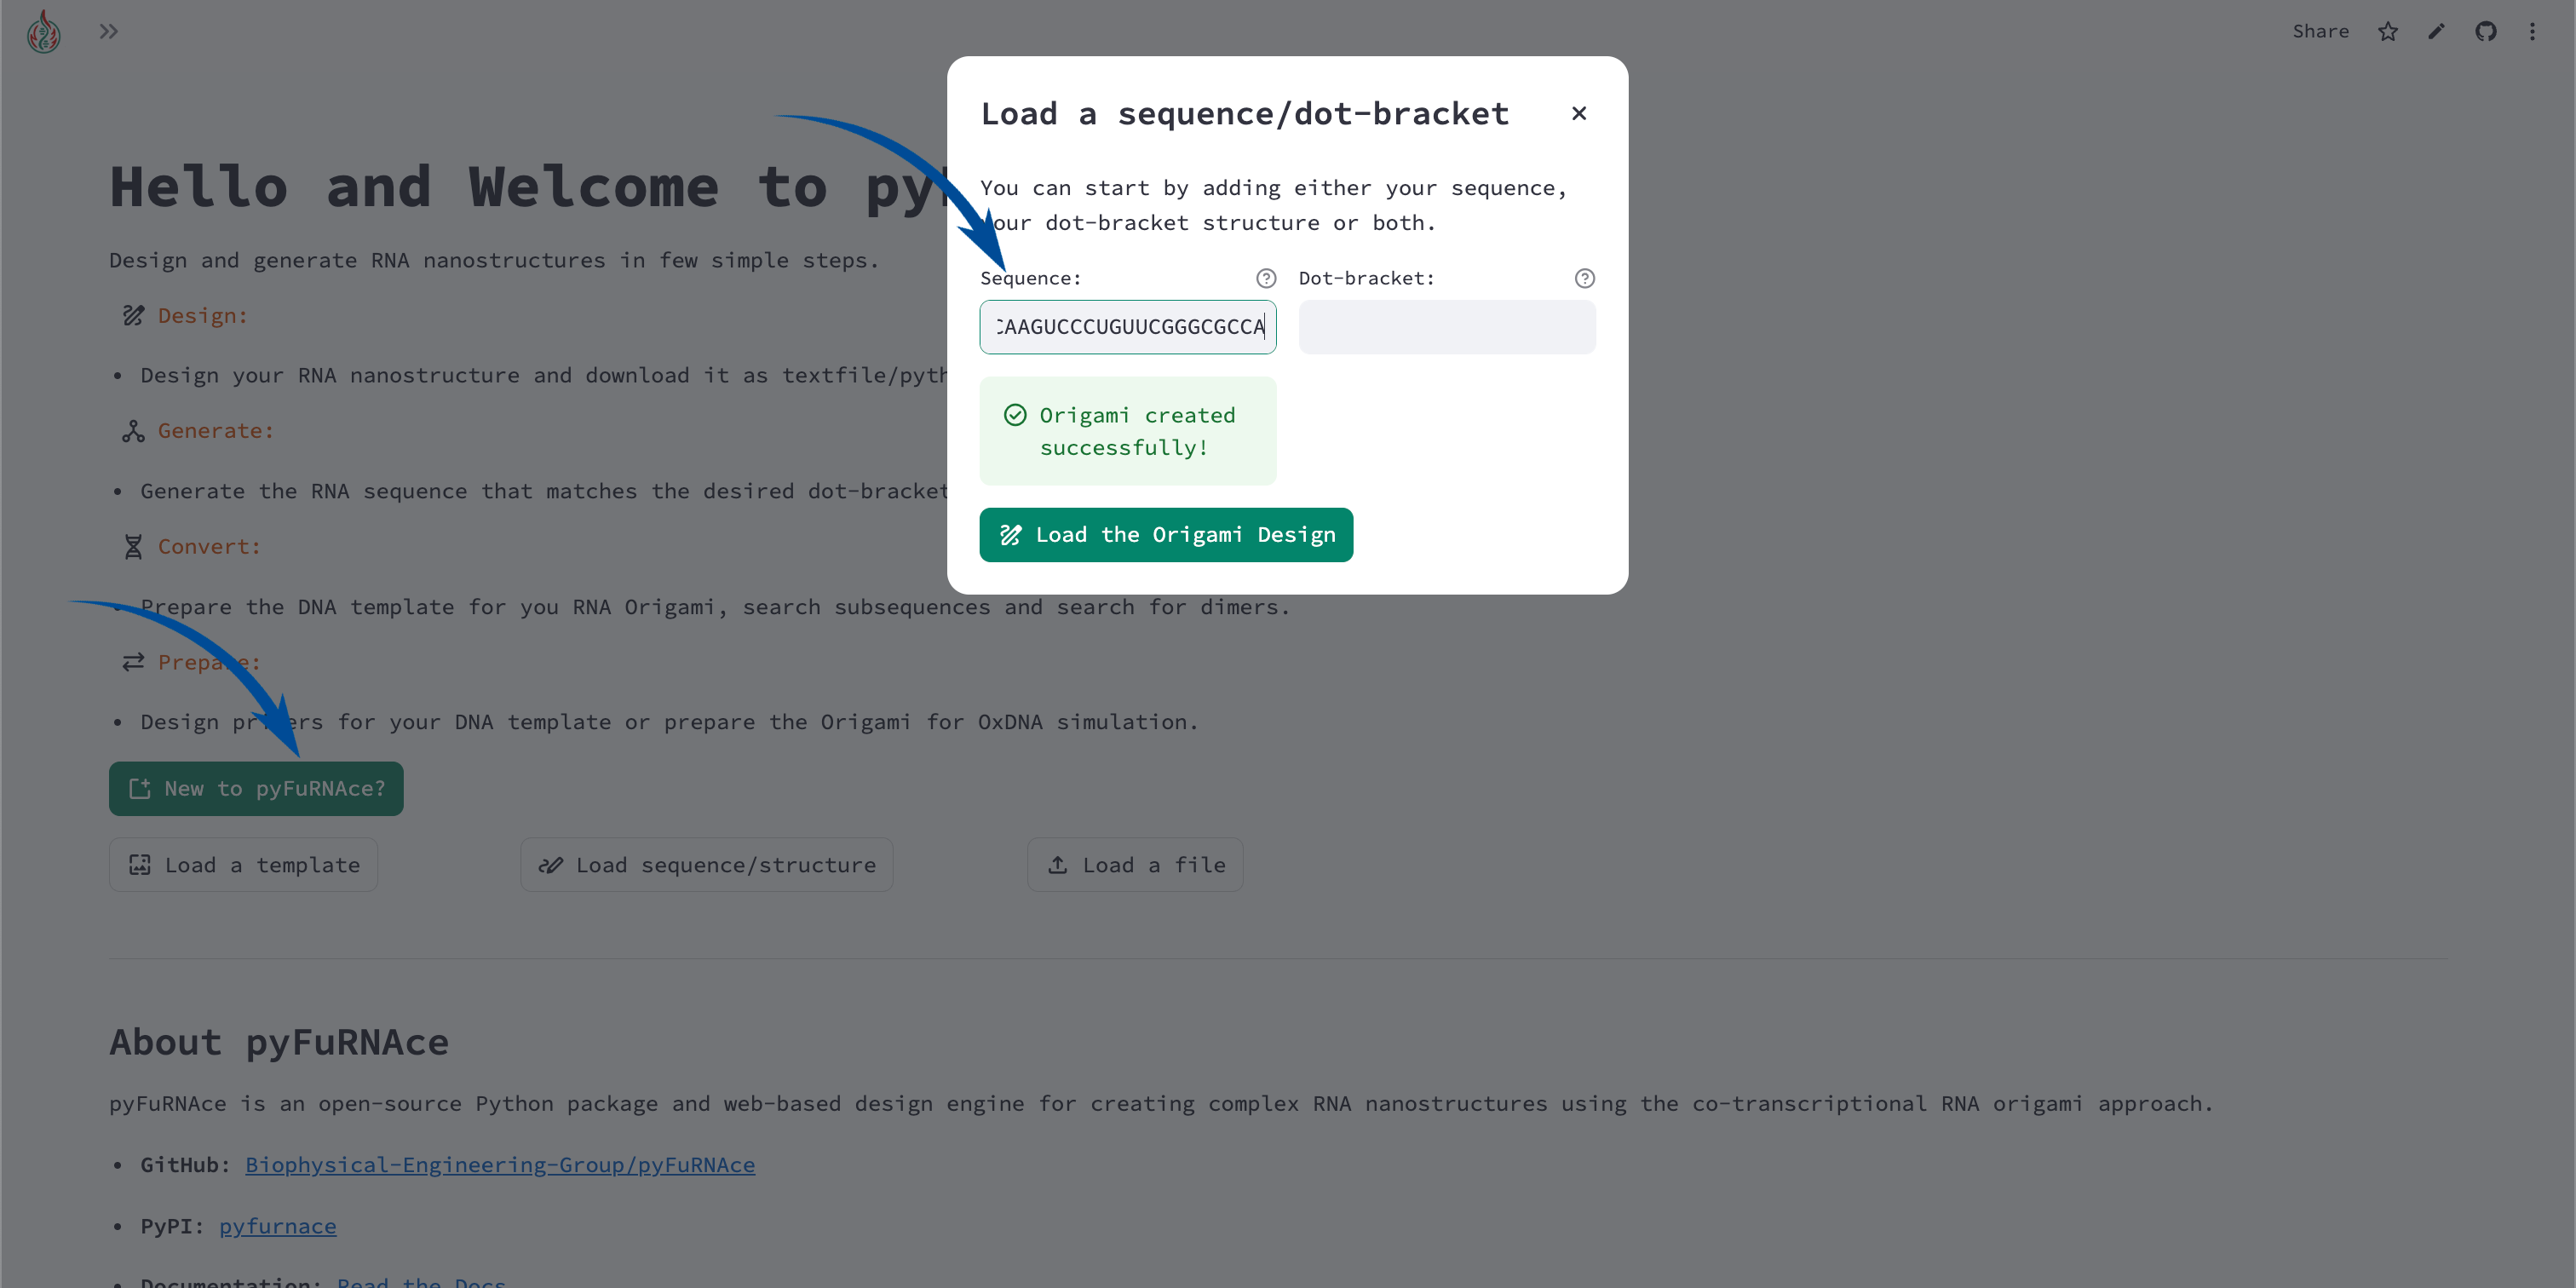
Remember that the structure of the origami is predicted with ViennaRNA, so it might not be exactly the same as the one in the paper.
2) Isolate the aptamer motif
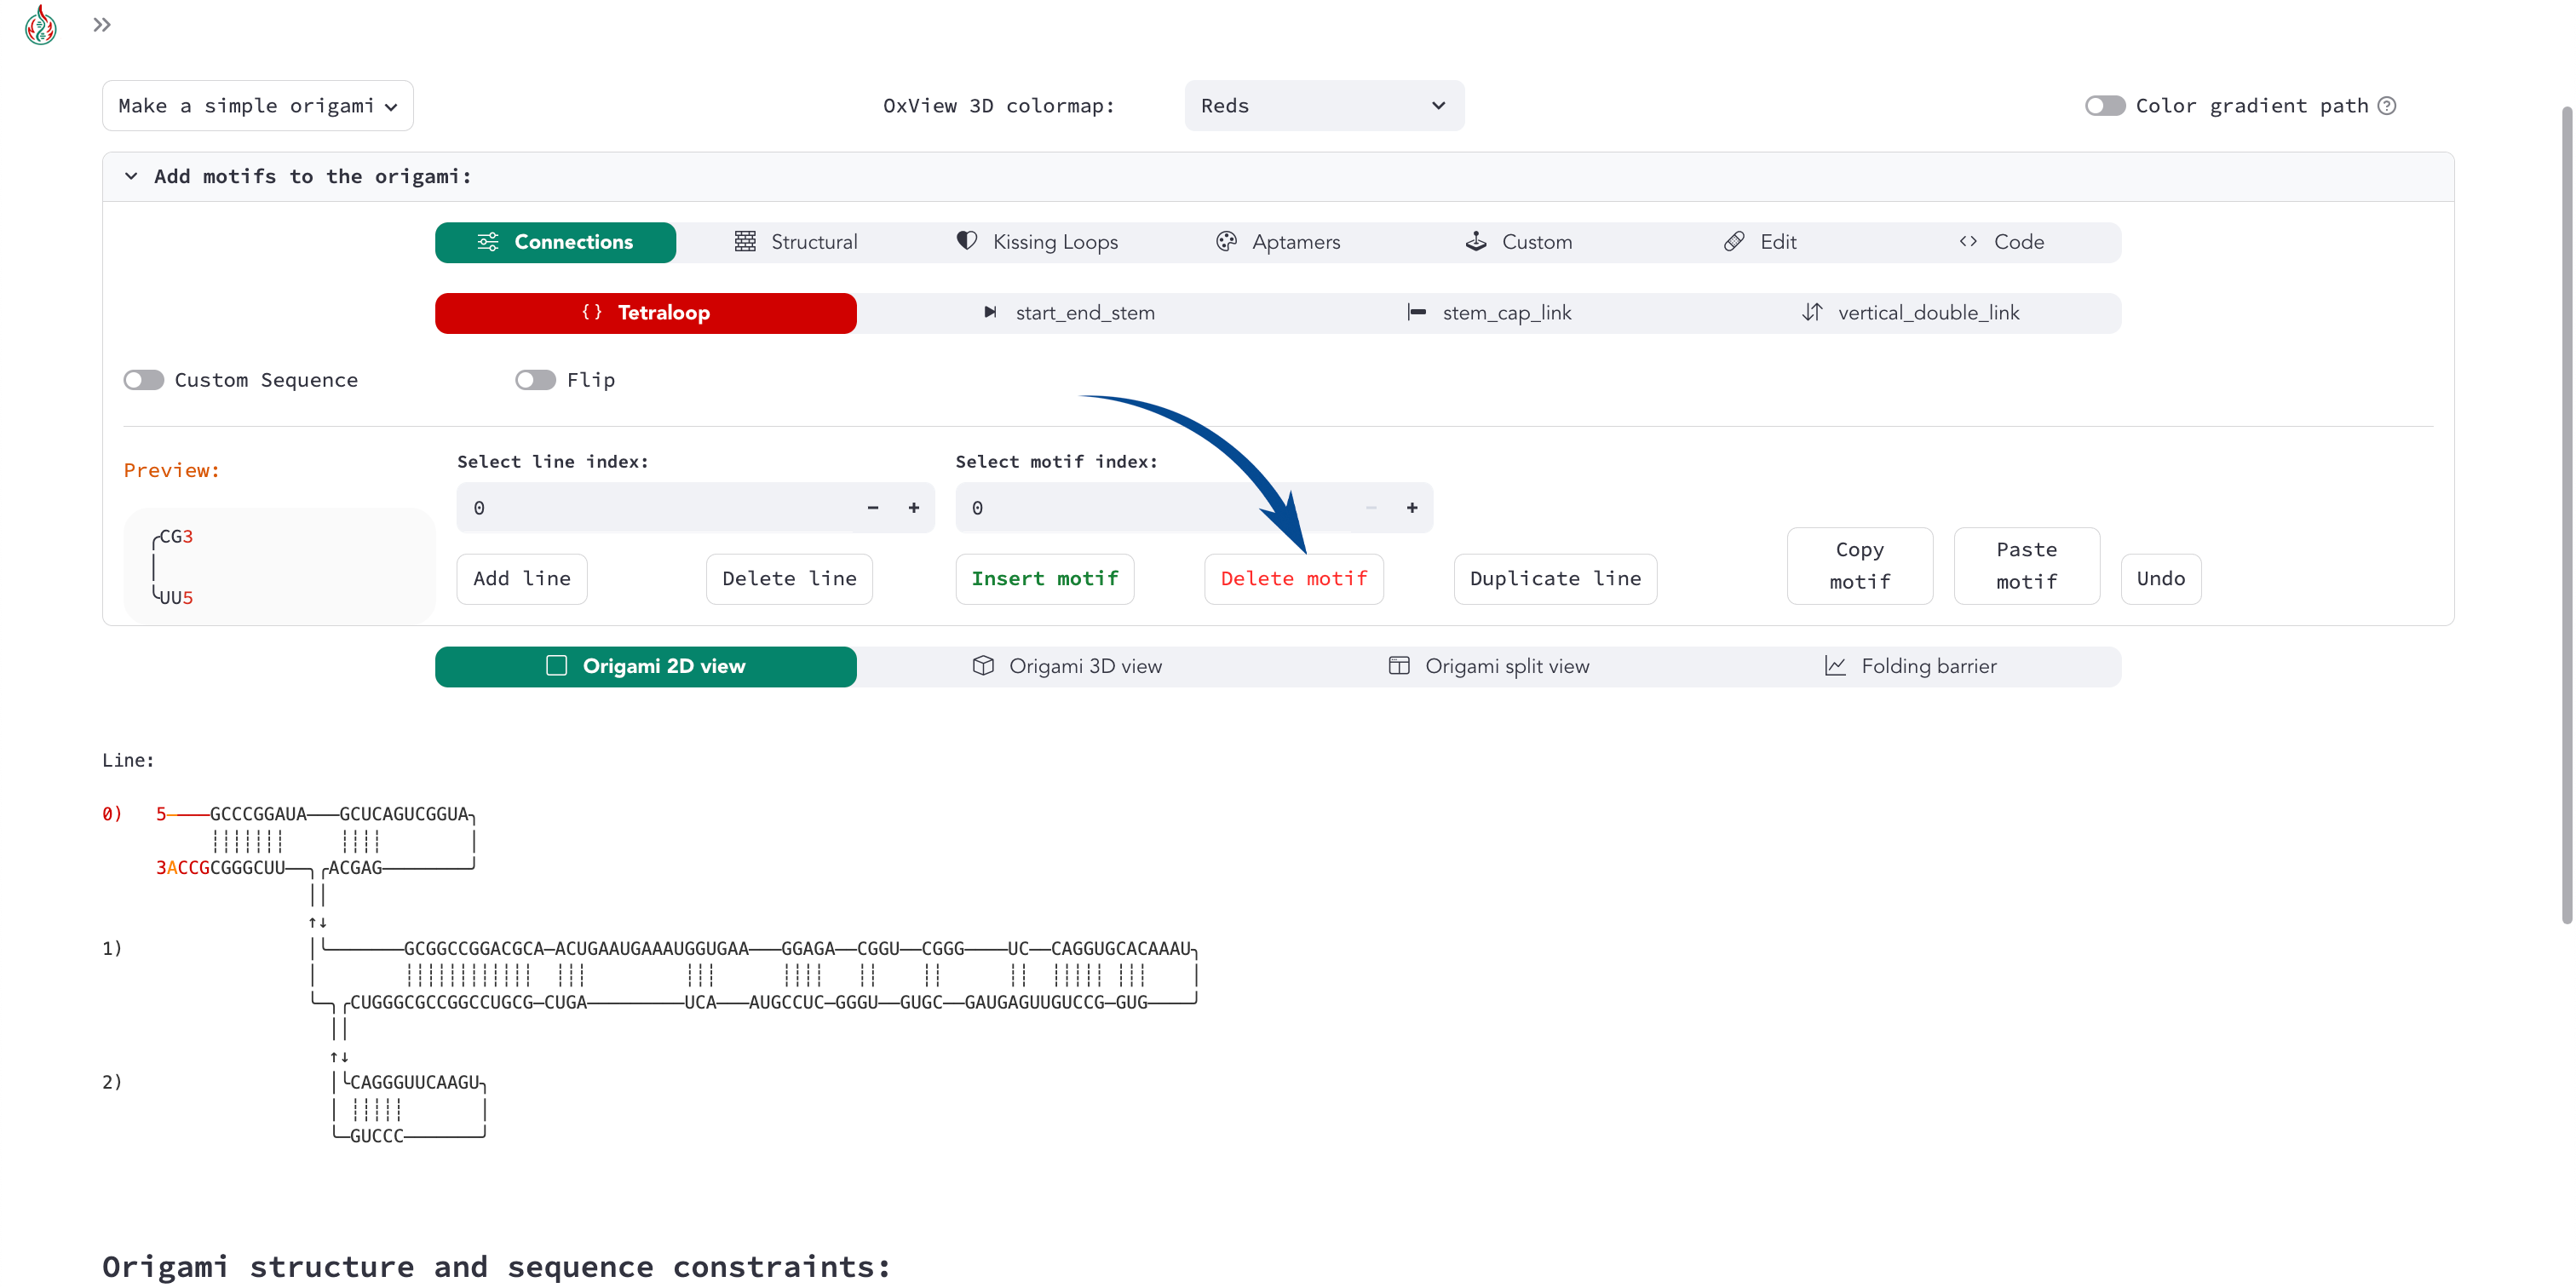
From the minimal structure in Supplementary Fig. 12, we can remove unnecessary motifs, keeping only the essential nucleotides.
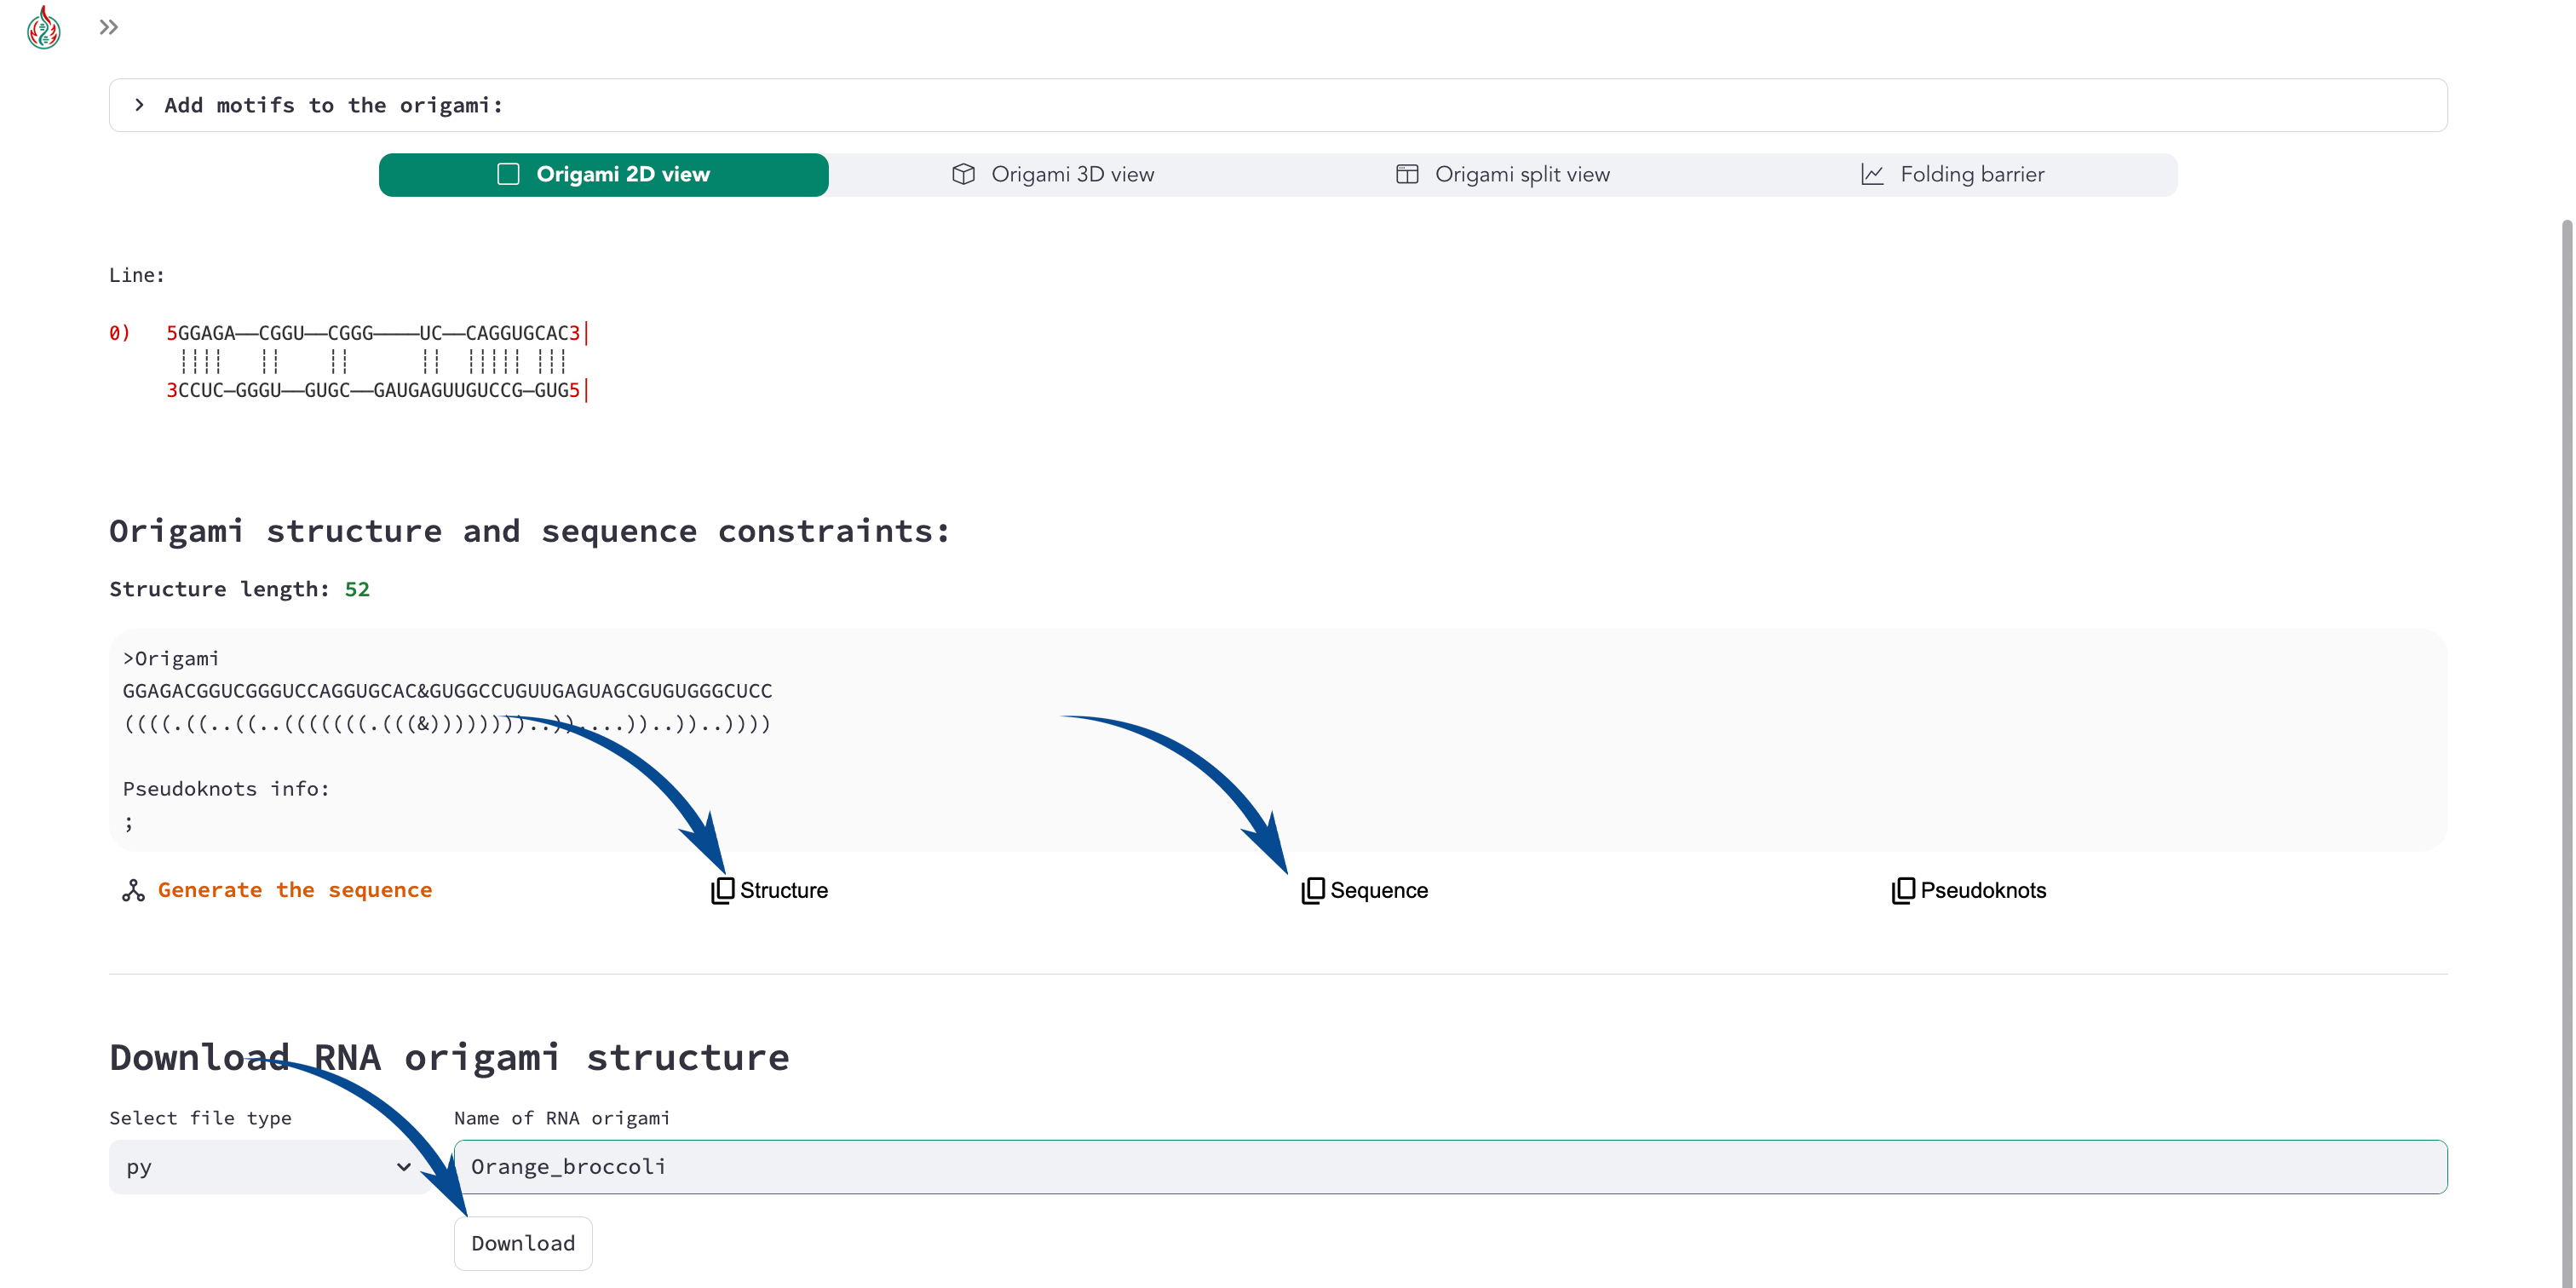
We have successfully isolated the aptamer motif! You can copy and paste the sequence and structure in the “Custom” motif menu to create a custom motif of the aptamer.
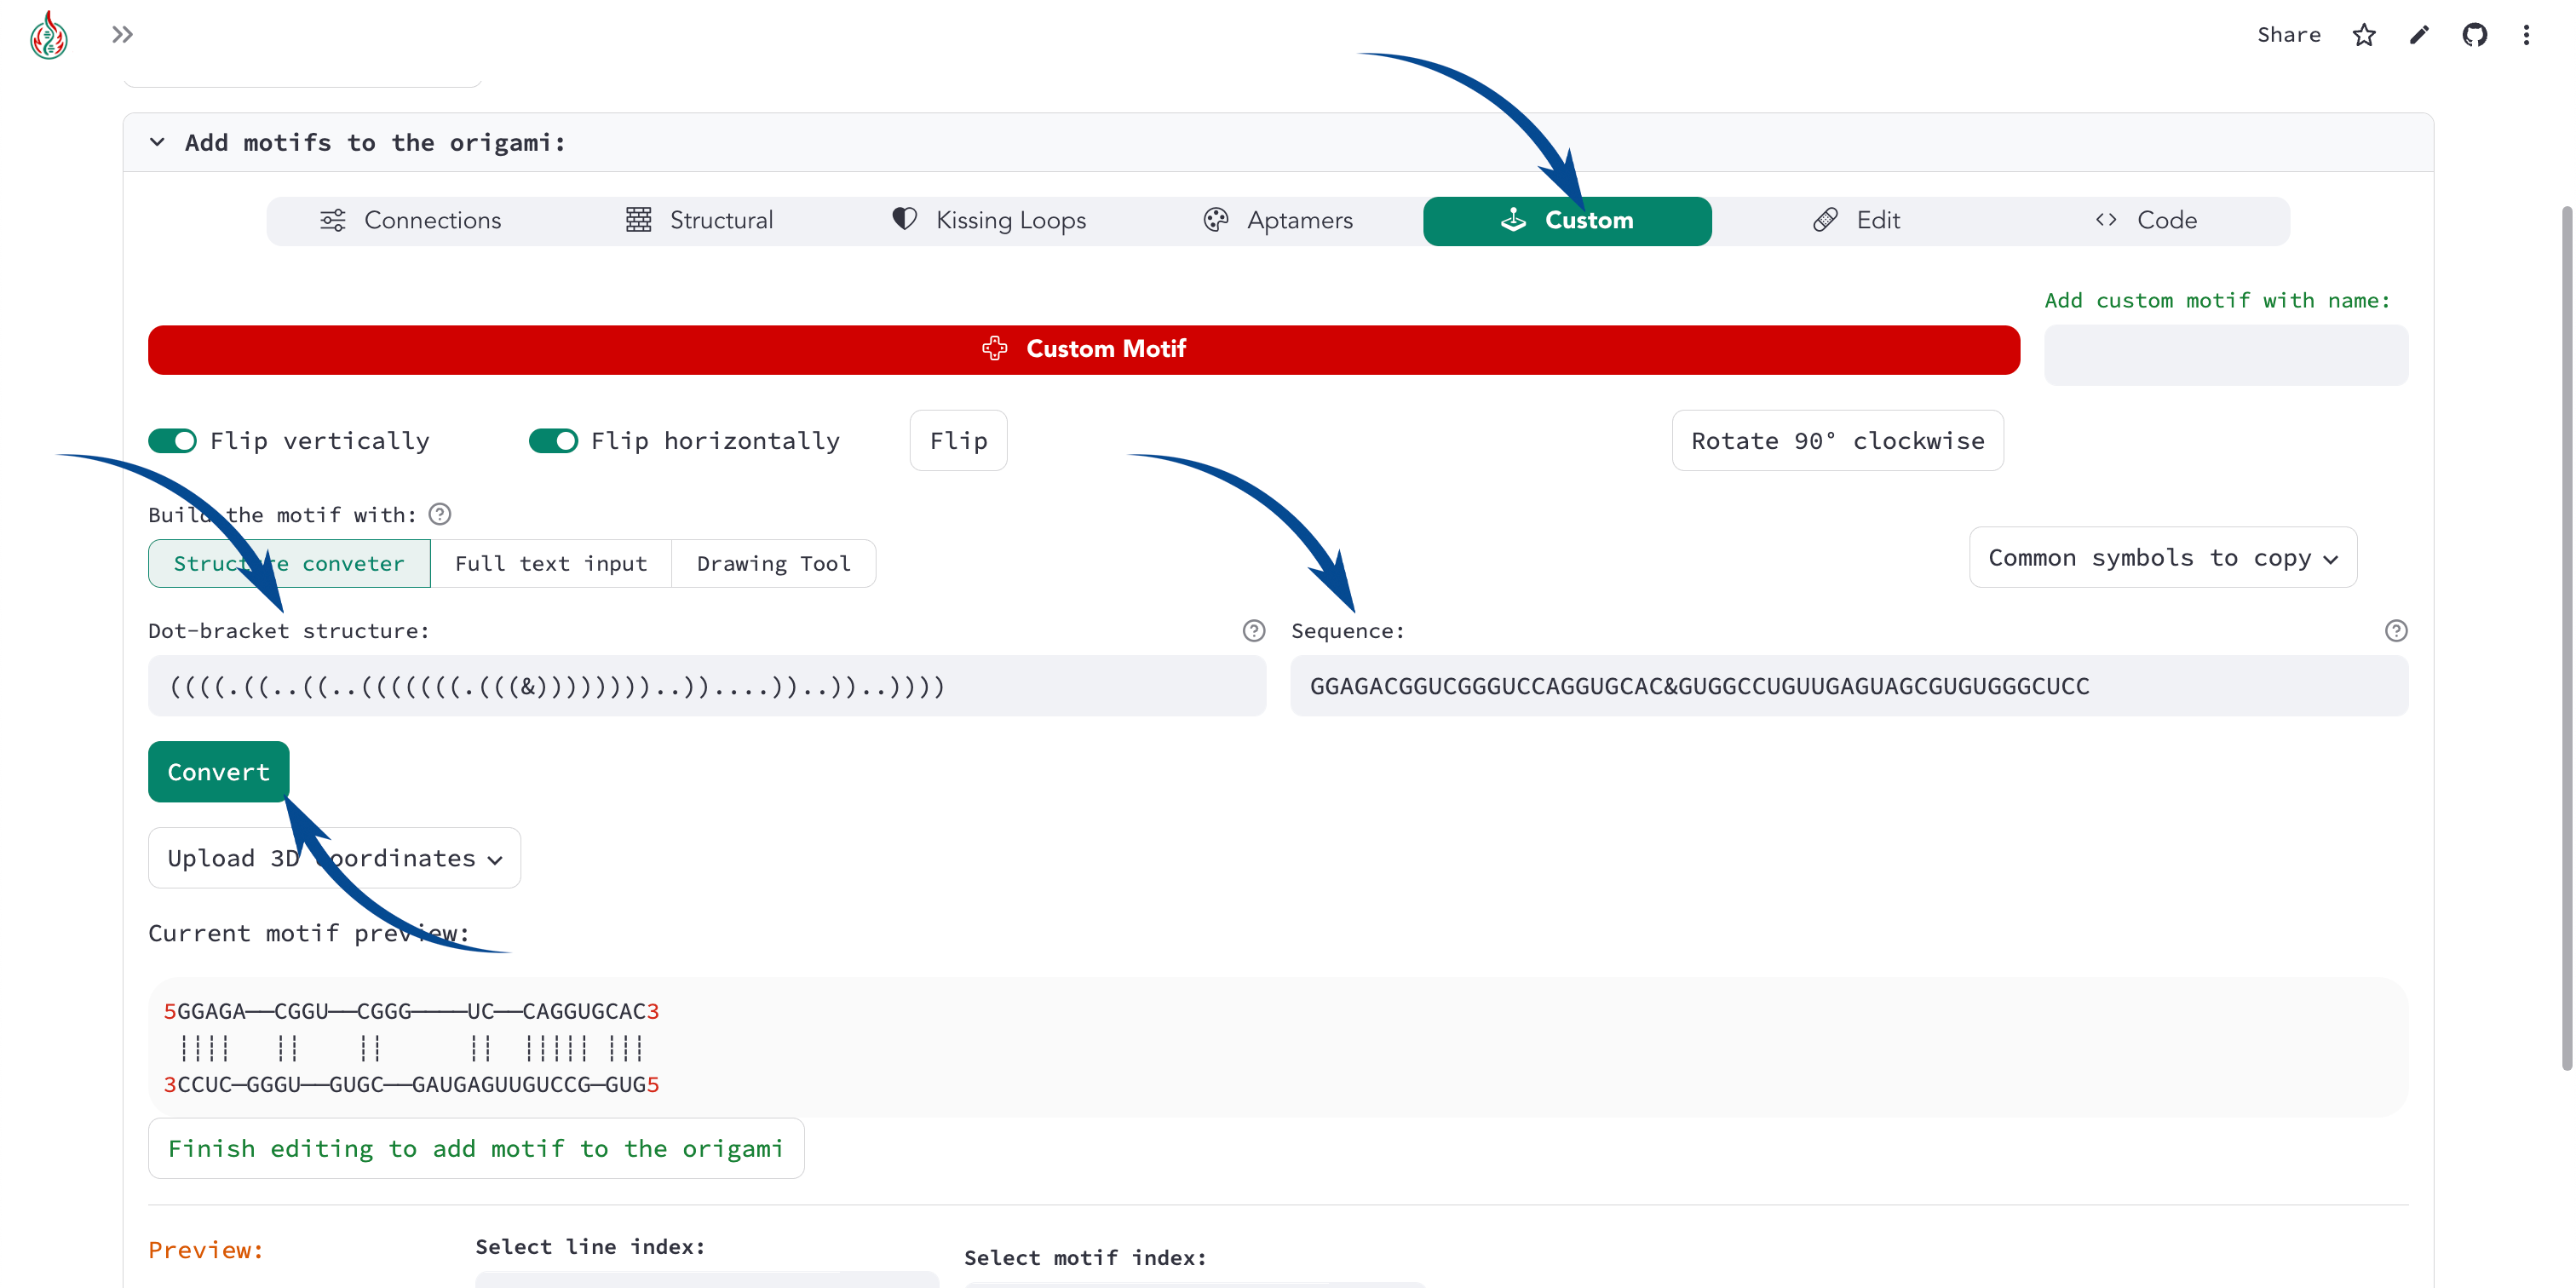
The corresponding code for the orange_broccoli aptamer motif is:
import pyfurnace as pf

orange_broc = pf.Motif.from_structure(
    structure="((((.((..((..(((((((.(((&))))))))..))....))..))..))))",
    sequence="GGAGACGGUCGGGUCCAGGUGCAC&GUGGCCUGUUGAGUAGCGUGUGGGCUCC"
)

# add the Orange Broccoli to an origami to visualize it in pyFuRNAce:
origami = pf.Origami([[orange_broc]])
Tip
You can additionally reduce the minimal aptamer sequence by removing nucleotides from the terminal stems. You can create an aptamer with the minimal sequence:
import pyfurnace as pf

orange_broc = pf.Motif.from_structure(
    structure="((((.((..((..(((((&)))..))....))..))..))))",
    sequence="GGAGACGGUCGGGUCCAG&CUGUUGAGUAGCGUGUGGGCUCC"
)

# add the Orange Broccoli to an origami to visualize it in pyFuRNAce:
origami = pf.Origami([[orange_broc]])
You can copy and paste the structure/sequence directly to the Structure Converter in the Custom Motif menu.
3) Optional: Add 3D structure
Since there is no deposited PDB structure of the Orange Broccoli aptamer, we can use 3D prediction tools to get a rough 3D model of the aptamer. Since 3D prediction tools usually only accept single-stranded structures, let’s trim the tRNA-aptamer as much as possible to keep a single-stranded structure with the aptamer.
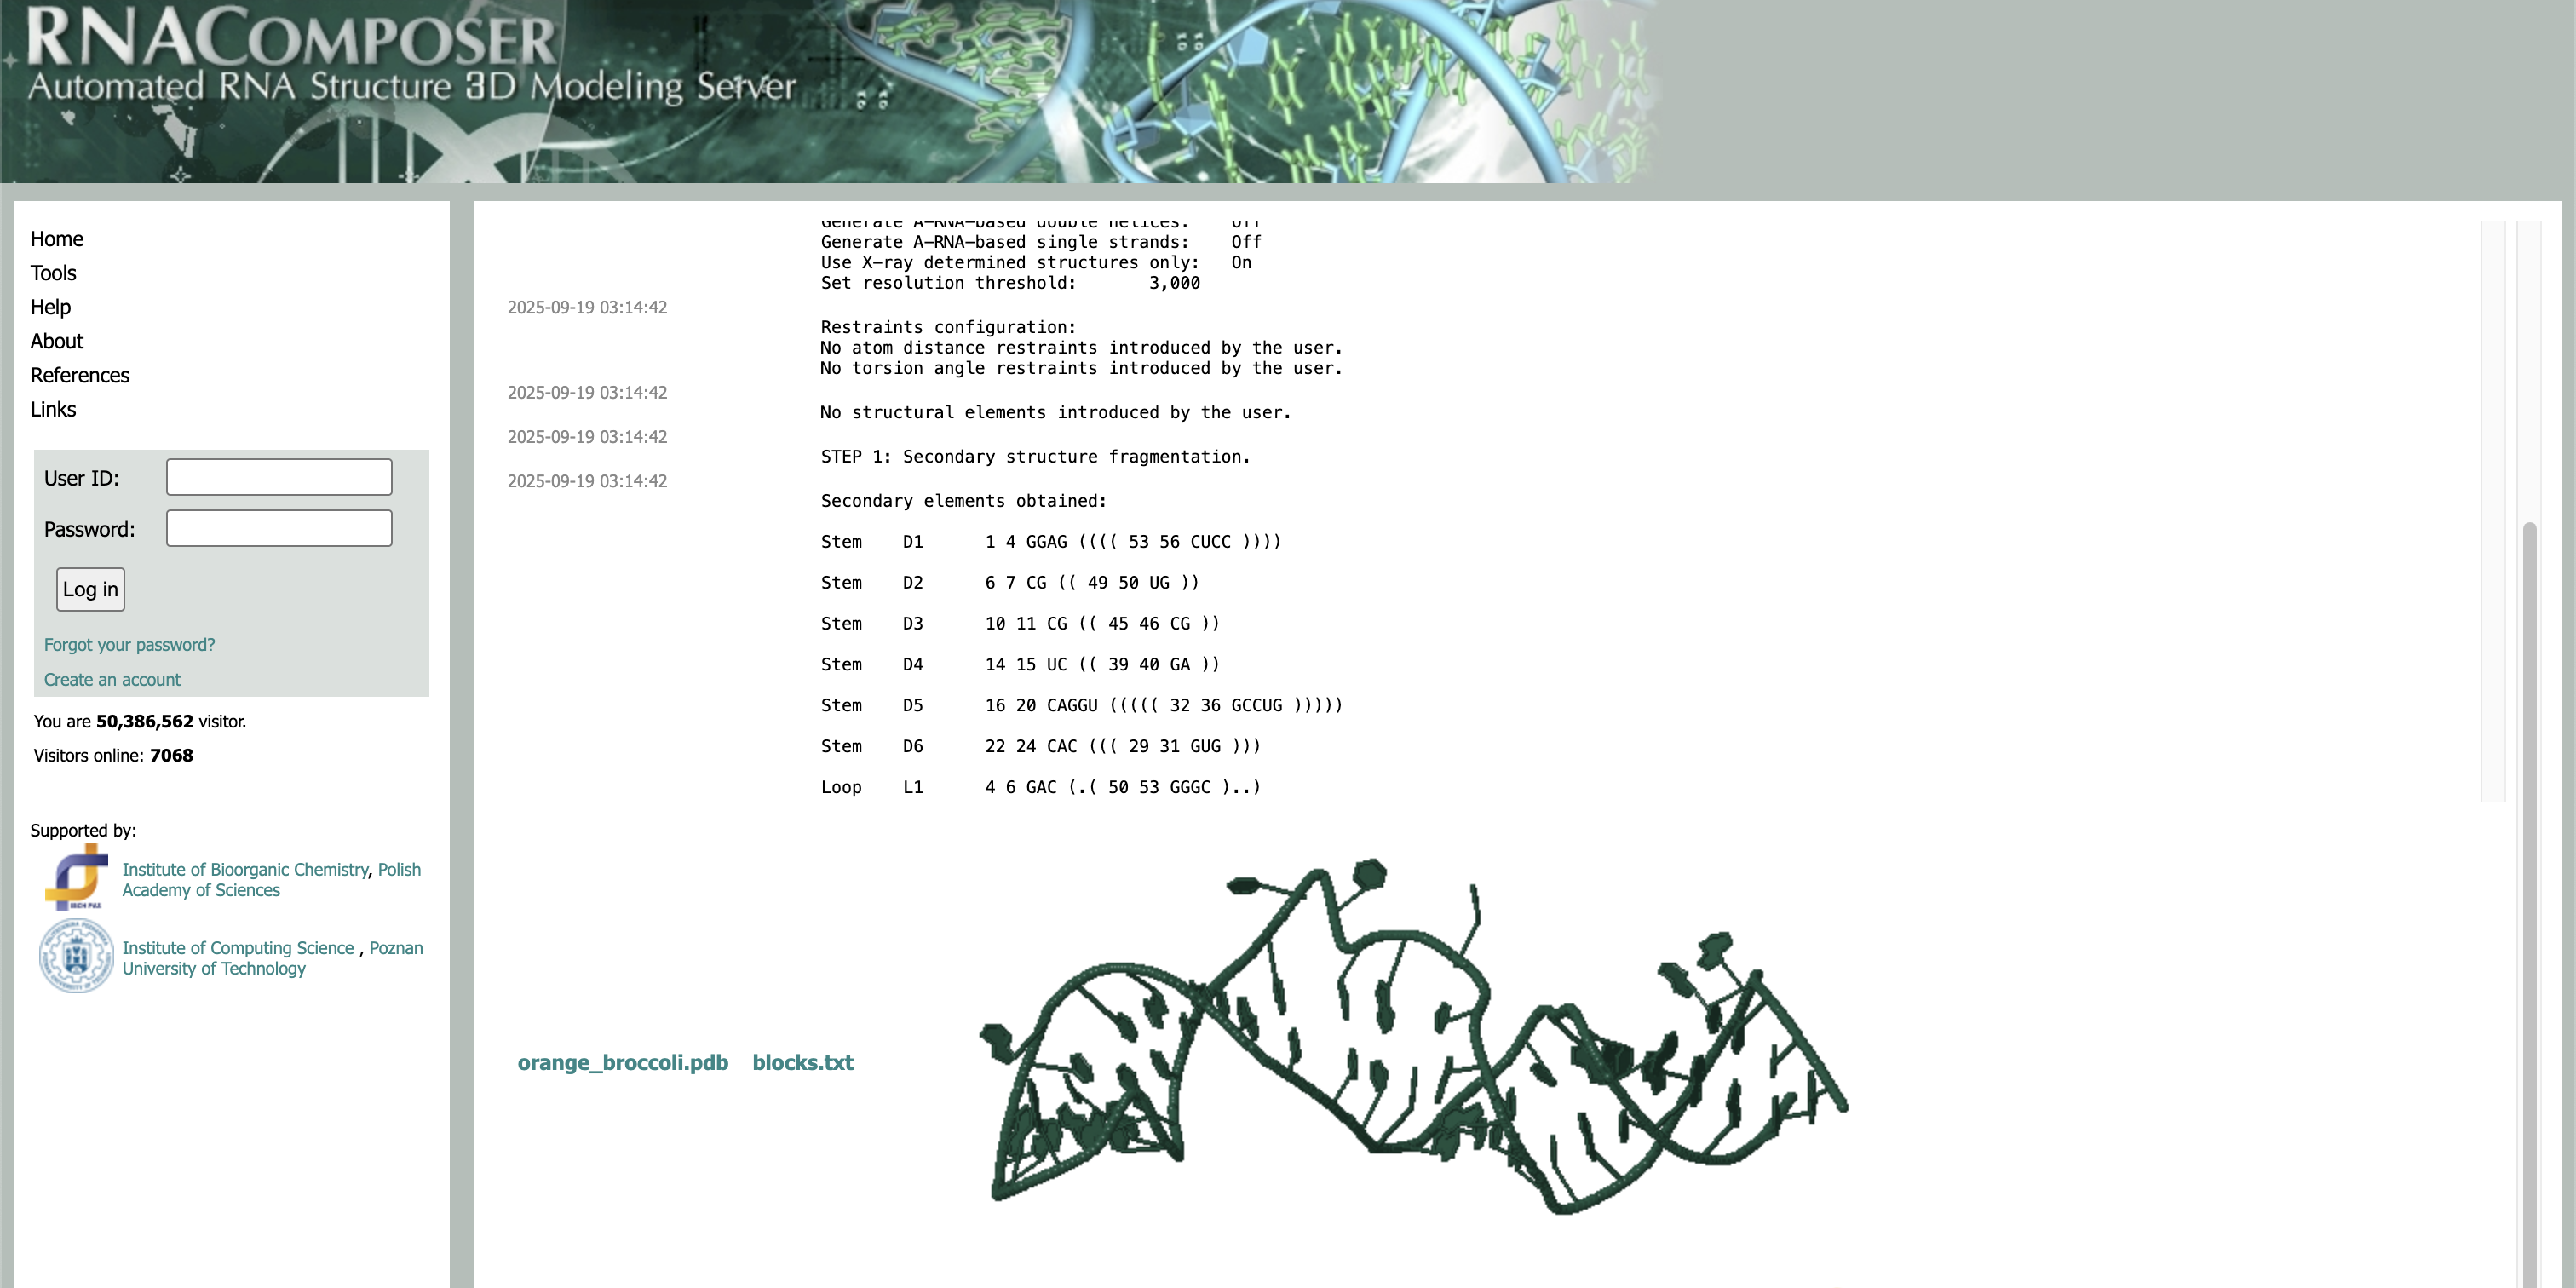
Then we can use the sequence or structure to predict the 3D conformation of the aptamer with 3D prediction tools. Here is an example of RNAComposer web server:
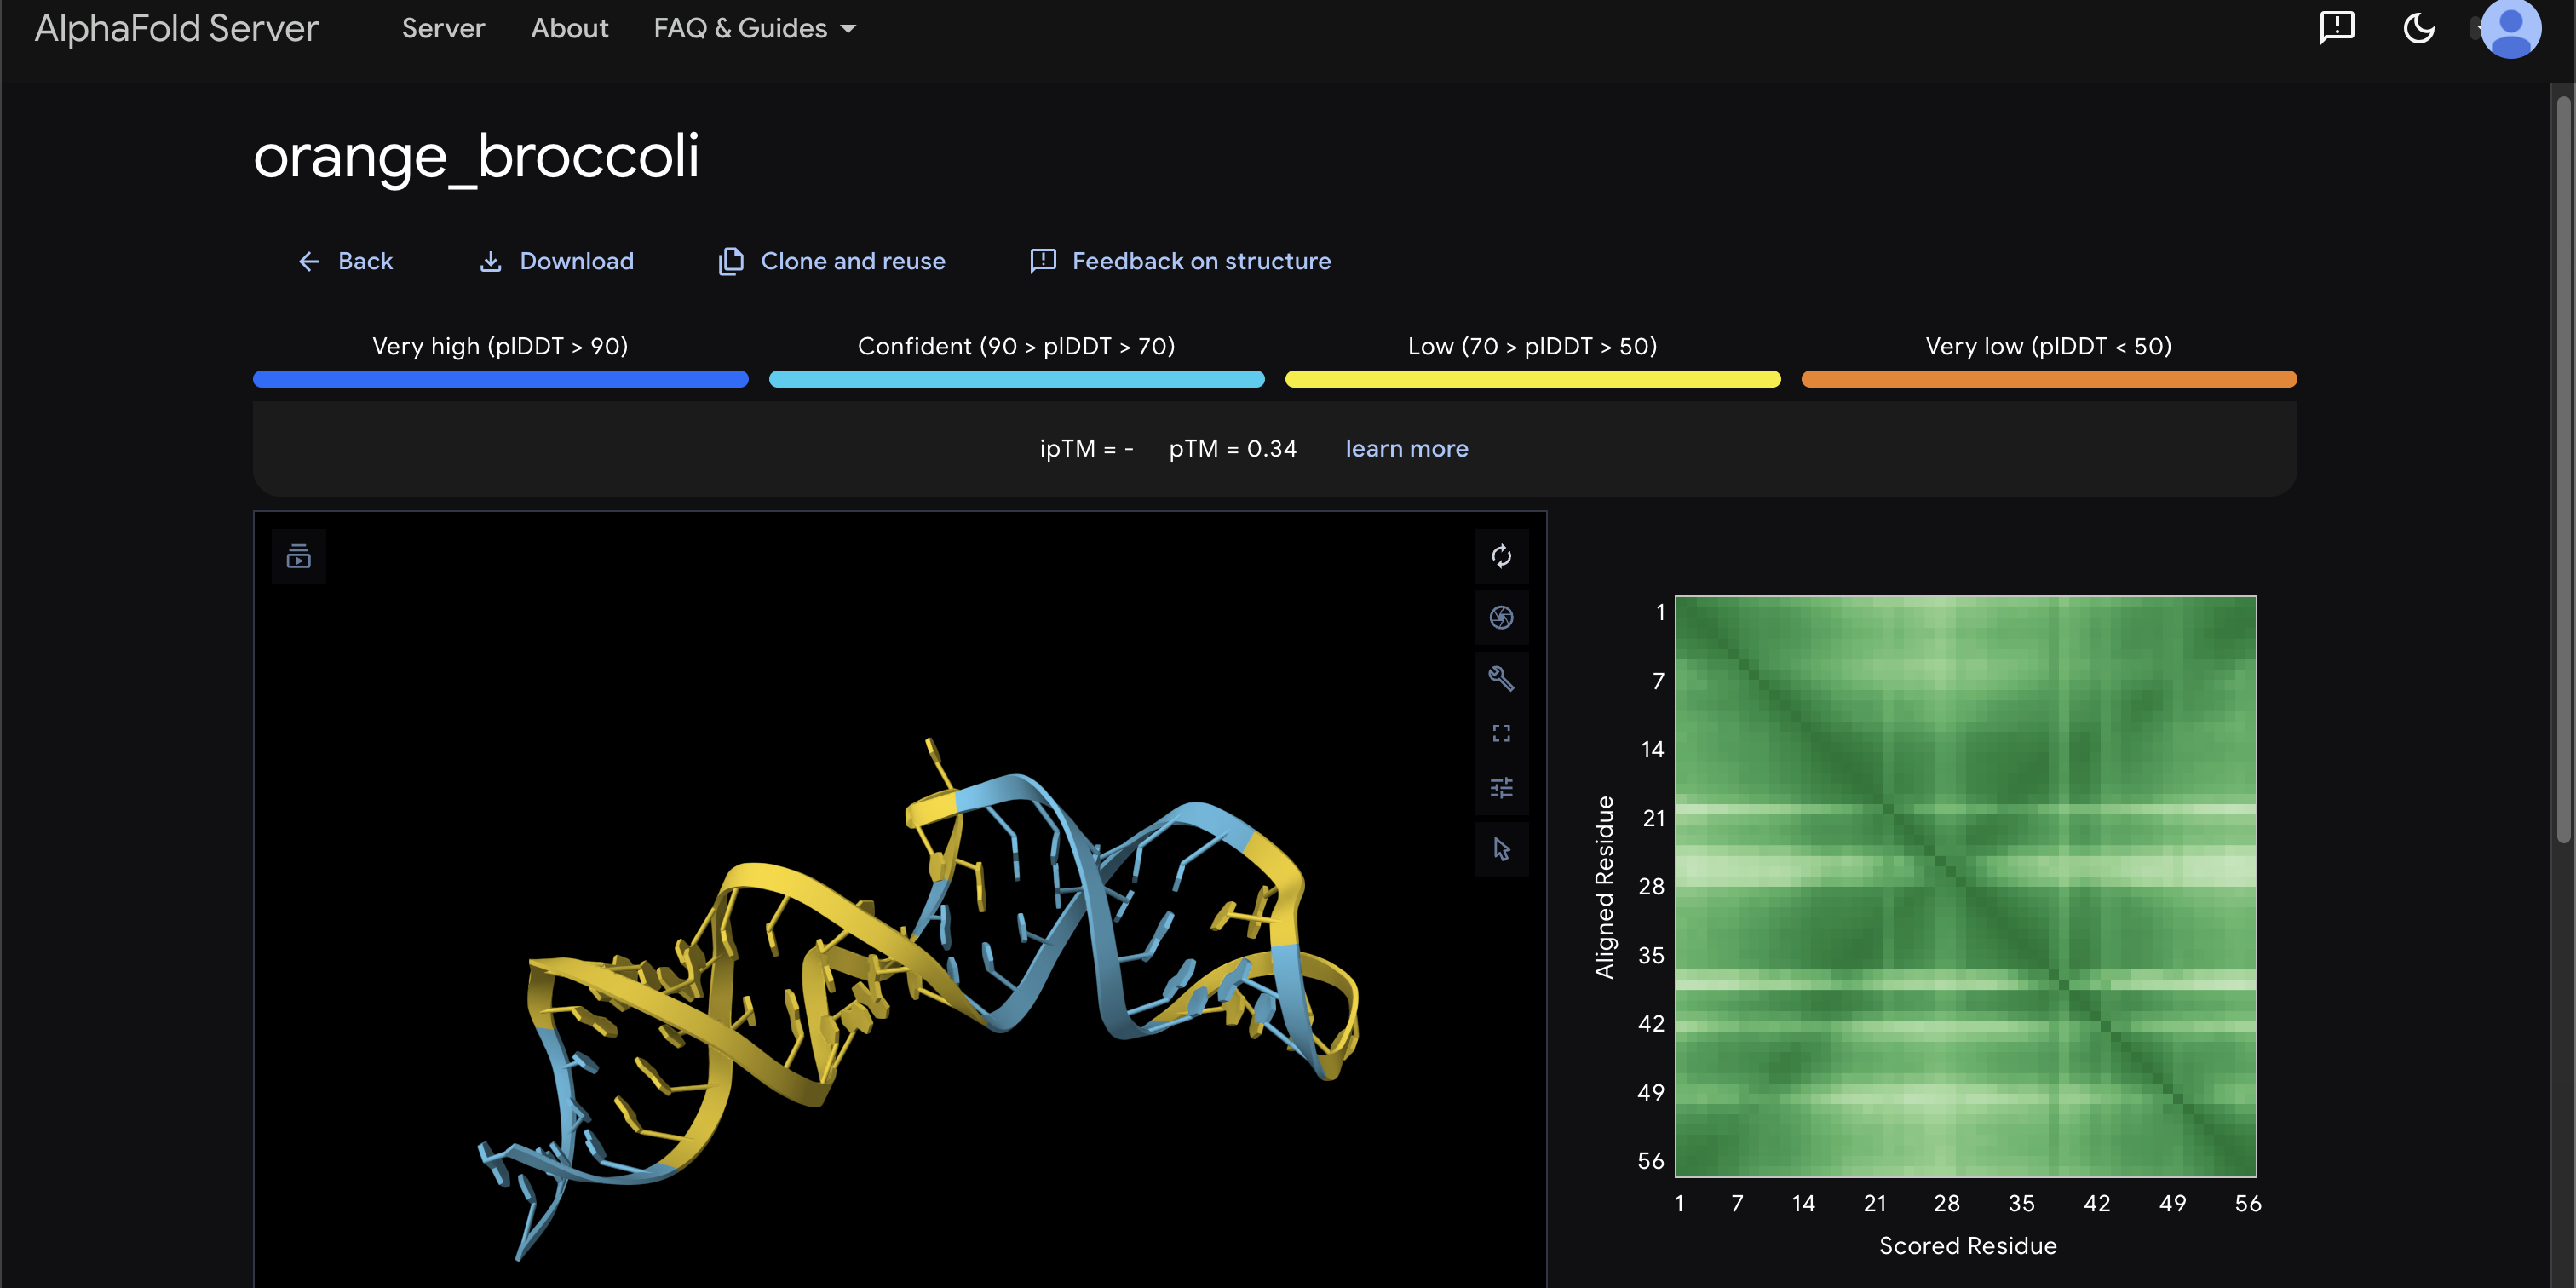
And here is an example of the AlphaFold web server:
Now we can download the PDB structure and open it in OxView to visualize it. In the Edit menu, we can search for unnecessary nucleotides, delete them, and keep the minimal aptamer structure.
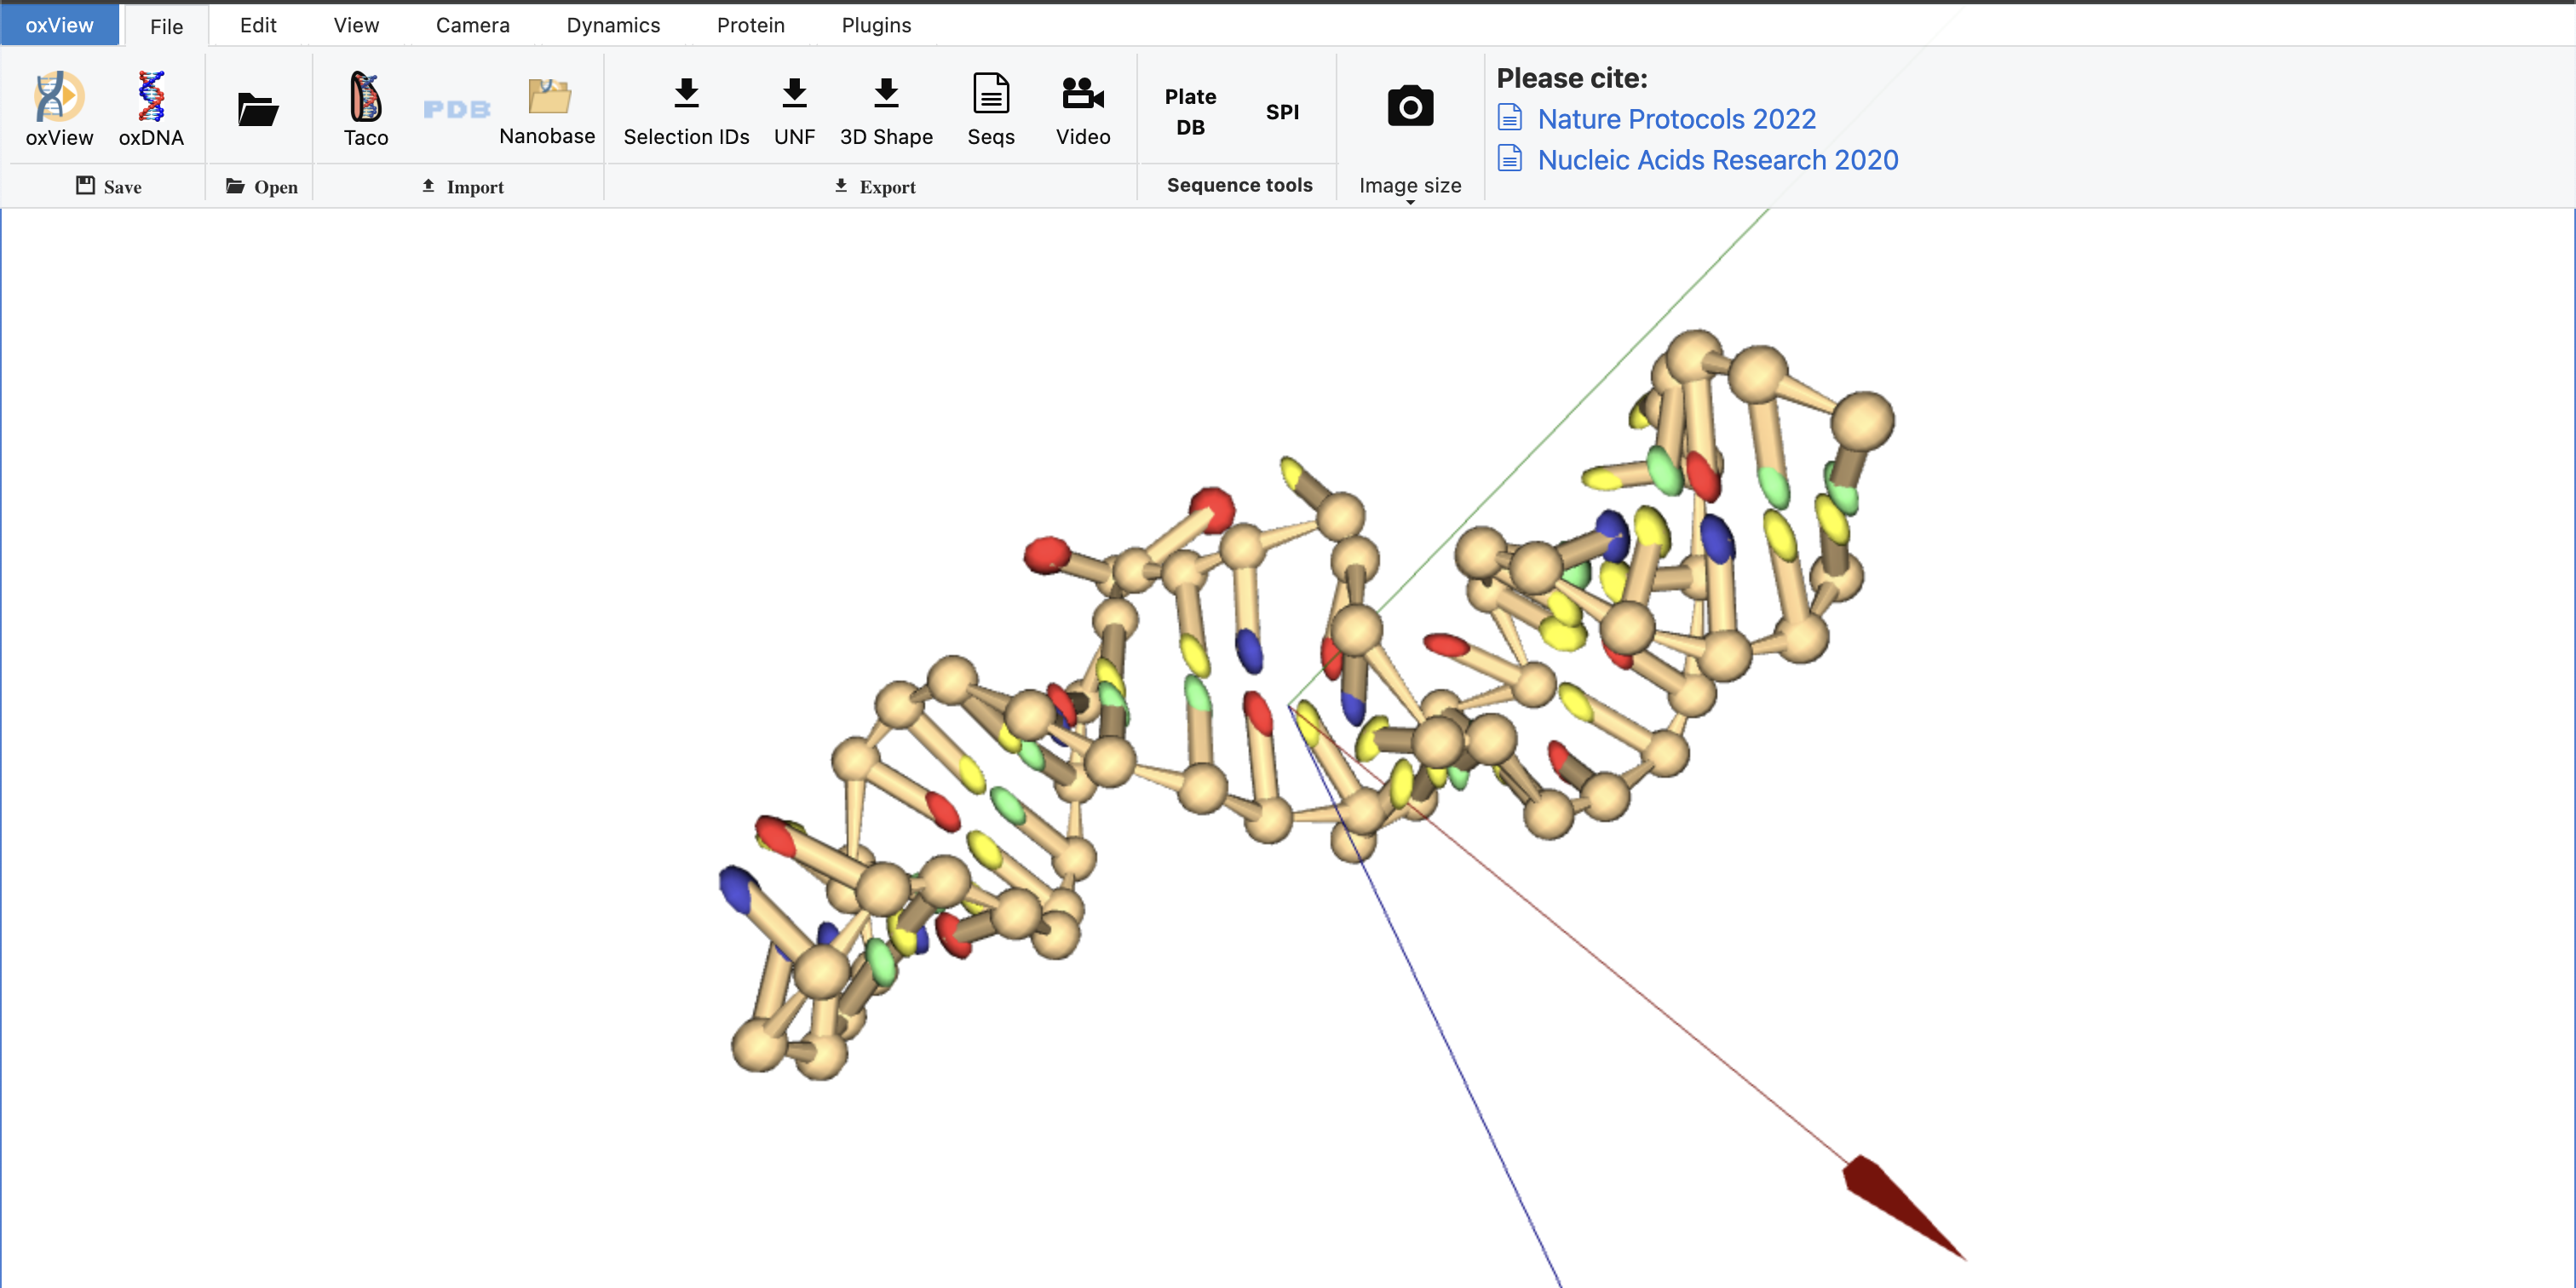
We finally have a structure with two strands. We need an individual configuration file for each strand to load the structure in pyFuRNAce.
To do so, you can delete one strand, save the oxDNA configuration (use the new topology), then undo the deletion with Ctrl+Z, delete the other strand and save the configuration again.
Remember to label the strand configurations so you can identify them later.

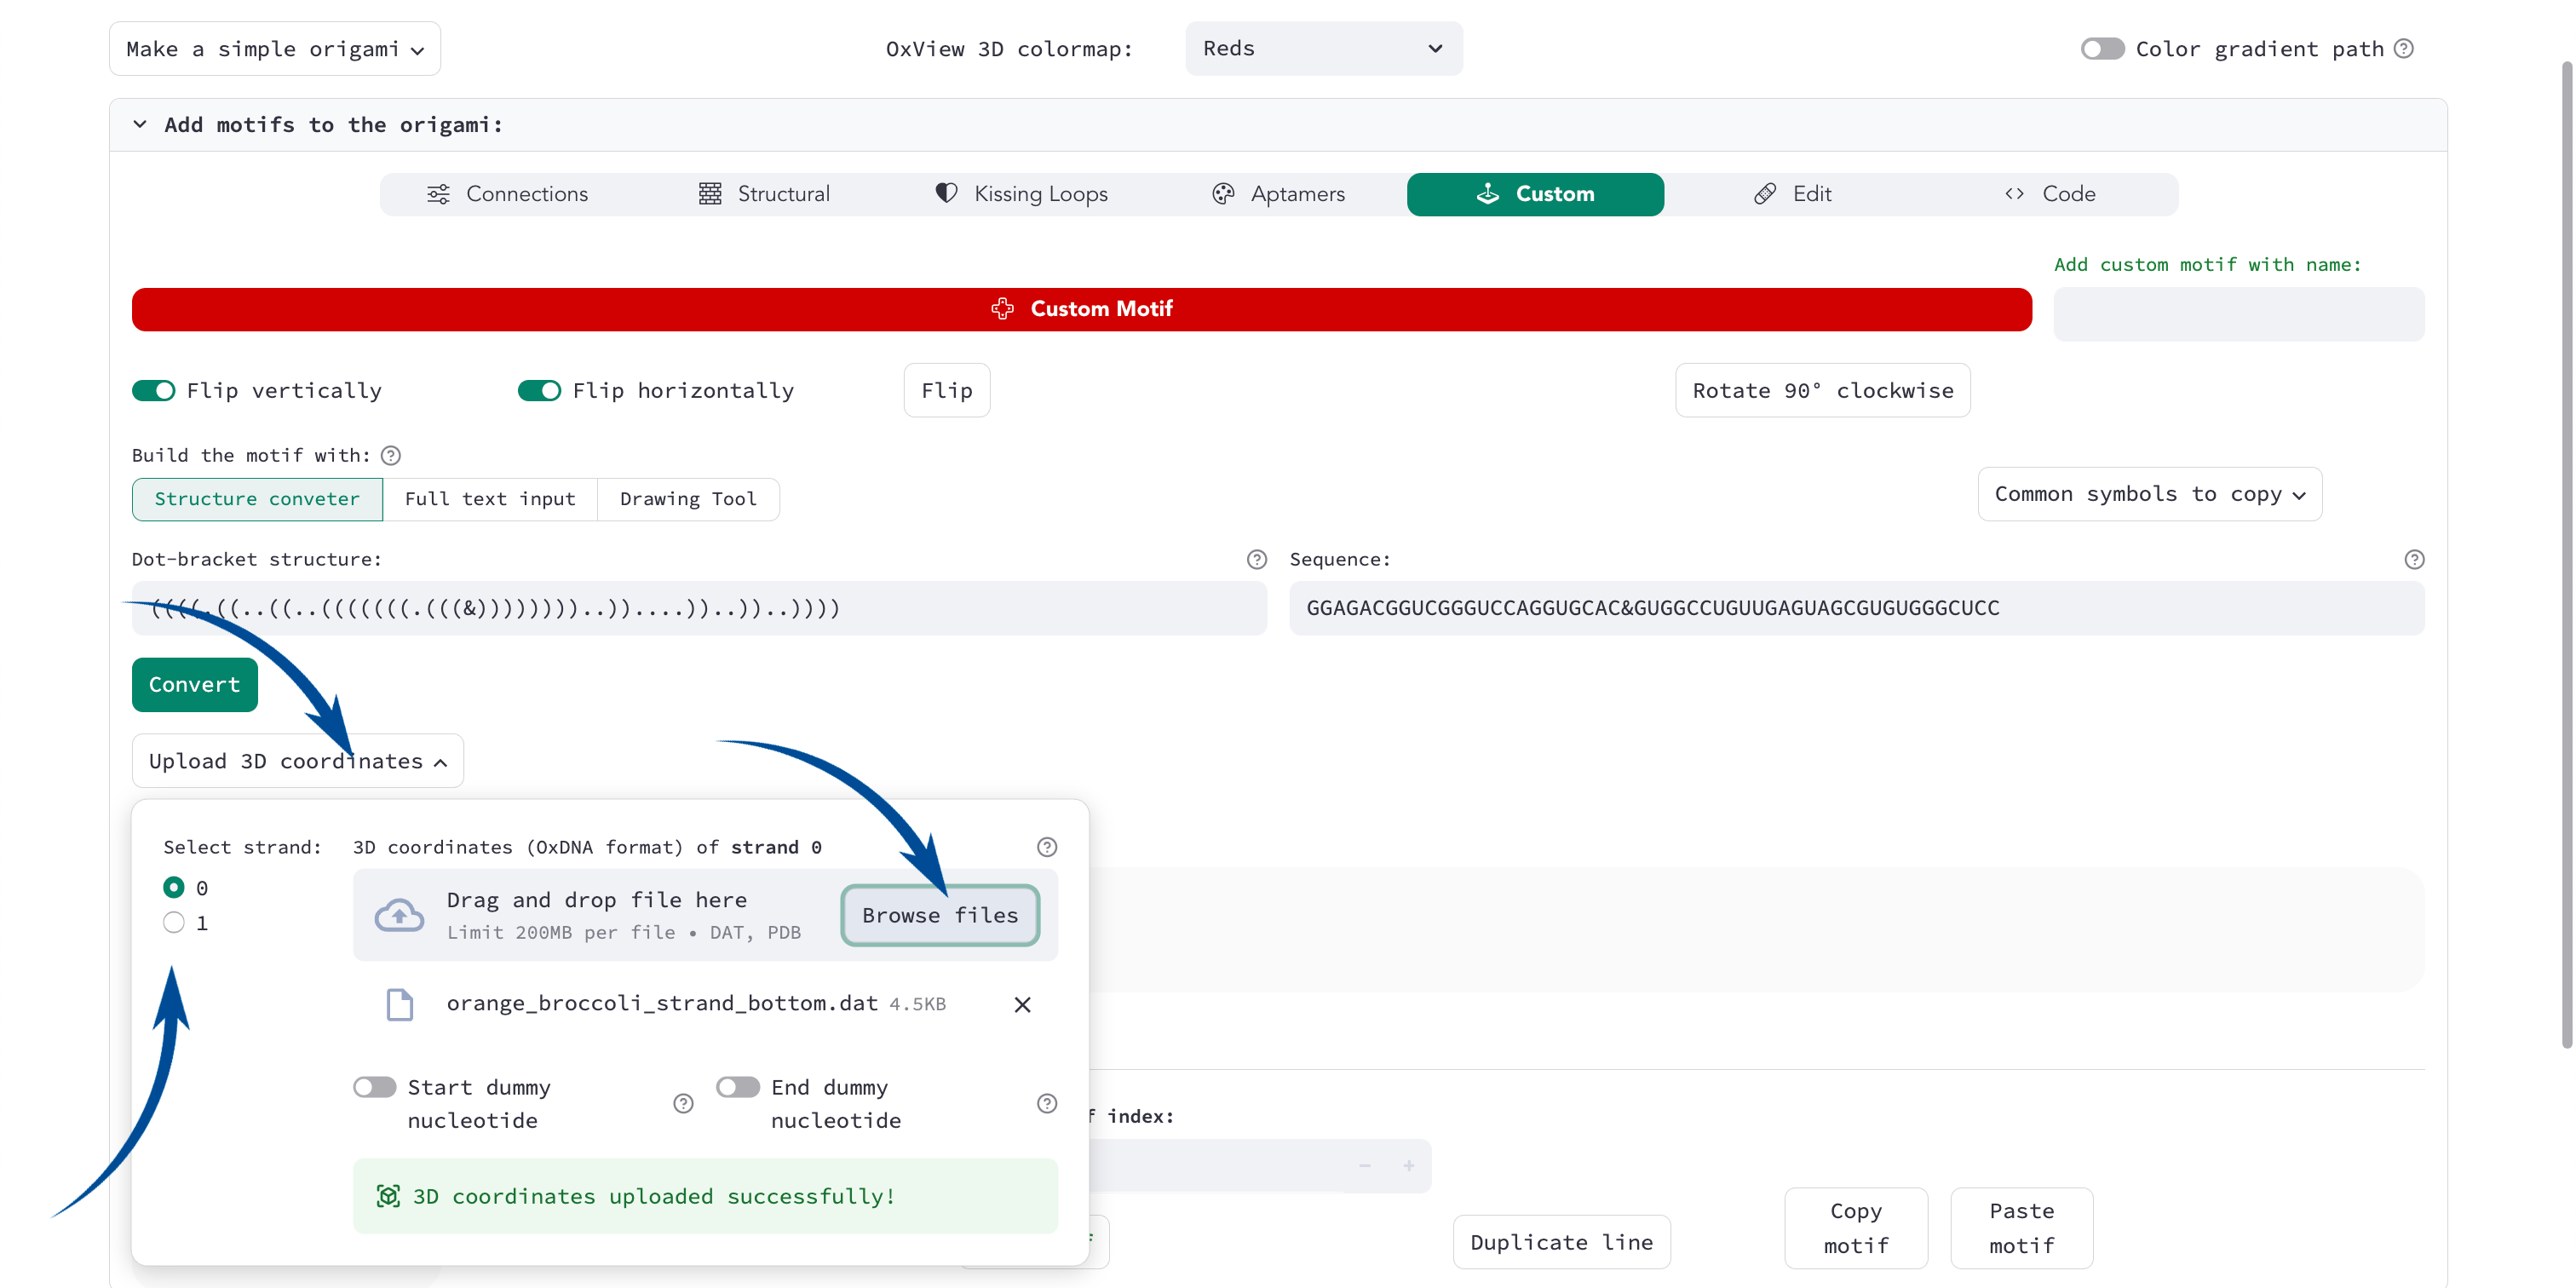
In pyFuRNAce, in the Custom Motif menu, add the dot-bracket structure and sequence of your aptamer (see Custom motif: origami with single-stranded region for details). You can use the Upload 3D coordinates popover to upload the two configuration files.
If the upload is successful, a brief green message will appear.
Success
Congratulations! You have successfully created a custom aptamer motif from literature!
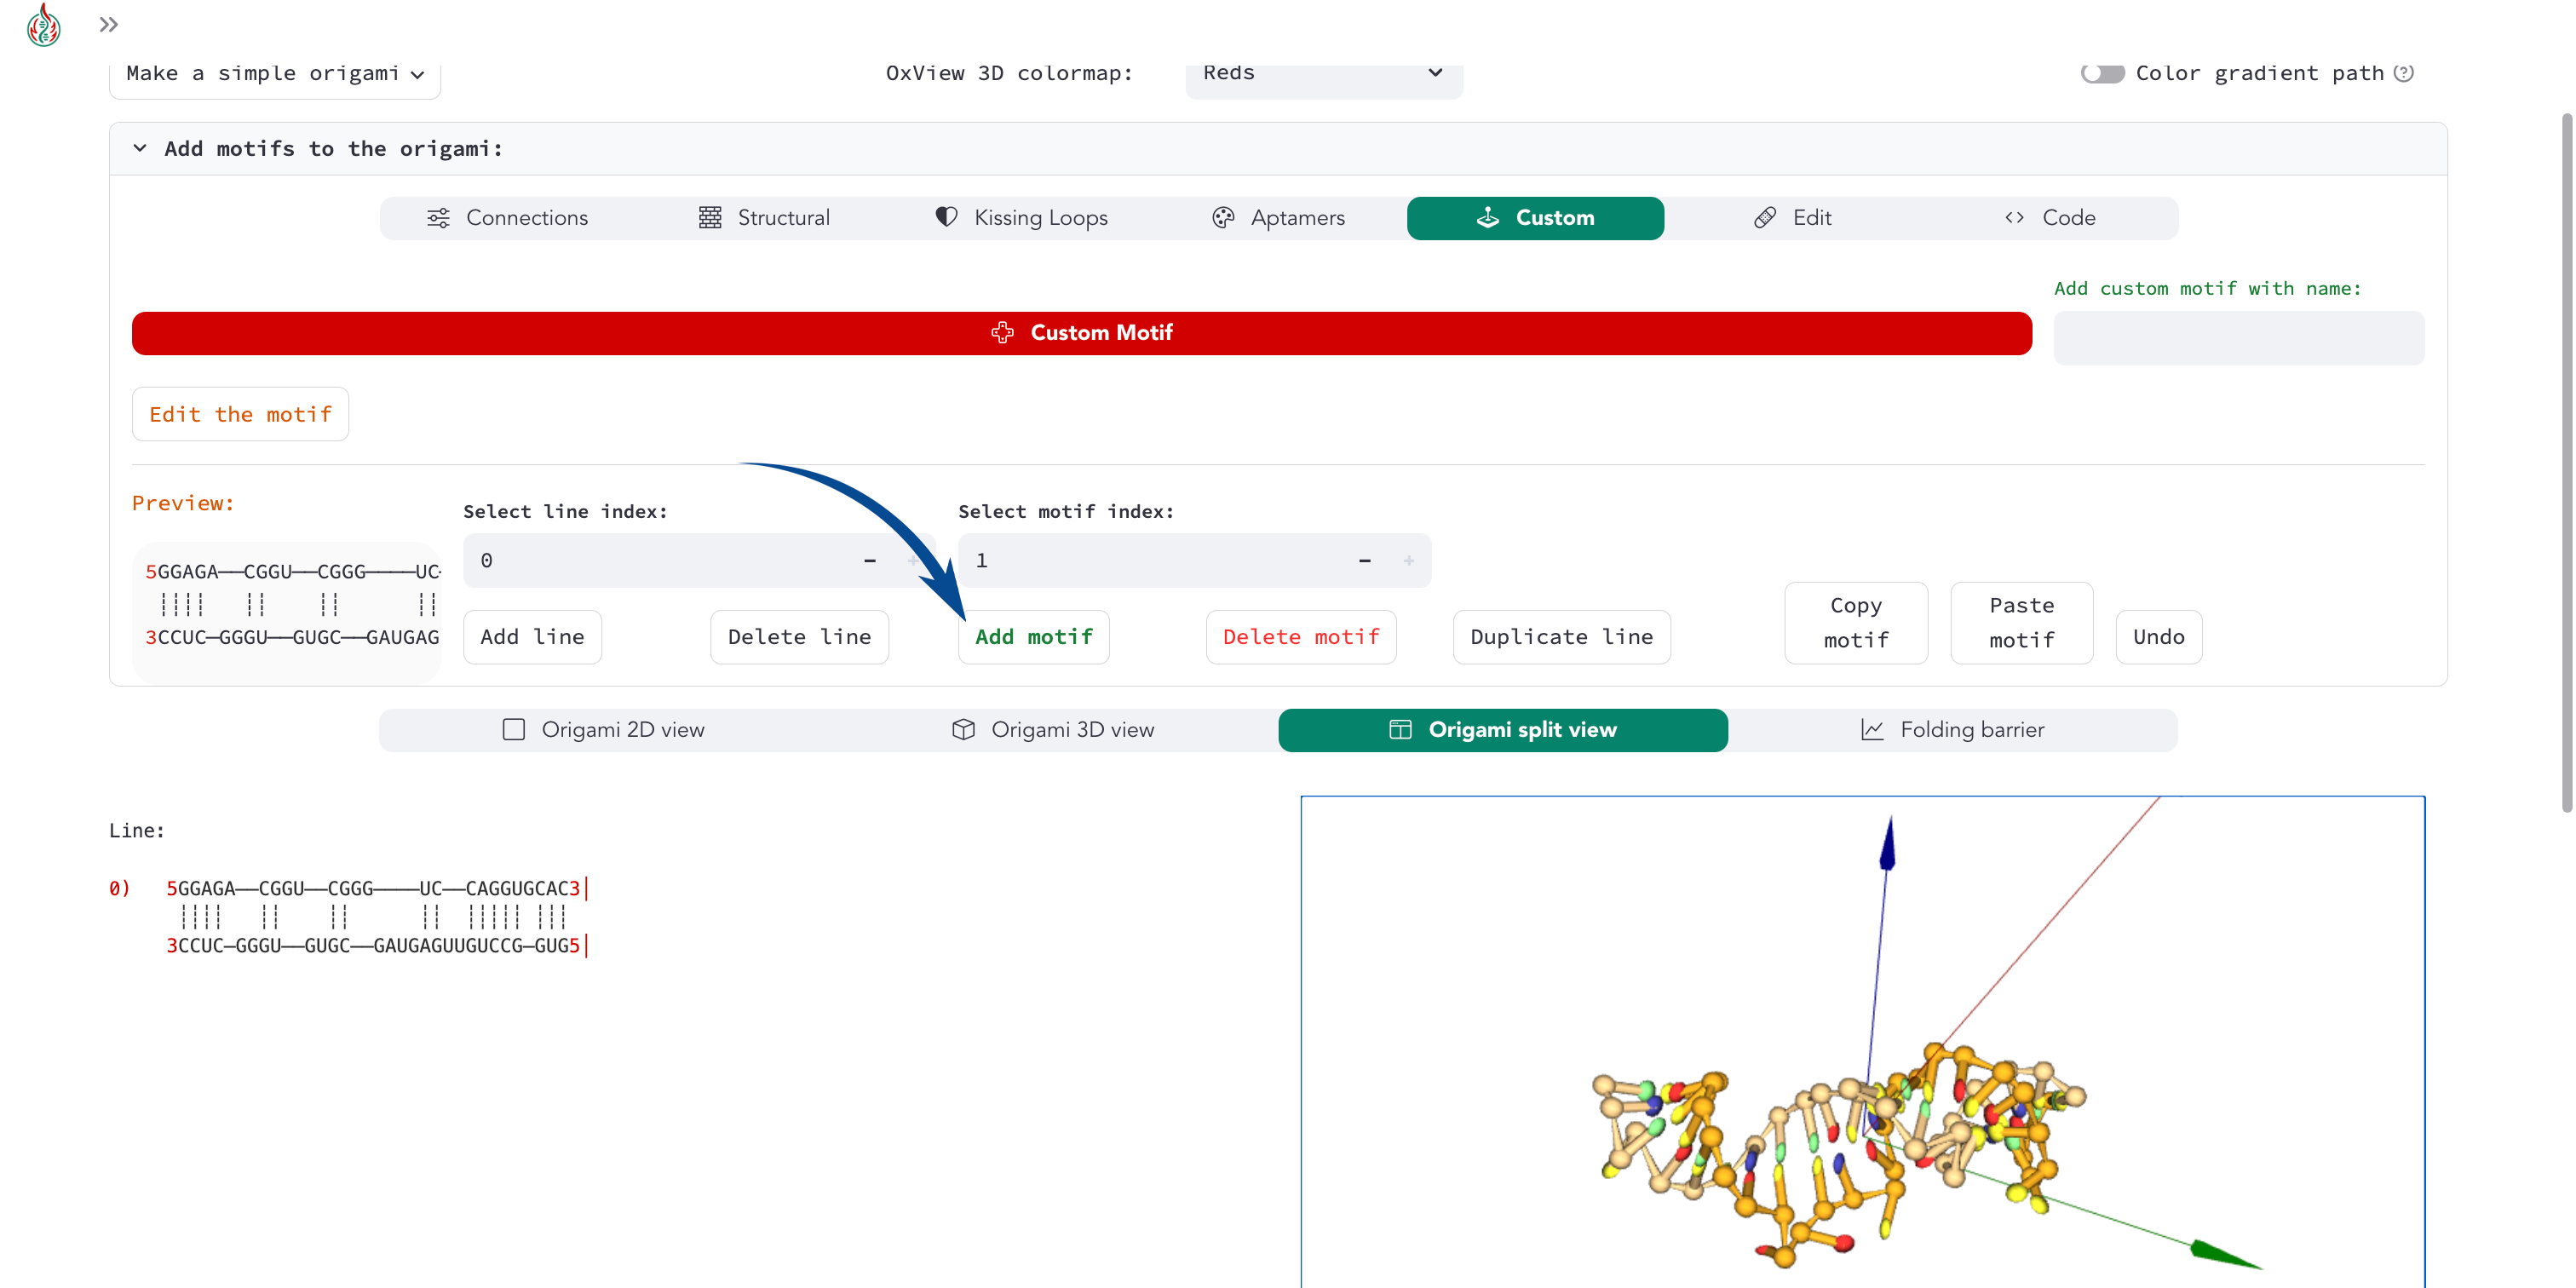
If you add the motif to the origami, it will store the motif in the Python code of your session.
You can copy the code from the Code motif menu, or save the Python file at the bottom of the Design page.
If you want to contribute to pyFuRNAce, please open a GitHub issue in the pyFuRNAce repository or get in touch so we can add the aptamer to the pyFuRNAce aptamer library.
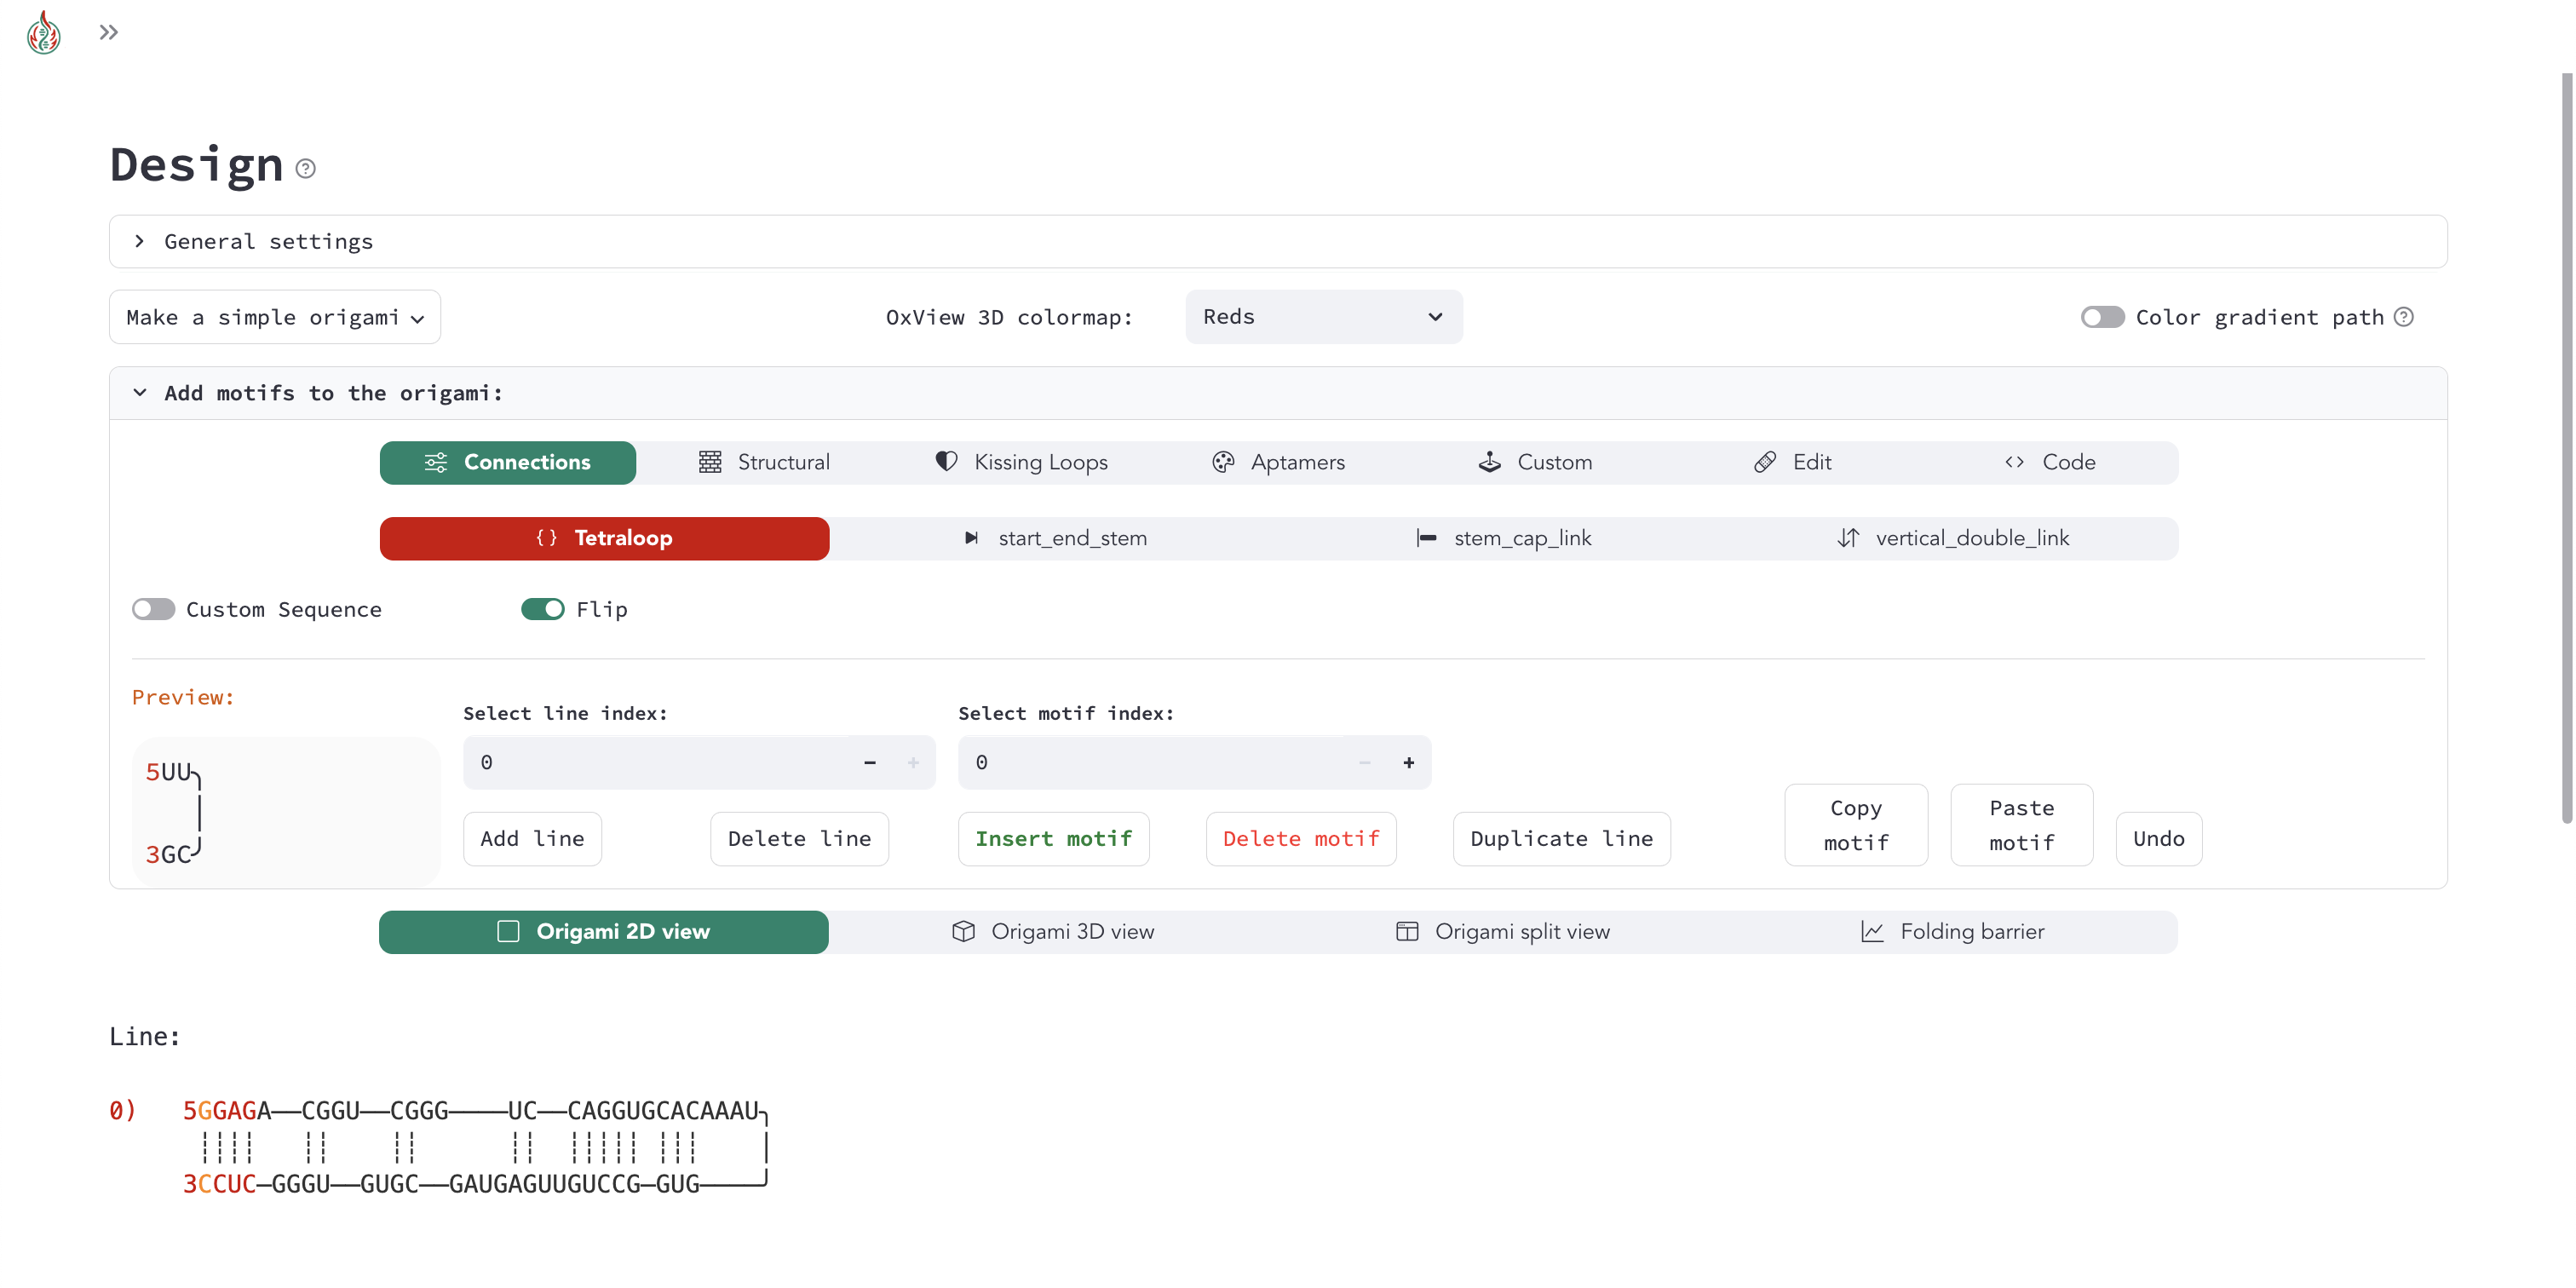
Now you can add the aptamer motif to your origami designs. You can add it to the origami and check the 3D structure in split view.
4) Python code
By default, the user interface loads the coordinates as text in the code, so the 3D structure is stored in the Python script of your session. If you want to use the configurations in a Python script or Jupyter Notebook and have cleaner code, you can load the aptamer motif with the following code:
import pyfurnace as pf

orange_broc = pf.Motif.from_structure(
    "((((.((..((..(((((((.(((&))))))))..))....))..))..))))",
    "GGAGACGGUCGGGUCCAGGUGCAC&GUGGCCUGUUGAGUAGCGUGUGGGCUCC",
)
orange_broc[0].coords = pf.Coords.load_from_file("PATH/TO/strand_1.dat")
orange_broc[1].coords = pf.Coords.load_from_file("PATH/TO/strand_2.dat")

origami = pf.Origami([orange_broc]) # to visualize the aptamer only
Custom motif: origami with single-stranded region
Warning
In pyFuRNAce, the characters 5 and 3 are terminal symbols that mark the ends of strands.
If a strand ends with a 5 or 3 symbol, it cannot be joined at that end.
In the graphical interface, 5 and 3 are shown in red purely as visual indicators of directionality.
These red symbols are not part of the strand itself; they are only for visualization.
In this tutorial, the red 3 and 5 indicators are represented as 5-> and ->3 to make the direction explicit.
Purely single-stranded motifs are discouraged in pyFuRNAce, since they are less predictable. In particular, they could lead to ambiguous scenarios in pyFuRNAce. For example, if you want two stems connected with a single-stranded 3AAAAAAA5 strand:
5->NNNKNN->3 5->NKNNN->3
   ┊┊┊┊┊┊       ┊┊┊┊┊
3<-NNNKNNAAAAAAANKNNN<-5
pyFuRNAce will try to connect the first strands at the top, which would lead to:
5->NNNKNNAAAAAAANKNNN->3
   ┊┊┊┊┊┊       ┊┊┊┊┊
3<-NNNKNN<-5 3<-NKNNN<-5
This will throw an error, since the directionality of the 3AAAAAAA5 strand is not compatible with the top strands of the stems.
In this example, we will show how to create a custom single-stranded motif to avoid ambiguity and solve the issue.
1) Create an origami with two stems
You will have an origami made of two stems:
5->NNNKNNNNNNNKNN->3
   ┊┊┊┊┊┊┊┊┊┊┊┊┊┊
3<-NNNKNNNNNNNKNN<-5
You can select the second motif (motif index: 1) and select Custom in the motif menu.
2) Custom motif creation
There are three different ways to create a custom motif: - a) Structure converter - b) Manual input - c) Drawing tool
You can switch between the three during the creation of the custom motif to use the tools that suit you best.
a) Structure converter
In the dot-bracket notation, an unpaired nucleotide is represented with a dot .. So, a single-stranded motif of 7 nucleotides can be represented as ........ In the structure converter, you can add either your structure, your sequence, or both.
If a structure is added, the sequence will be composed of any nucleotide (N). If a sequence is added, the structure will be guessed with ViennaRNA. If both are added, the structure will be used to create the motif.
Tip
pyFuRNAce uses the extended dot-bracket notation with the ampersand character & as a separator between different strands (as used in the ViennaRNA Python API).
Structure: .......
Sequence: AAAAAAA
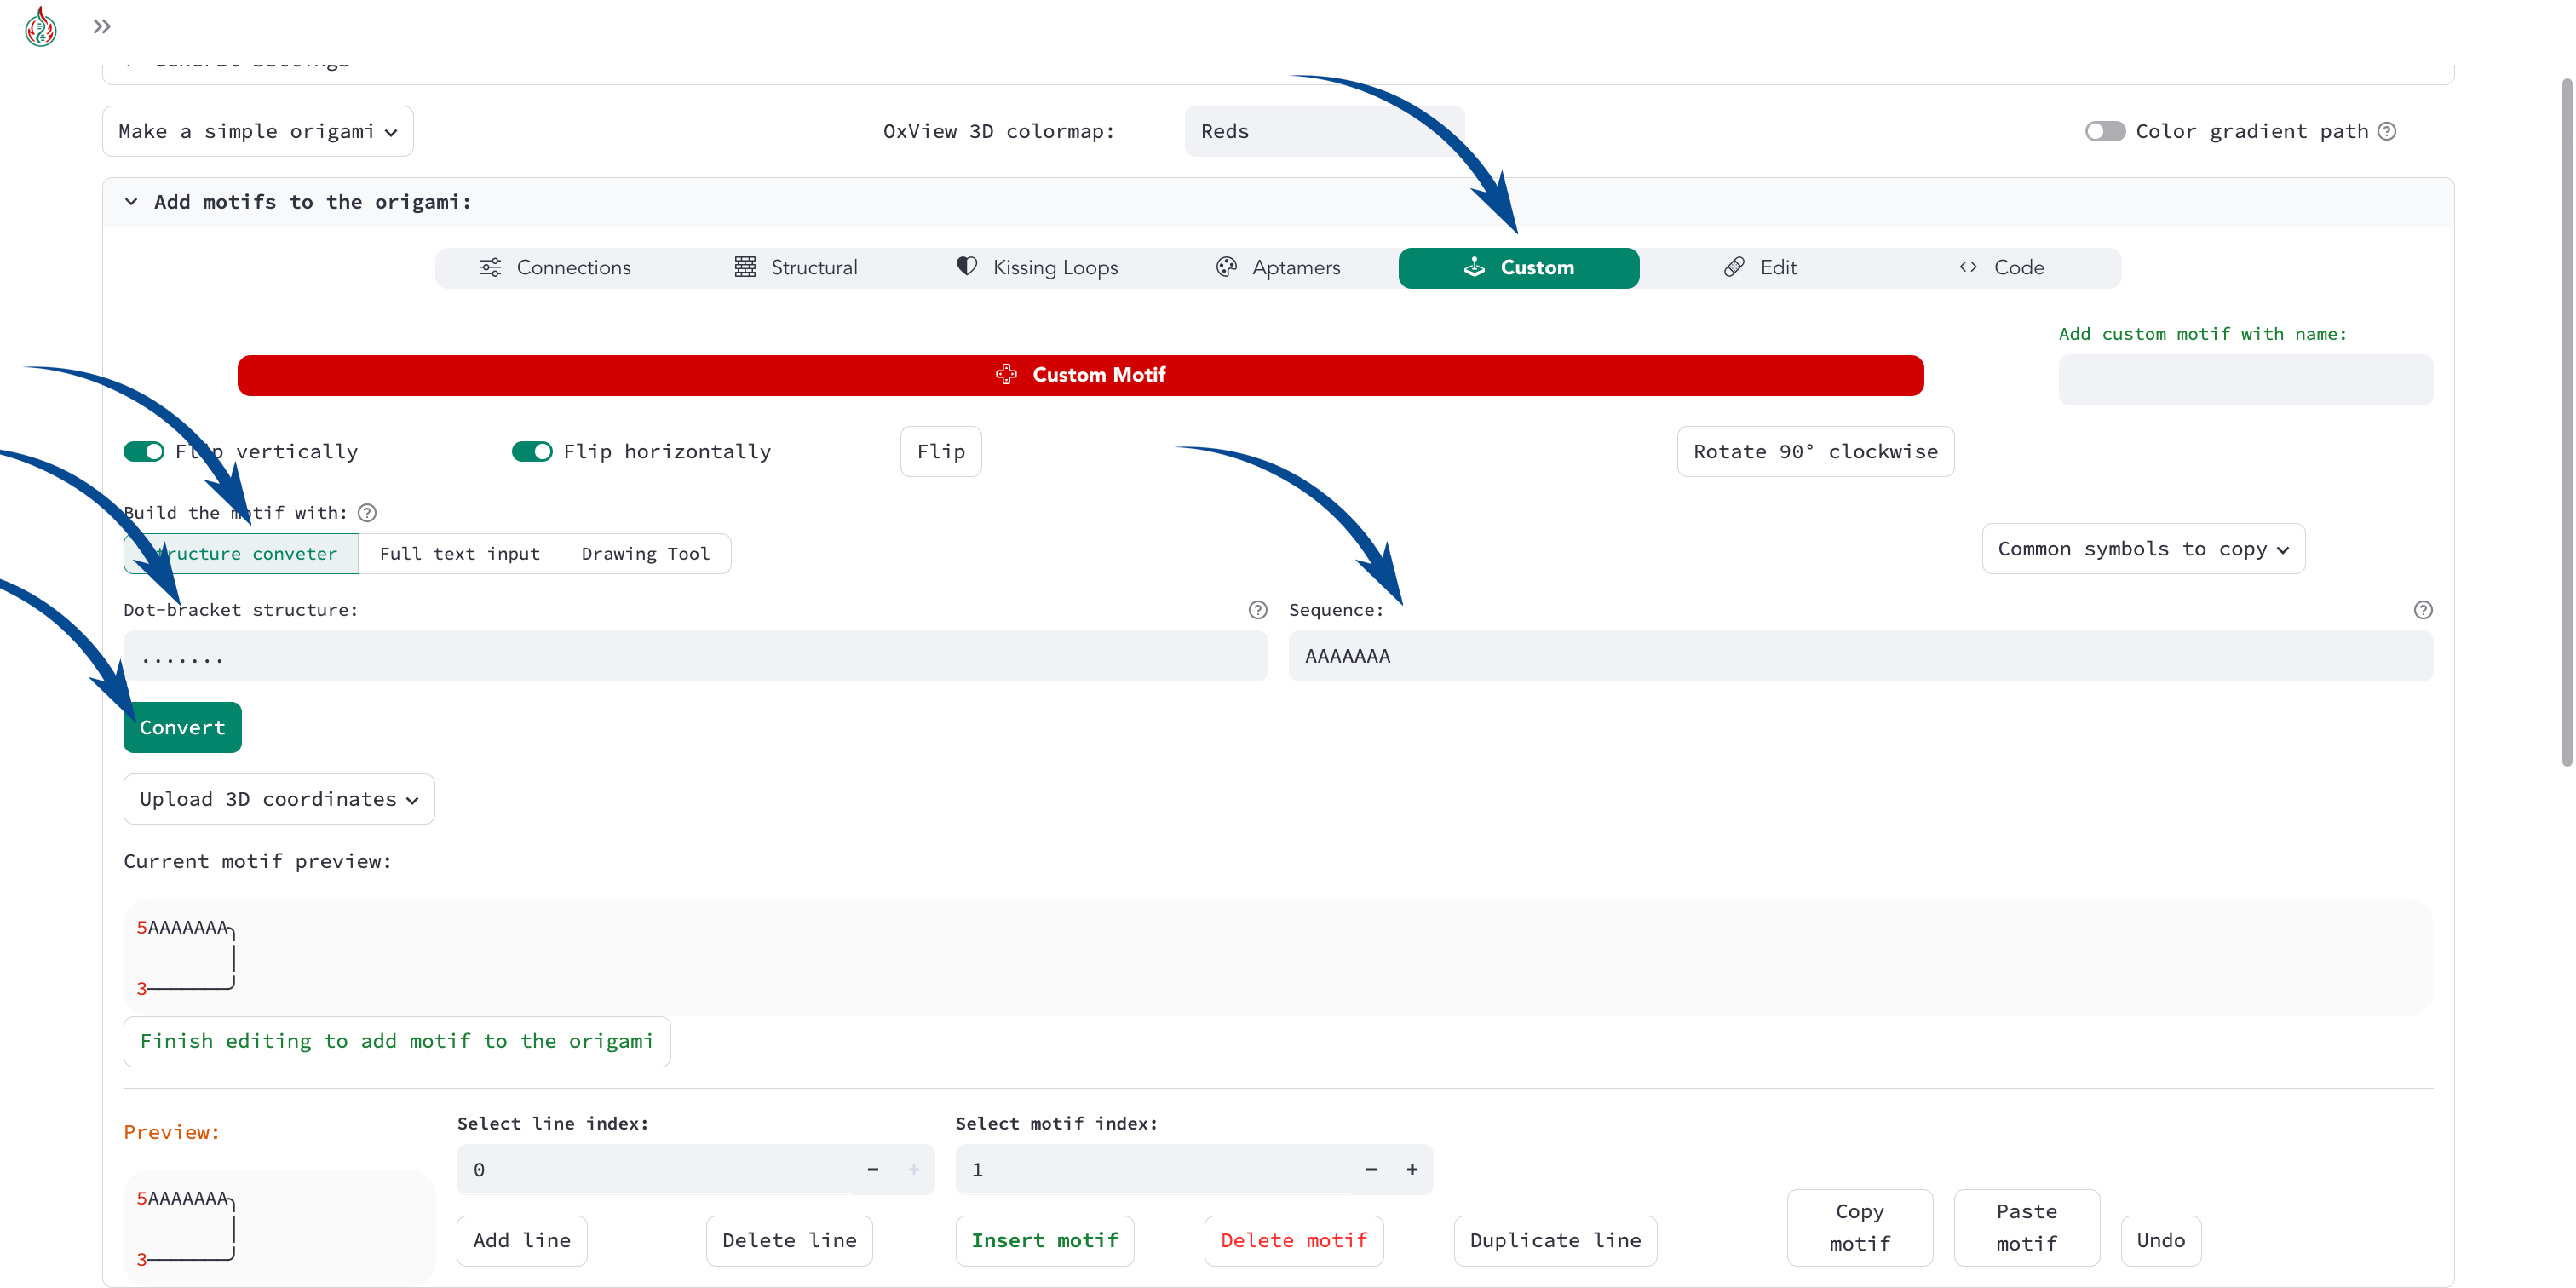
If we add a single-stranded structure, the custom motif will automatically create a loop:
5->AAAAAAA╮
          │
3<-───────╯
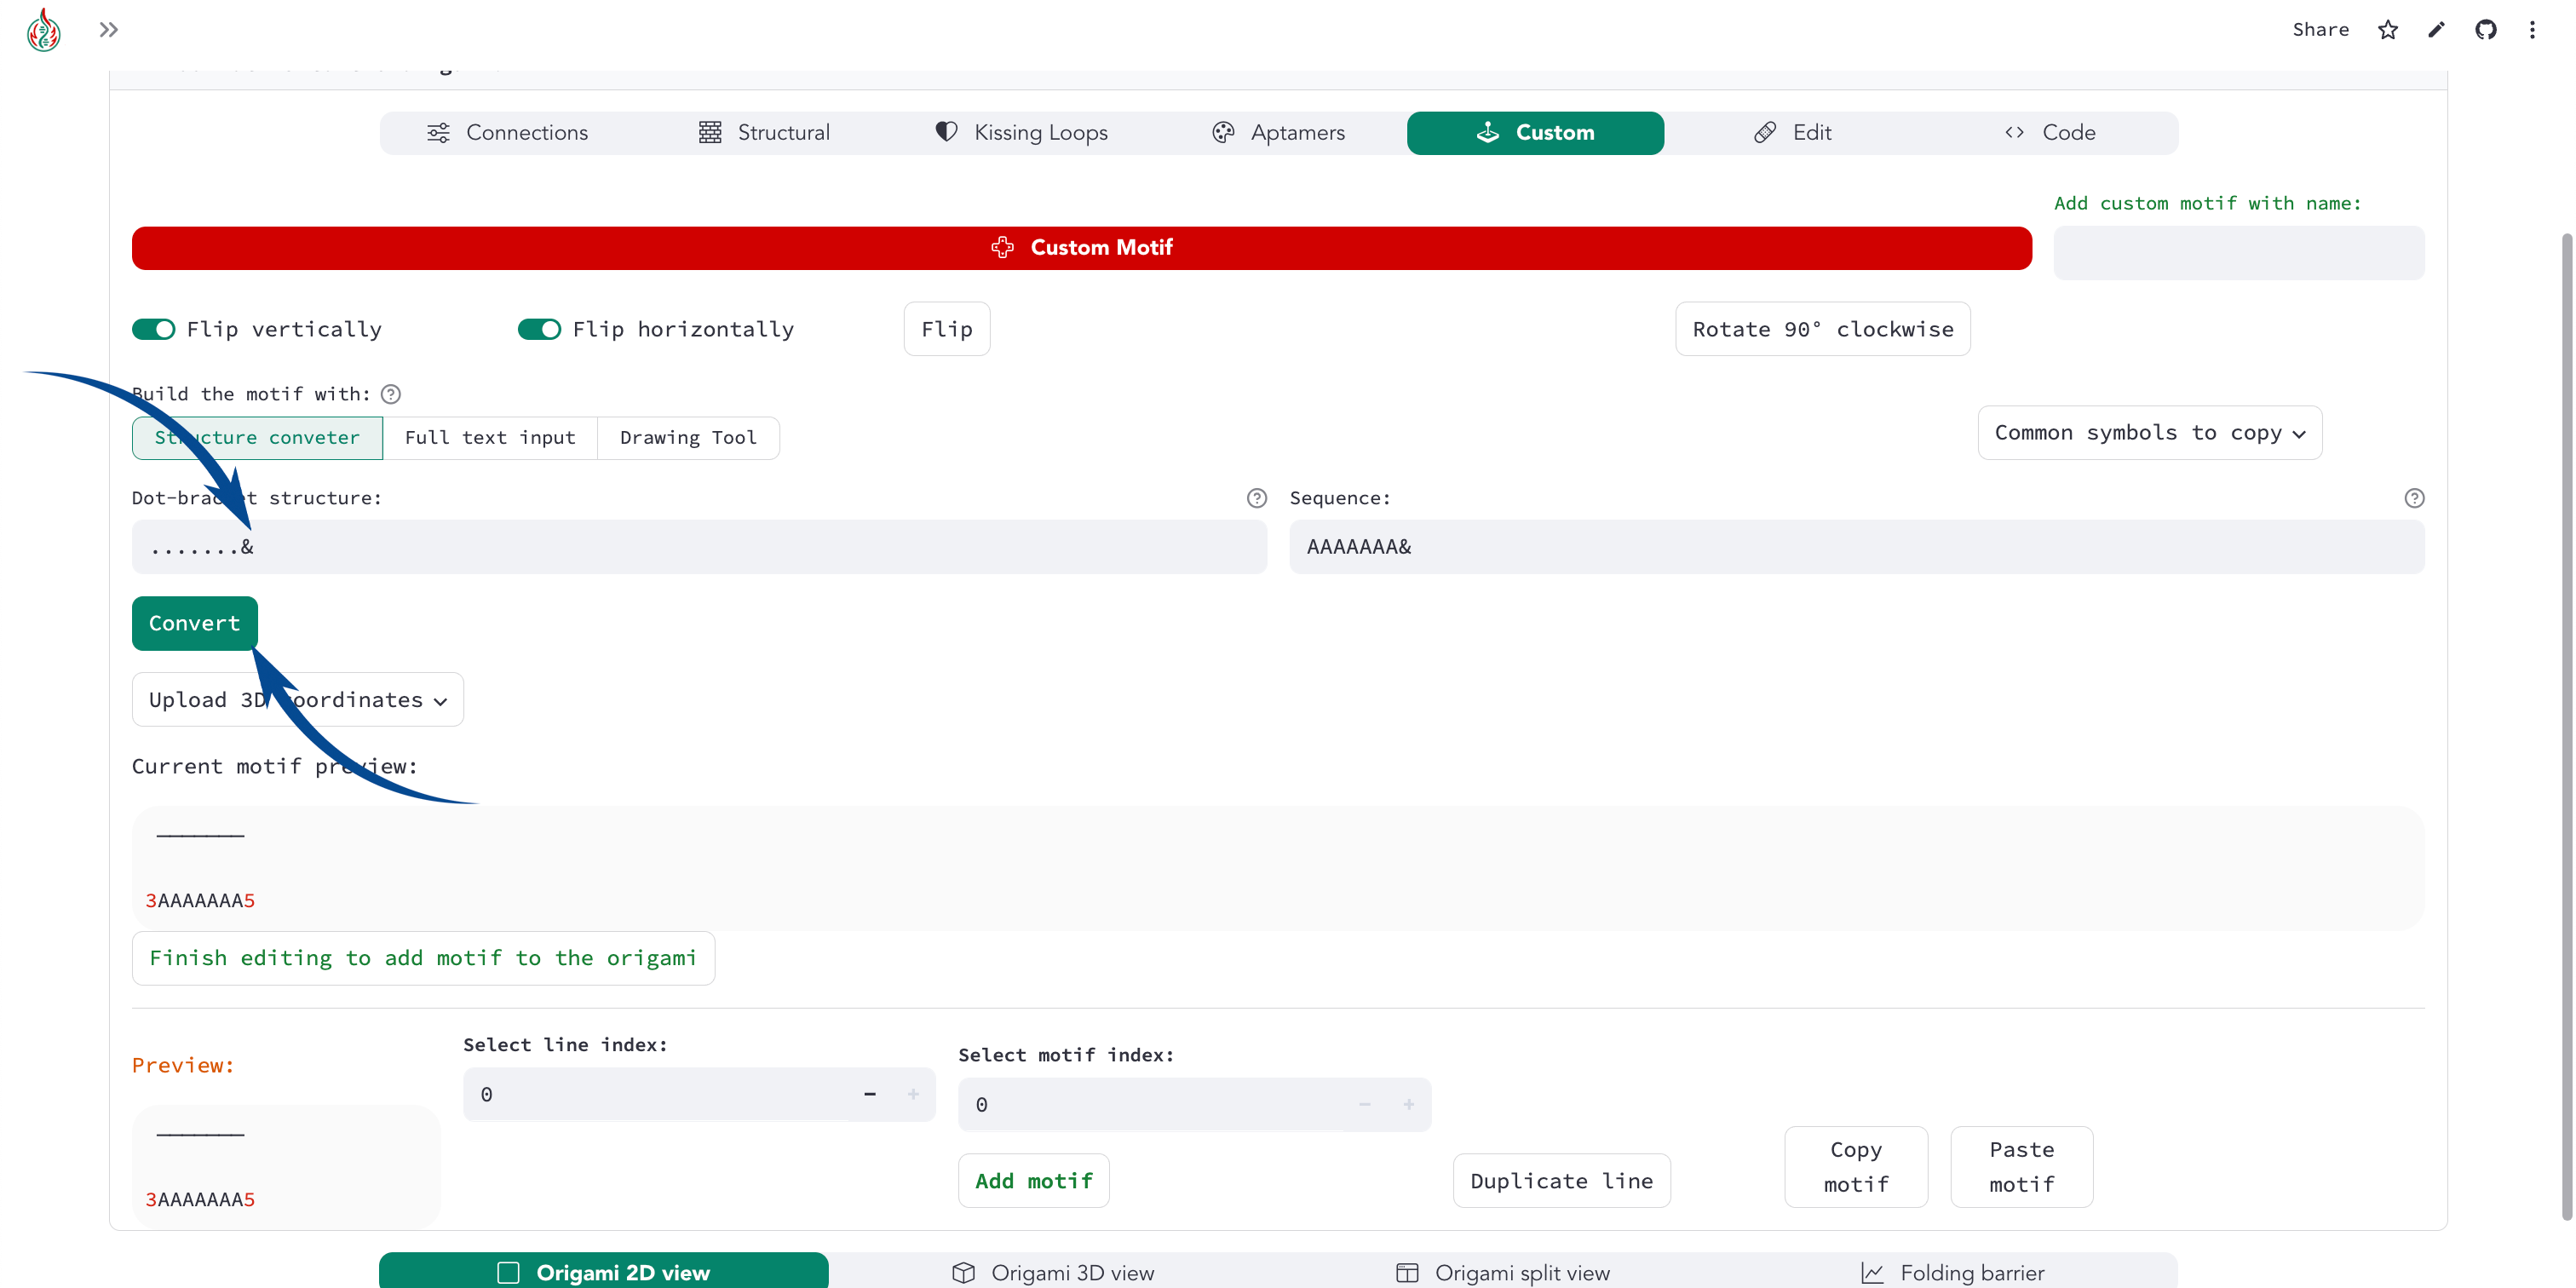
But in this case, we want a single-stranded connection. To break the loop, we can use the ViennaRNA dot-bracket cleavage symbol &. Adding it to the end of the dot-bracket structure will break the loop:
Structure: .......&
Sequence: AAAAAAA
Click convert to apply the changes. Now the custom motif will create a purely single-stranded motif:
5->AAAAAAA->3

   ───────
Using the flip button at the top will produce the motif that we want:
   ───────

3<-AAAAAAA<-5
b) Manual input
The second custom motif creation method is by manual text input (Full text input tab). It involves writing the motif as text in the text area.
Warning
To set the directionality of a strand in Full text input, you only need to add the 5 character at the beginning of the strand. Do not add a 3 character at the end of the strand.
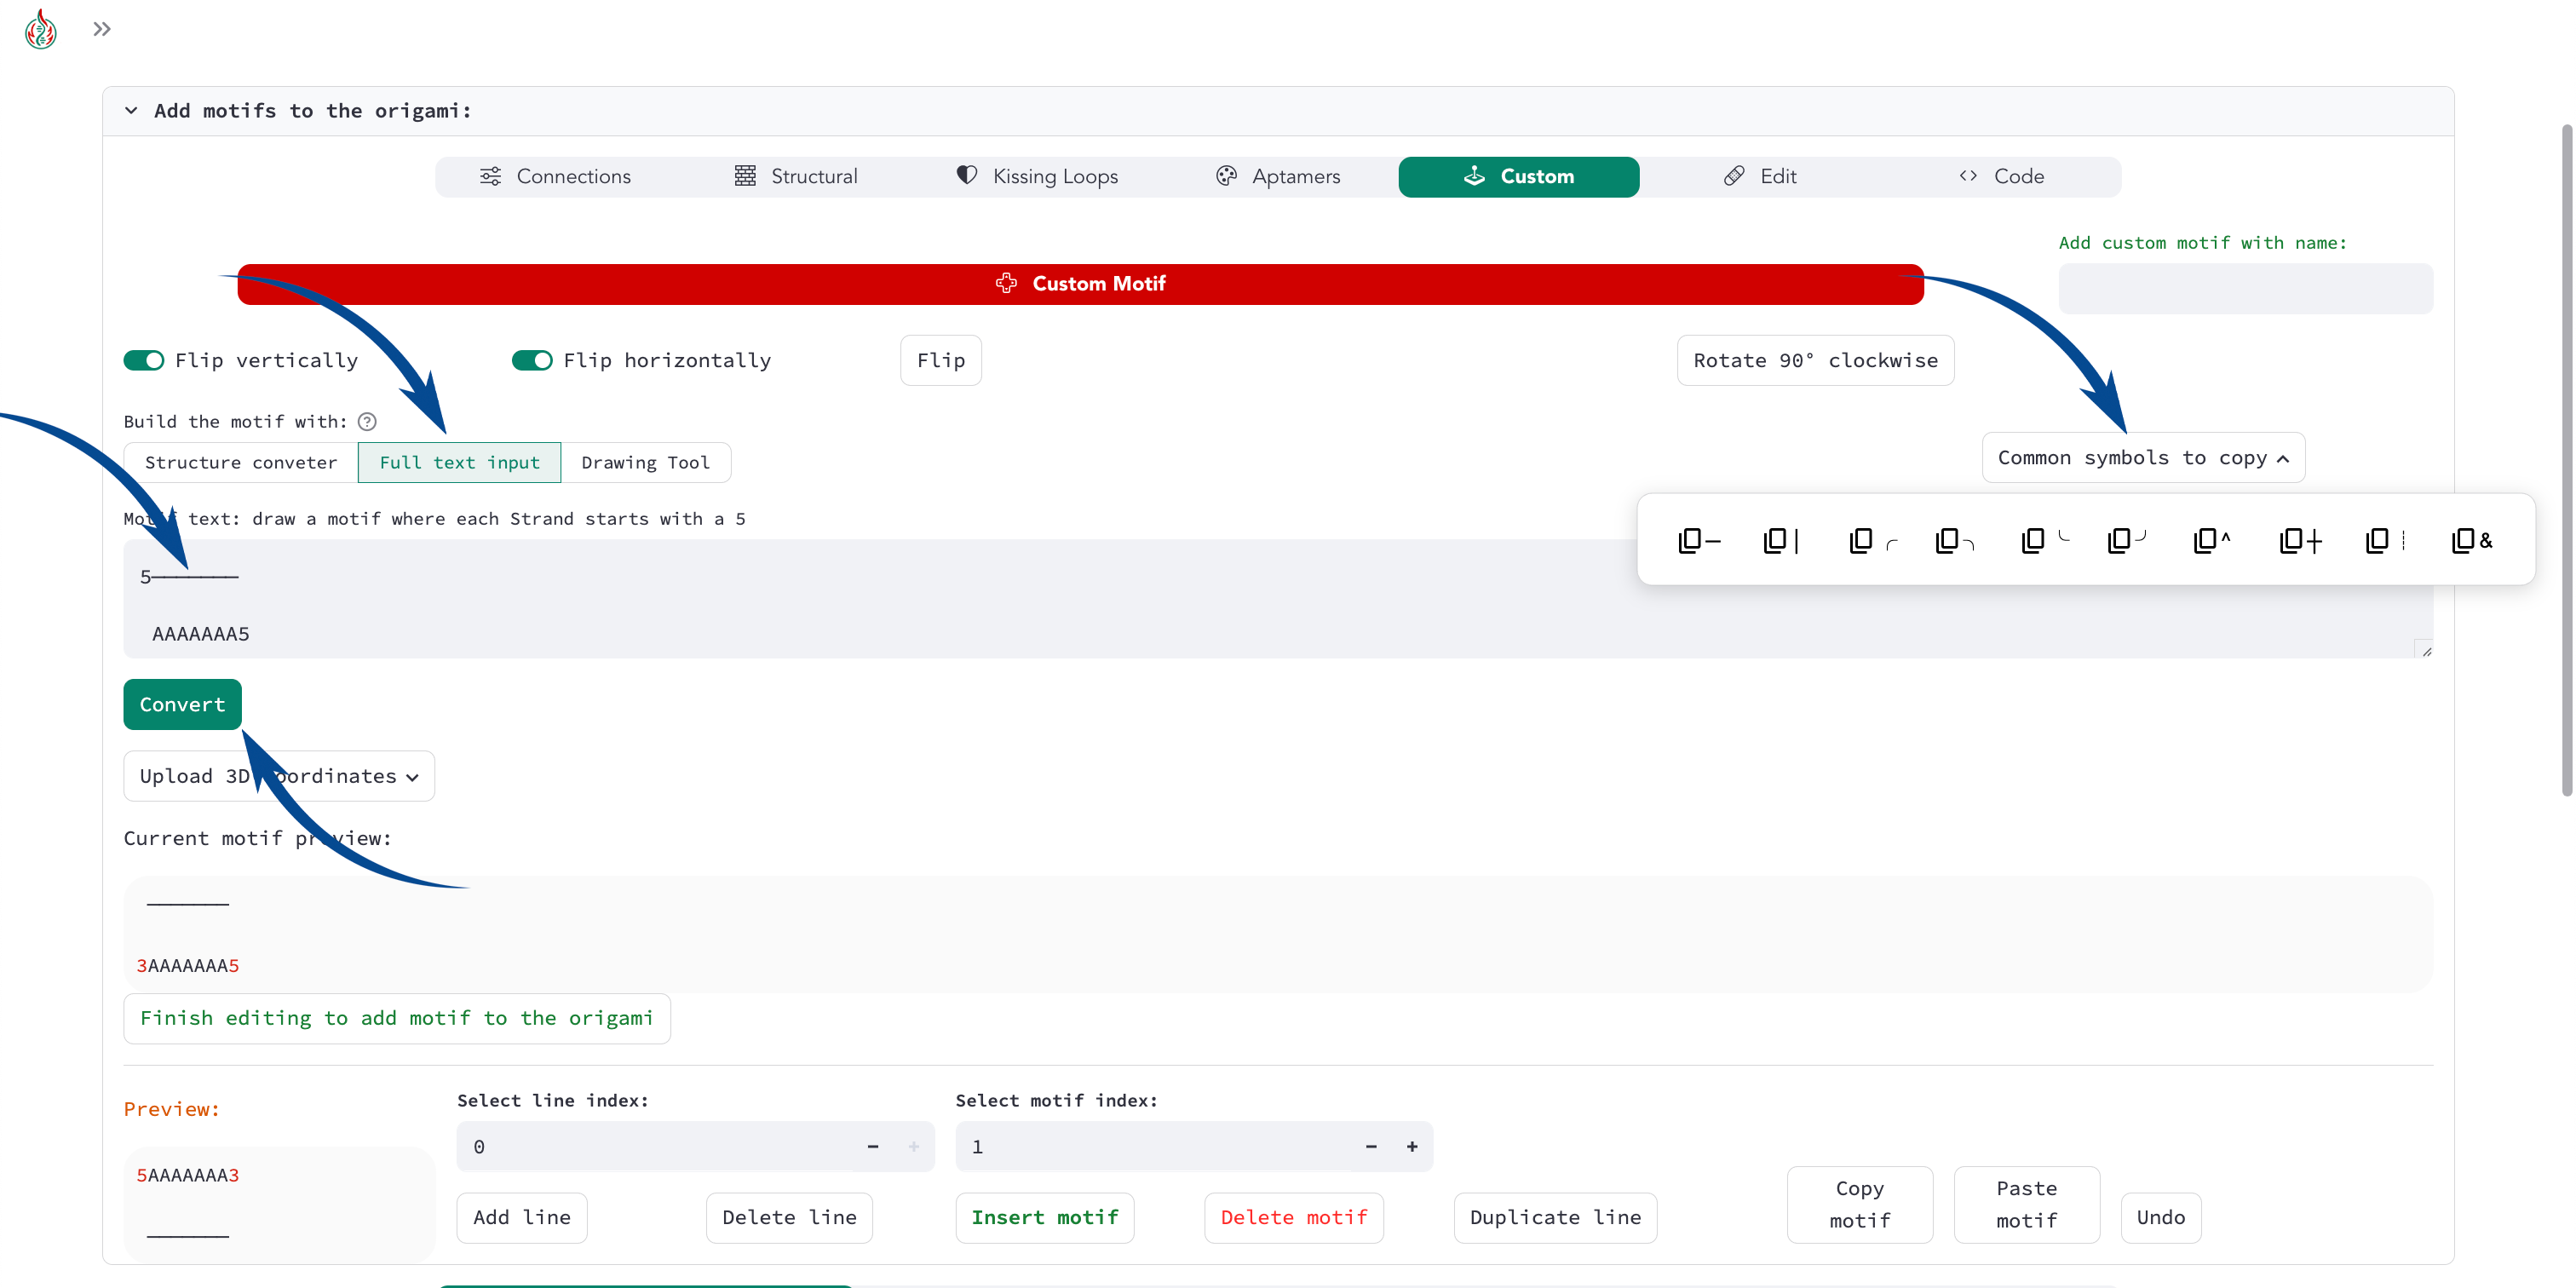
You can try to copy-paste the single-stranded motif:
5───────

AAAAAAA5
Click convert to apply the changes.
If you want to draw curves in the strand, you can use the slash symbols / and \; while the minus symbol - and the pipe symbol | can be used to draw straight lines. If you want to use the ASCII character of ROAD/pyFuRNAce, they can be copied and pasted in the popover at the top right of the custom motif editor.
An example of a curved strand is:
    ╭╮
5───╯╰──

 AAAAAAA5
c) Drawing tool
This tool displays the canvas to draw the motif, where the dots represent the available positions. When you first click on a dot, you select the starting point of the strand. You can click on another dot in the same line/row to create a straight line. By consecutively clicking on dots in different lines/rows, you can draw a strand. Below the canvas, you can find the parameters defining the strand: starting point, start direction, characters, and directionality. You can edit them to modify the strand in the canvas.
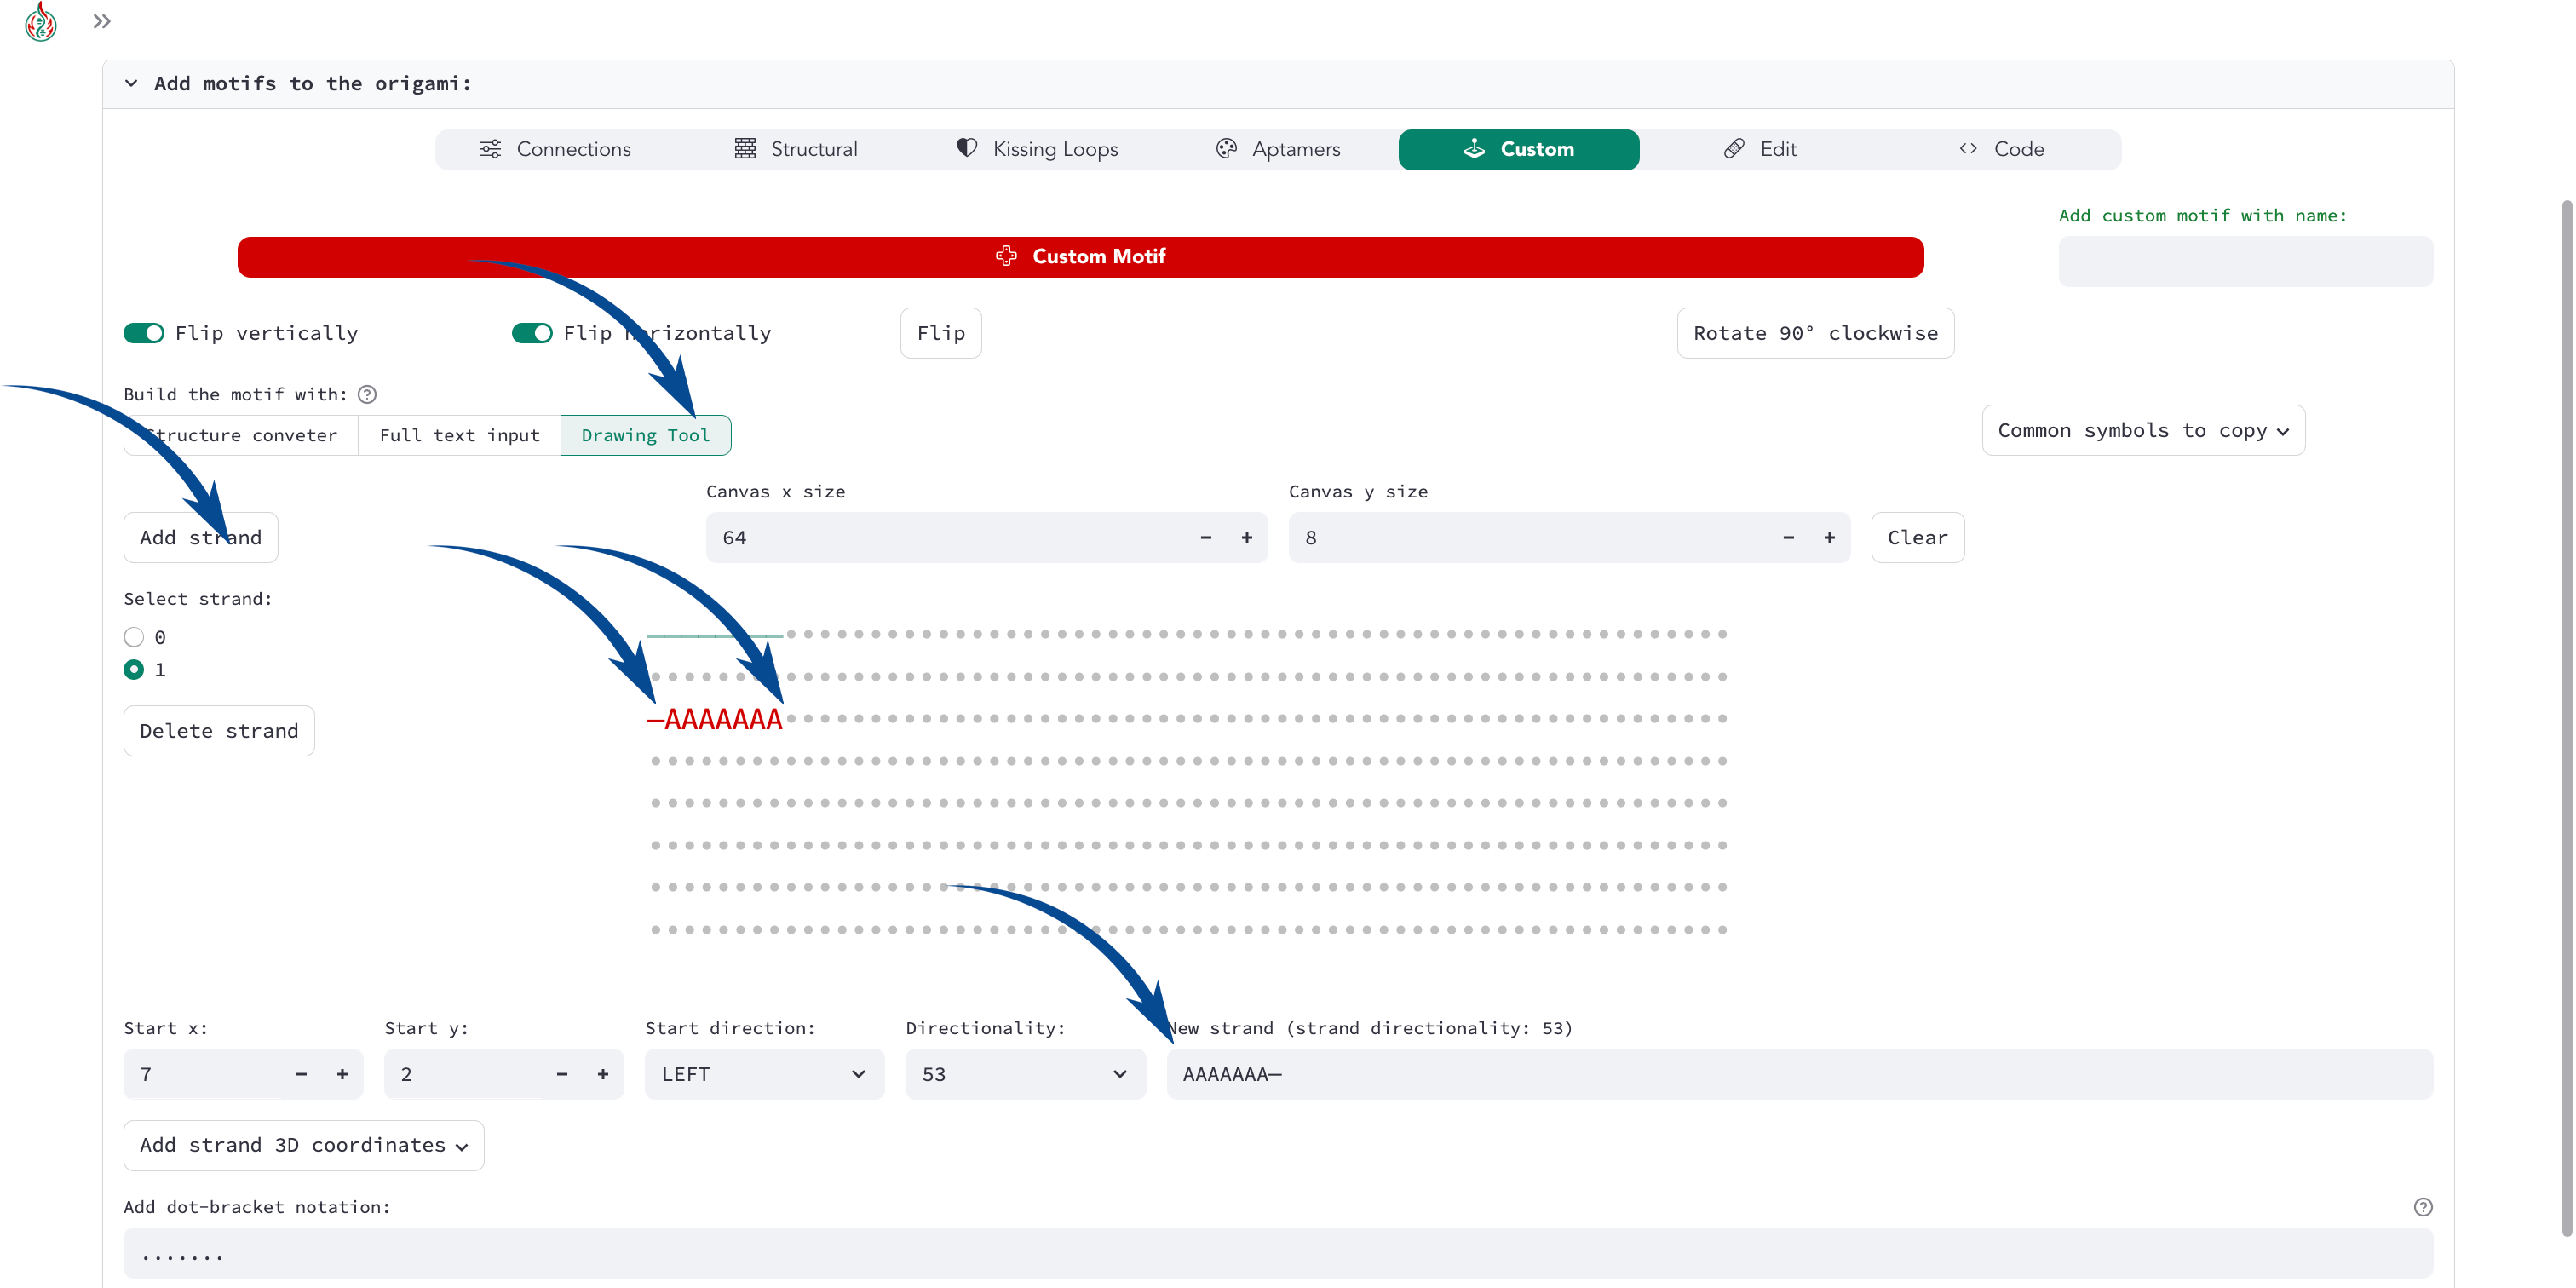
You can add, select, or remove strands with the buttons on the left of the canvas.
3) Complete the structure
Once you are satisfied with your custom motif, click the green Finish editing button at the bottom left. You can always go back to edit mode by clicking the Edit the motif button above the motif preview.
Now your origami should look like:
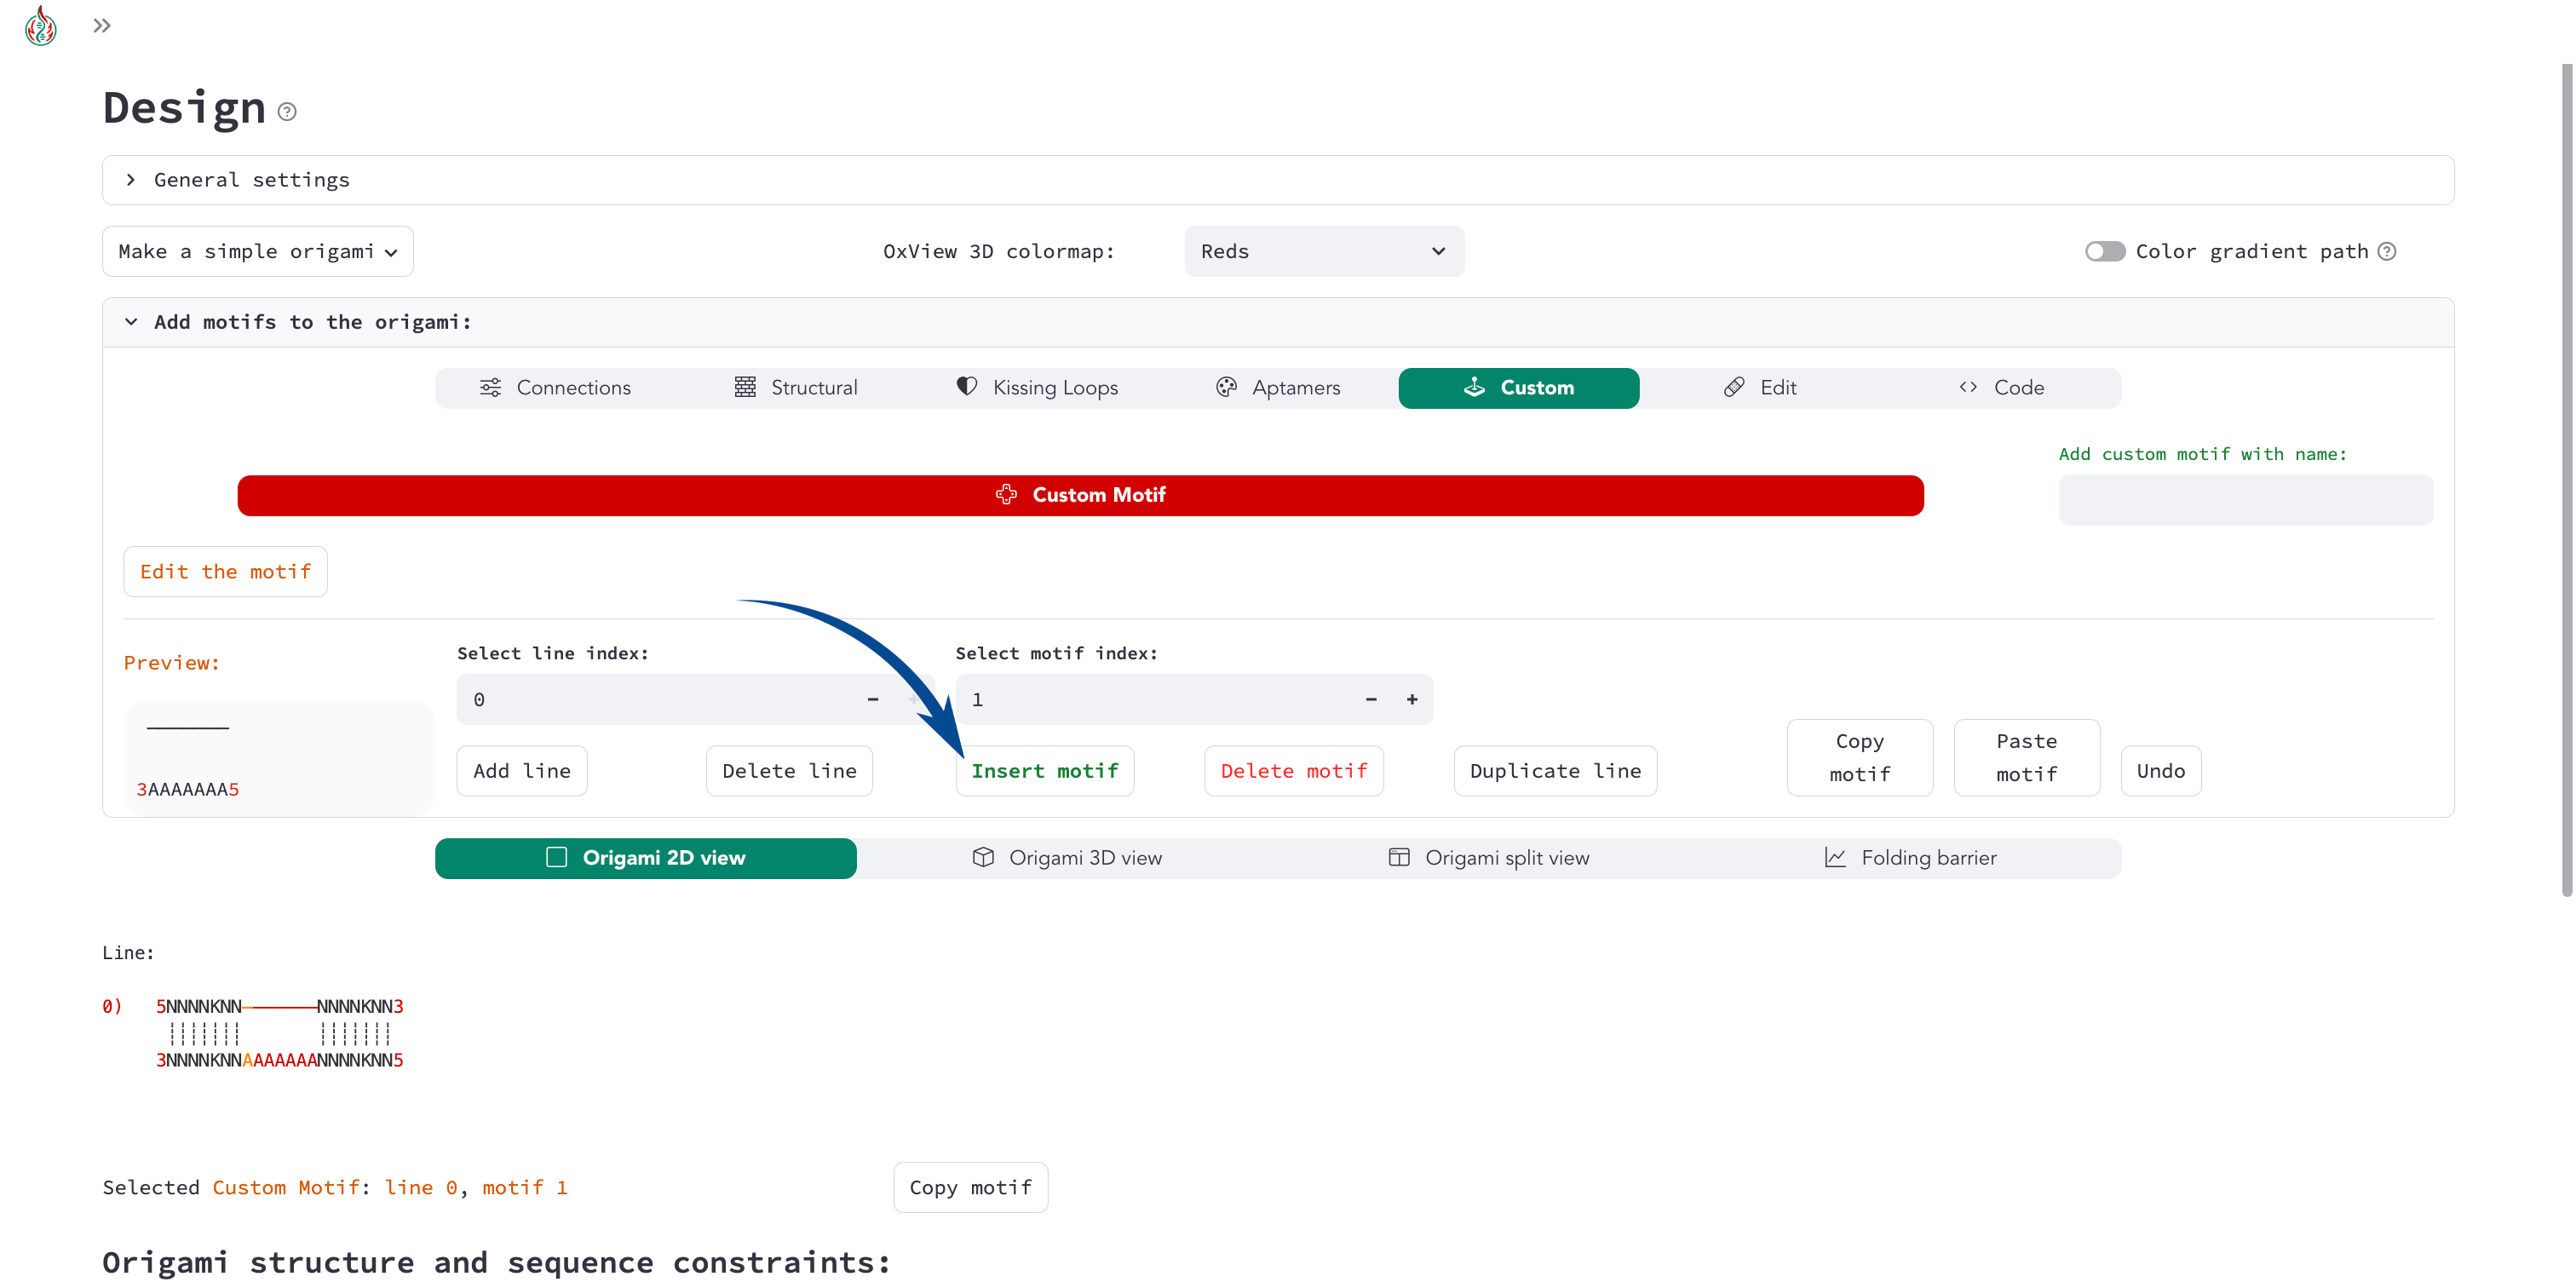
5->NNNNKNN───────NNNNKNN->3
   ┊┊┊┊┊┊┊       ┊┊┊┊┊┊┊
3<-NNNNKNNAAAAAAANNNNKNN<-5
To split the strand at the top, you can select Connections then start_end_stem in the motif menu.
Here is the final result:
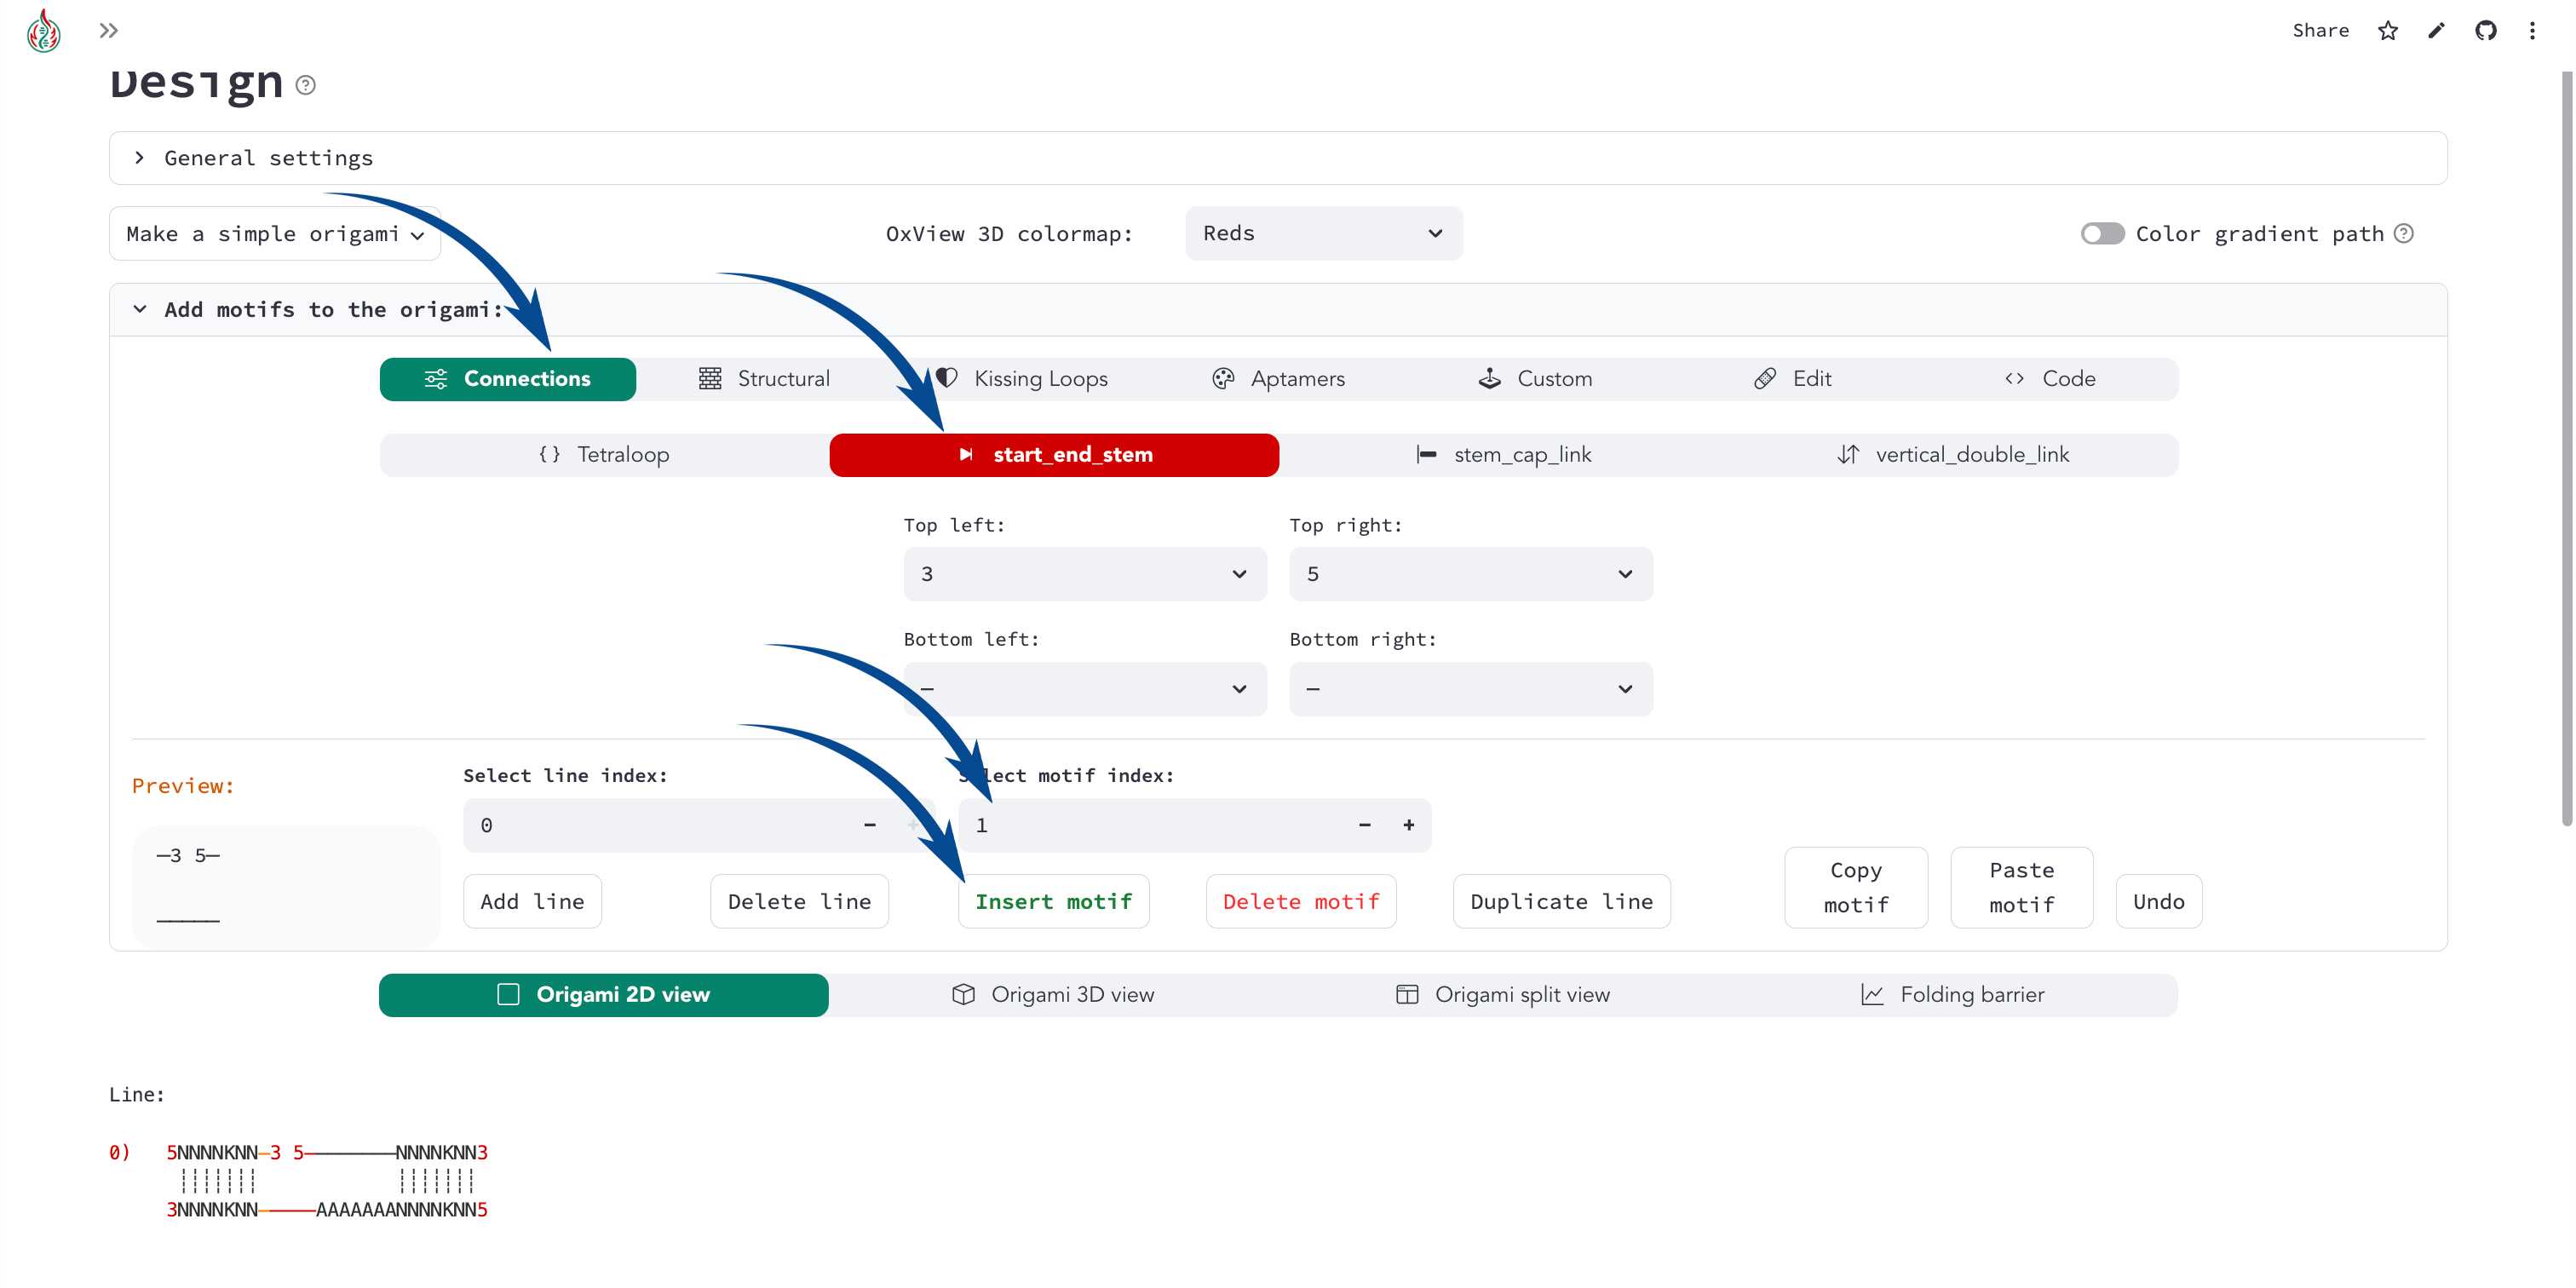
5->NNNNKNN─3 5────────NNNNKNN->3
   ┊┊┊┊┊┊┊            ┊┊┊┊┊┊┊
3<-NNNNKNN─────AAAAAAANNNNKNN<-5
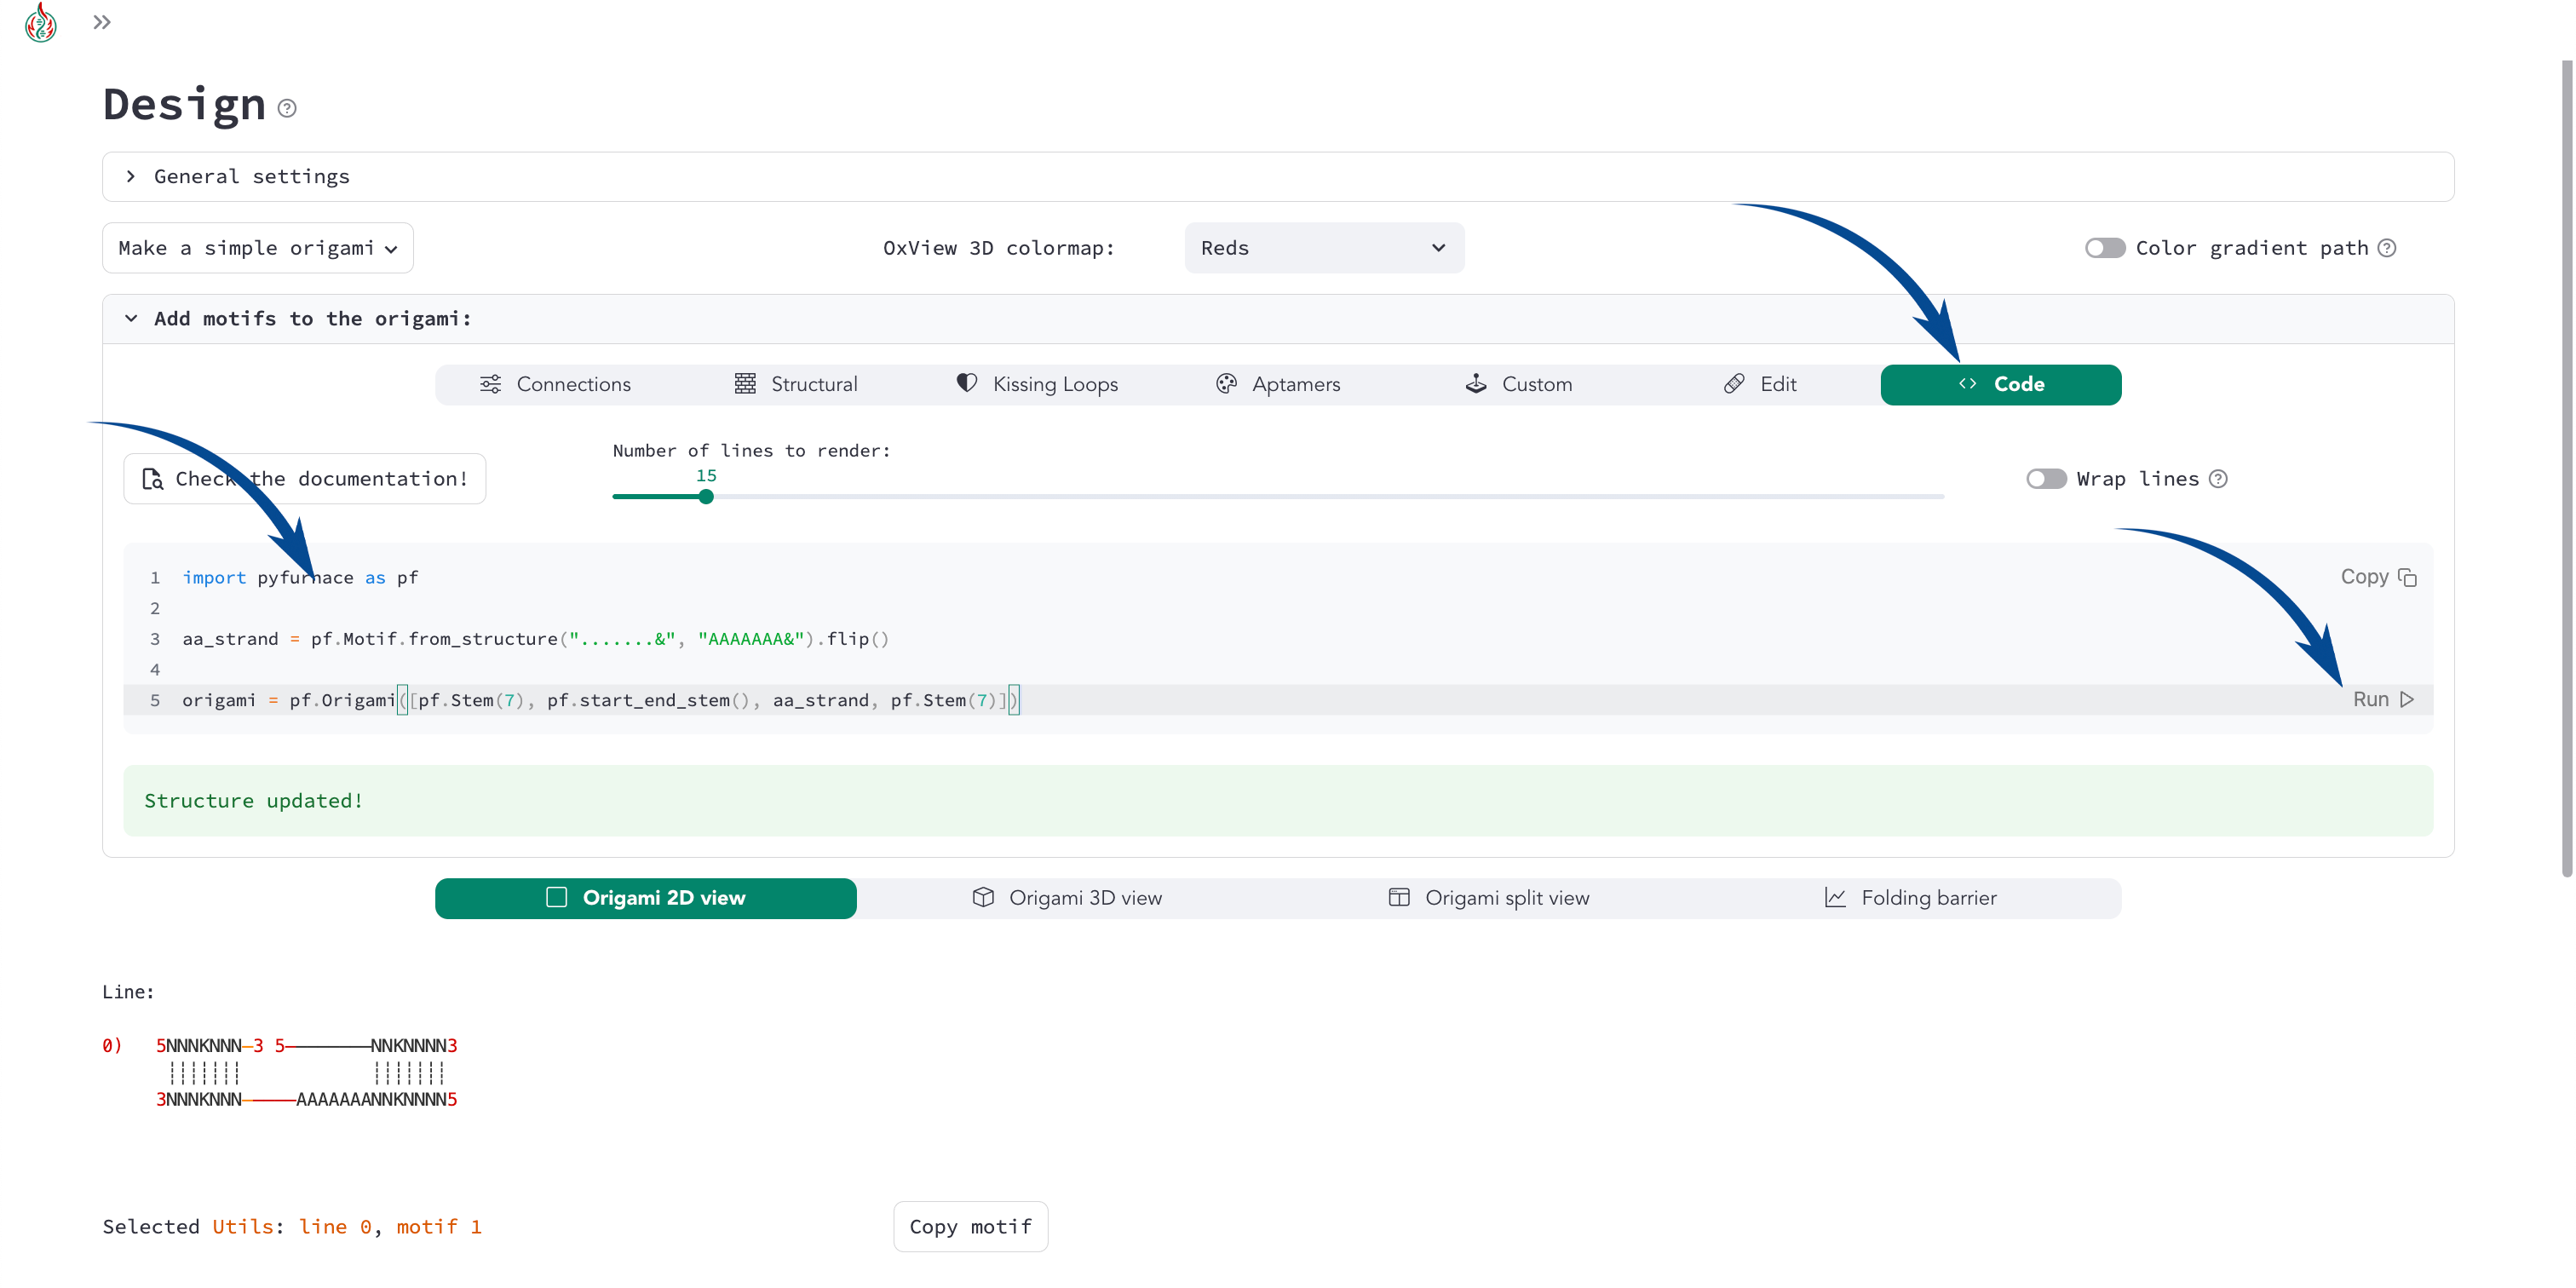
4) Equivalent Code
The equivalent code to create the same origami with the Python scripting interface is:
import pyfurnace as pf

aa_strand = pf.Motif.from_structure(".......&", "AAAAAAA&").flip()

origami = pf.Origami([pf.Stem(7), pf.start_end_stem(), aa_strand, pf.Stem(7)])
In the motif menu, you can select Code, paste the code, and click Run at the bottom right to create the origami from Python code.
Adding an overhang at the 5’ or 3’ end
Following the suggestions from the Custom motif: Single Stranded tutorial, even when adding single-stranded regions, it is recommended to use motifs with two pyFuRNAce strands to avoid ambiguity.
1) Create an origami
To start the design, we will make a simple origami with the simple origami popover at the top left:
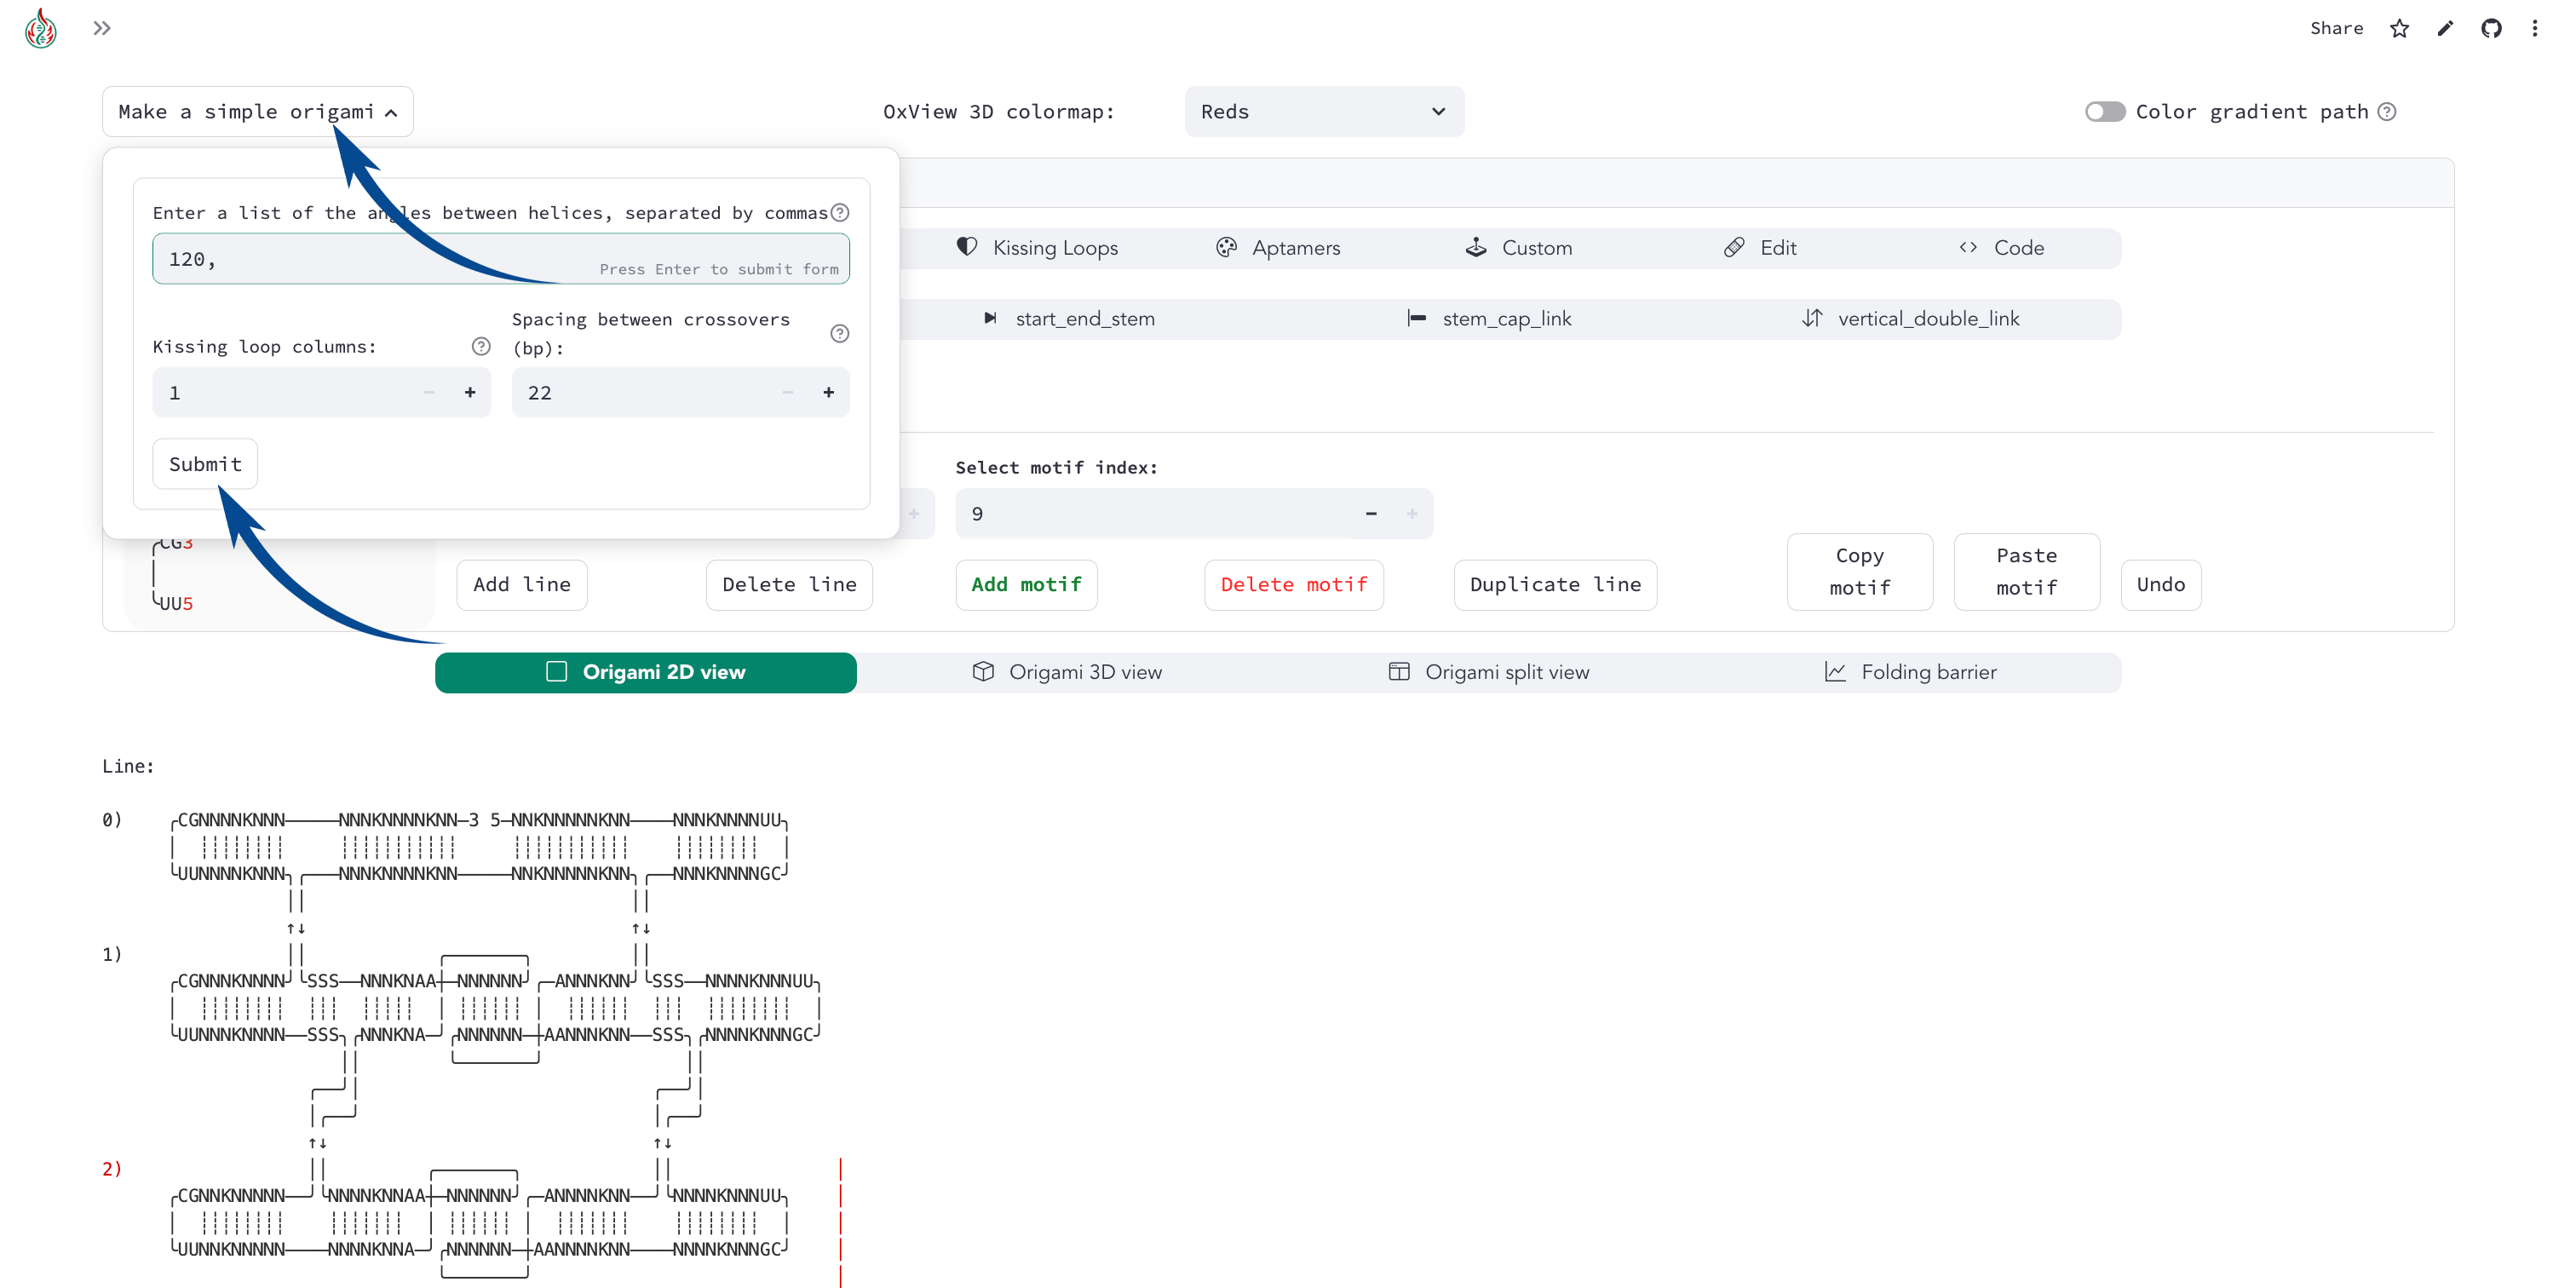
2) Add a line and a connection
Once the origami is made, select line index -1 and add a line to make space for the new single-stranded motif. The line indices at the left of the origami now start from 1 instead of 0.
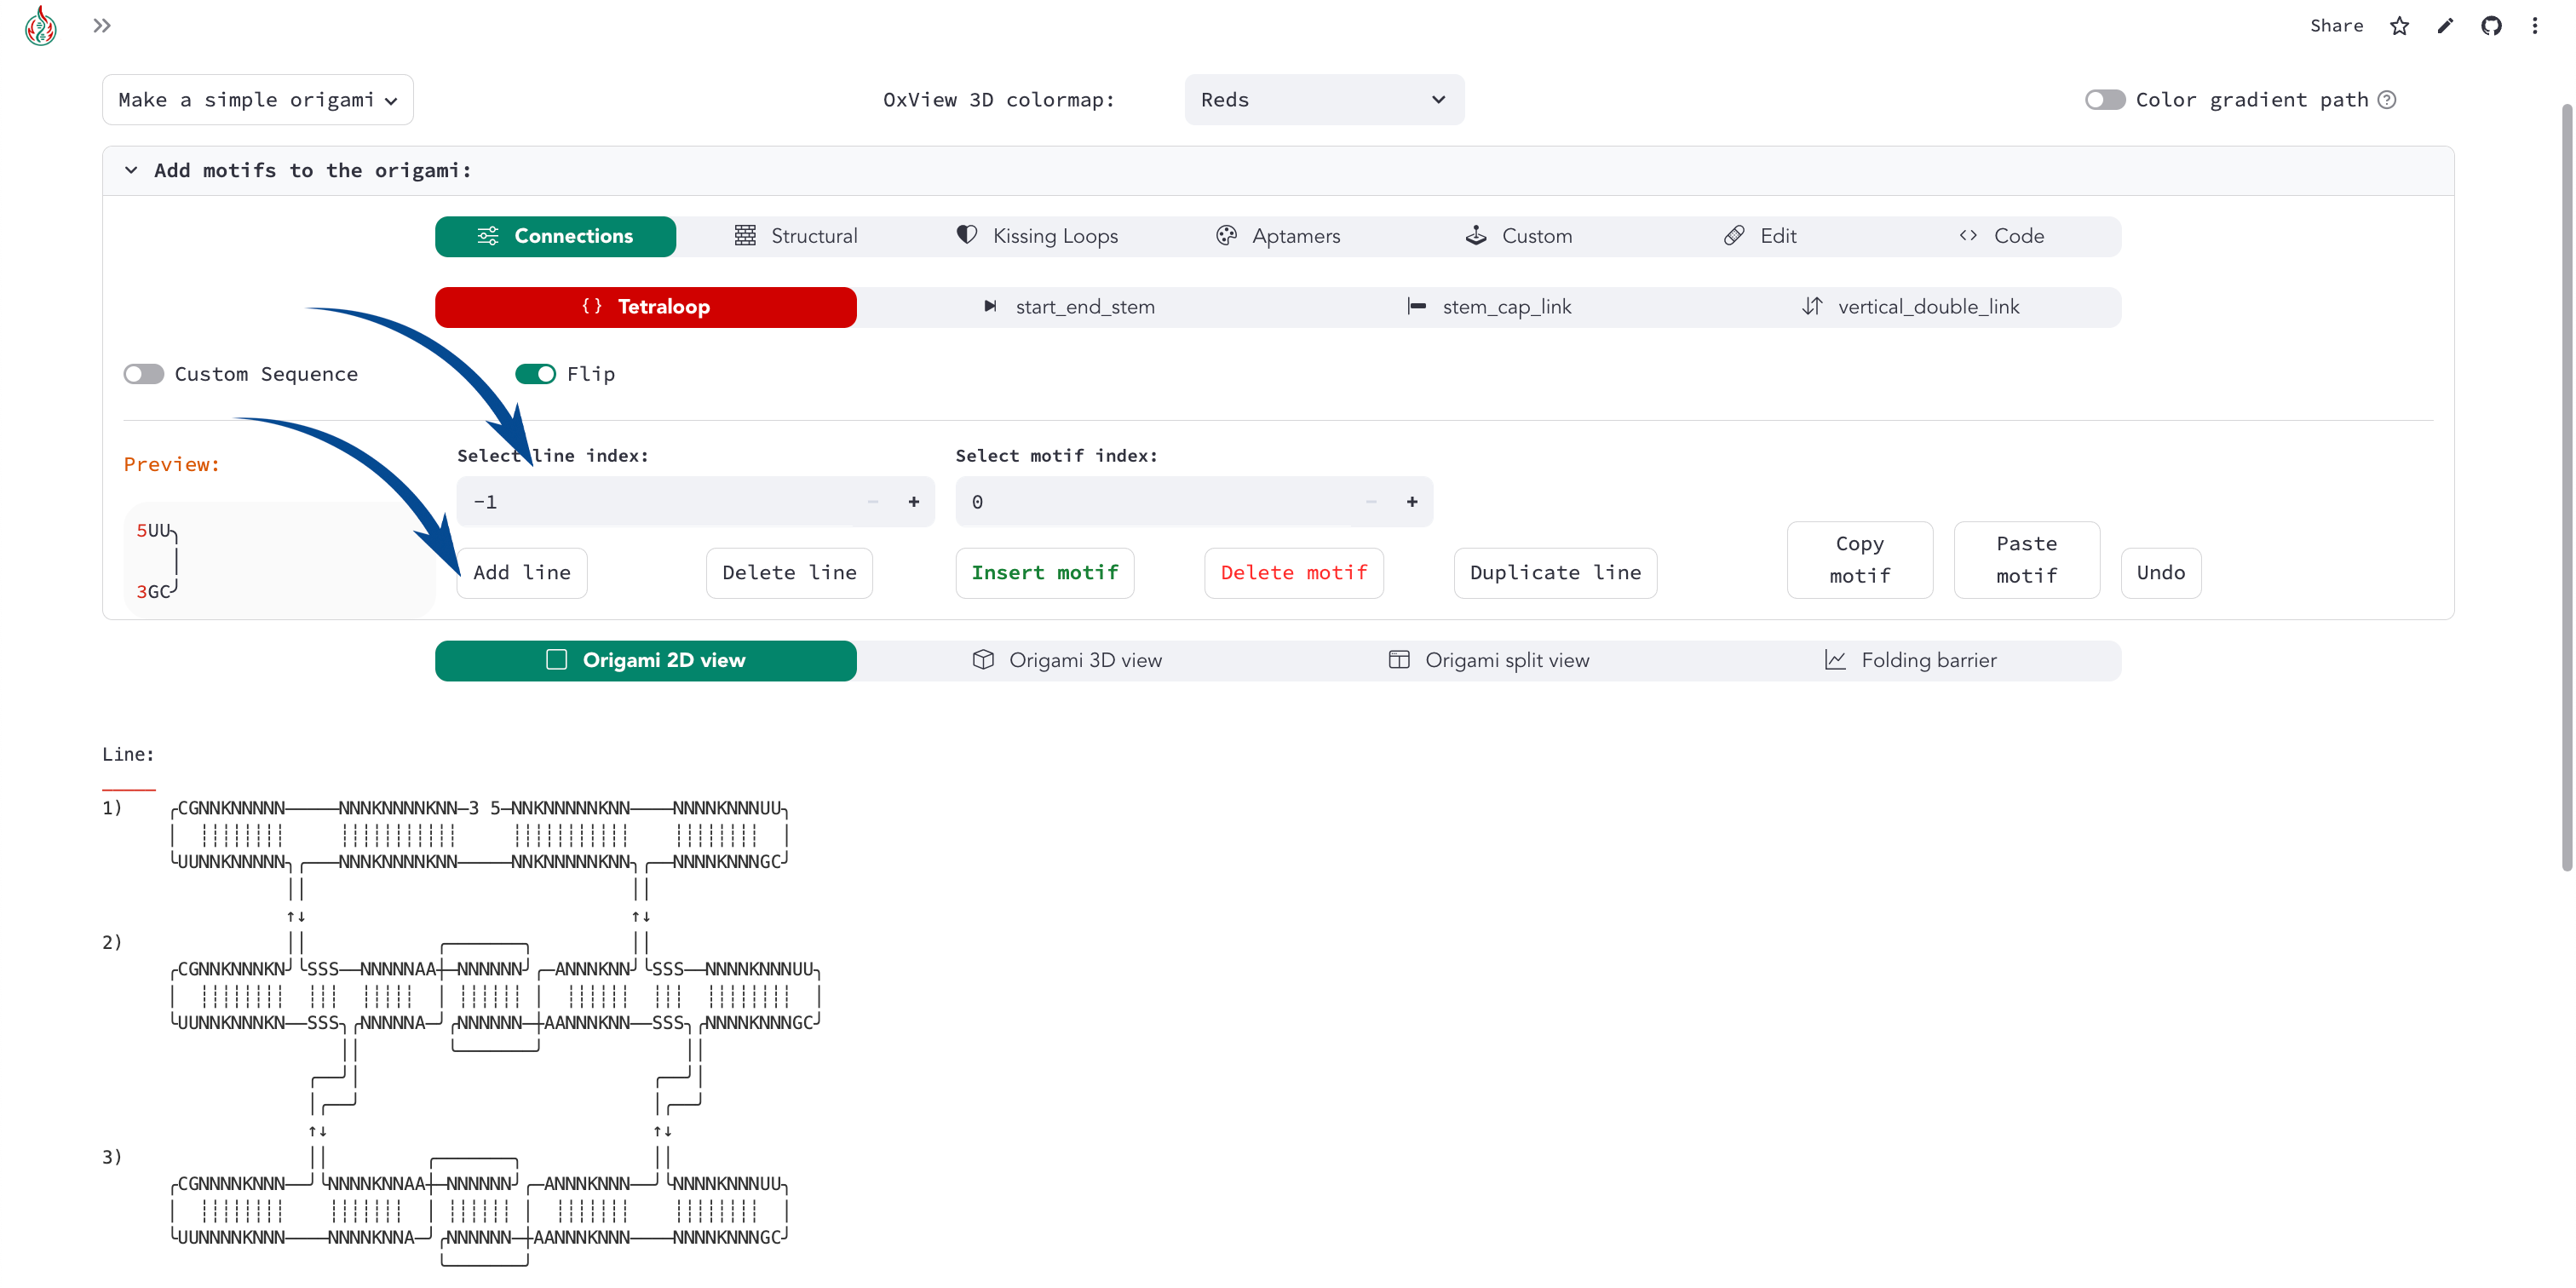
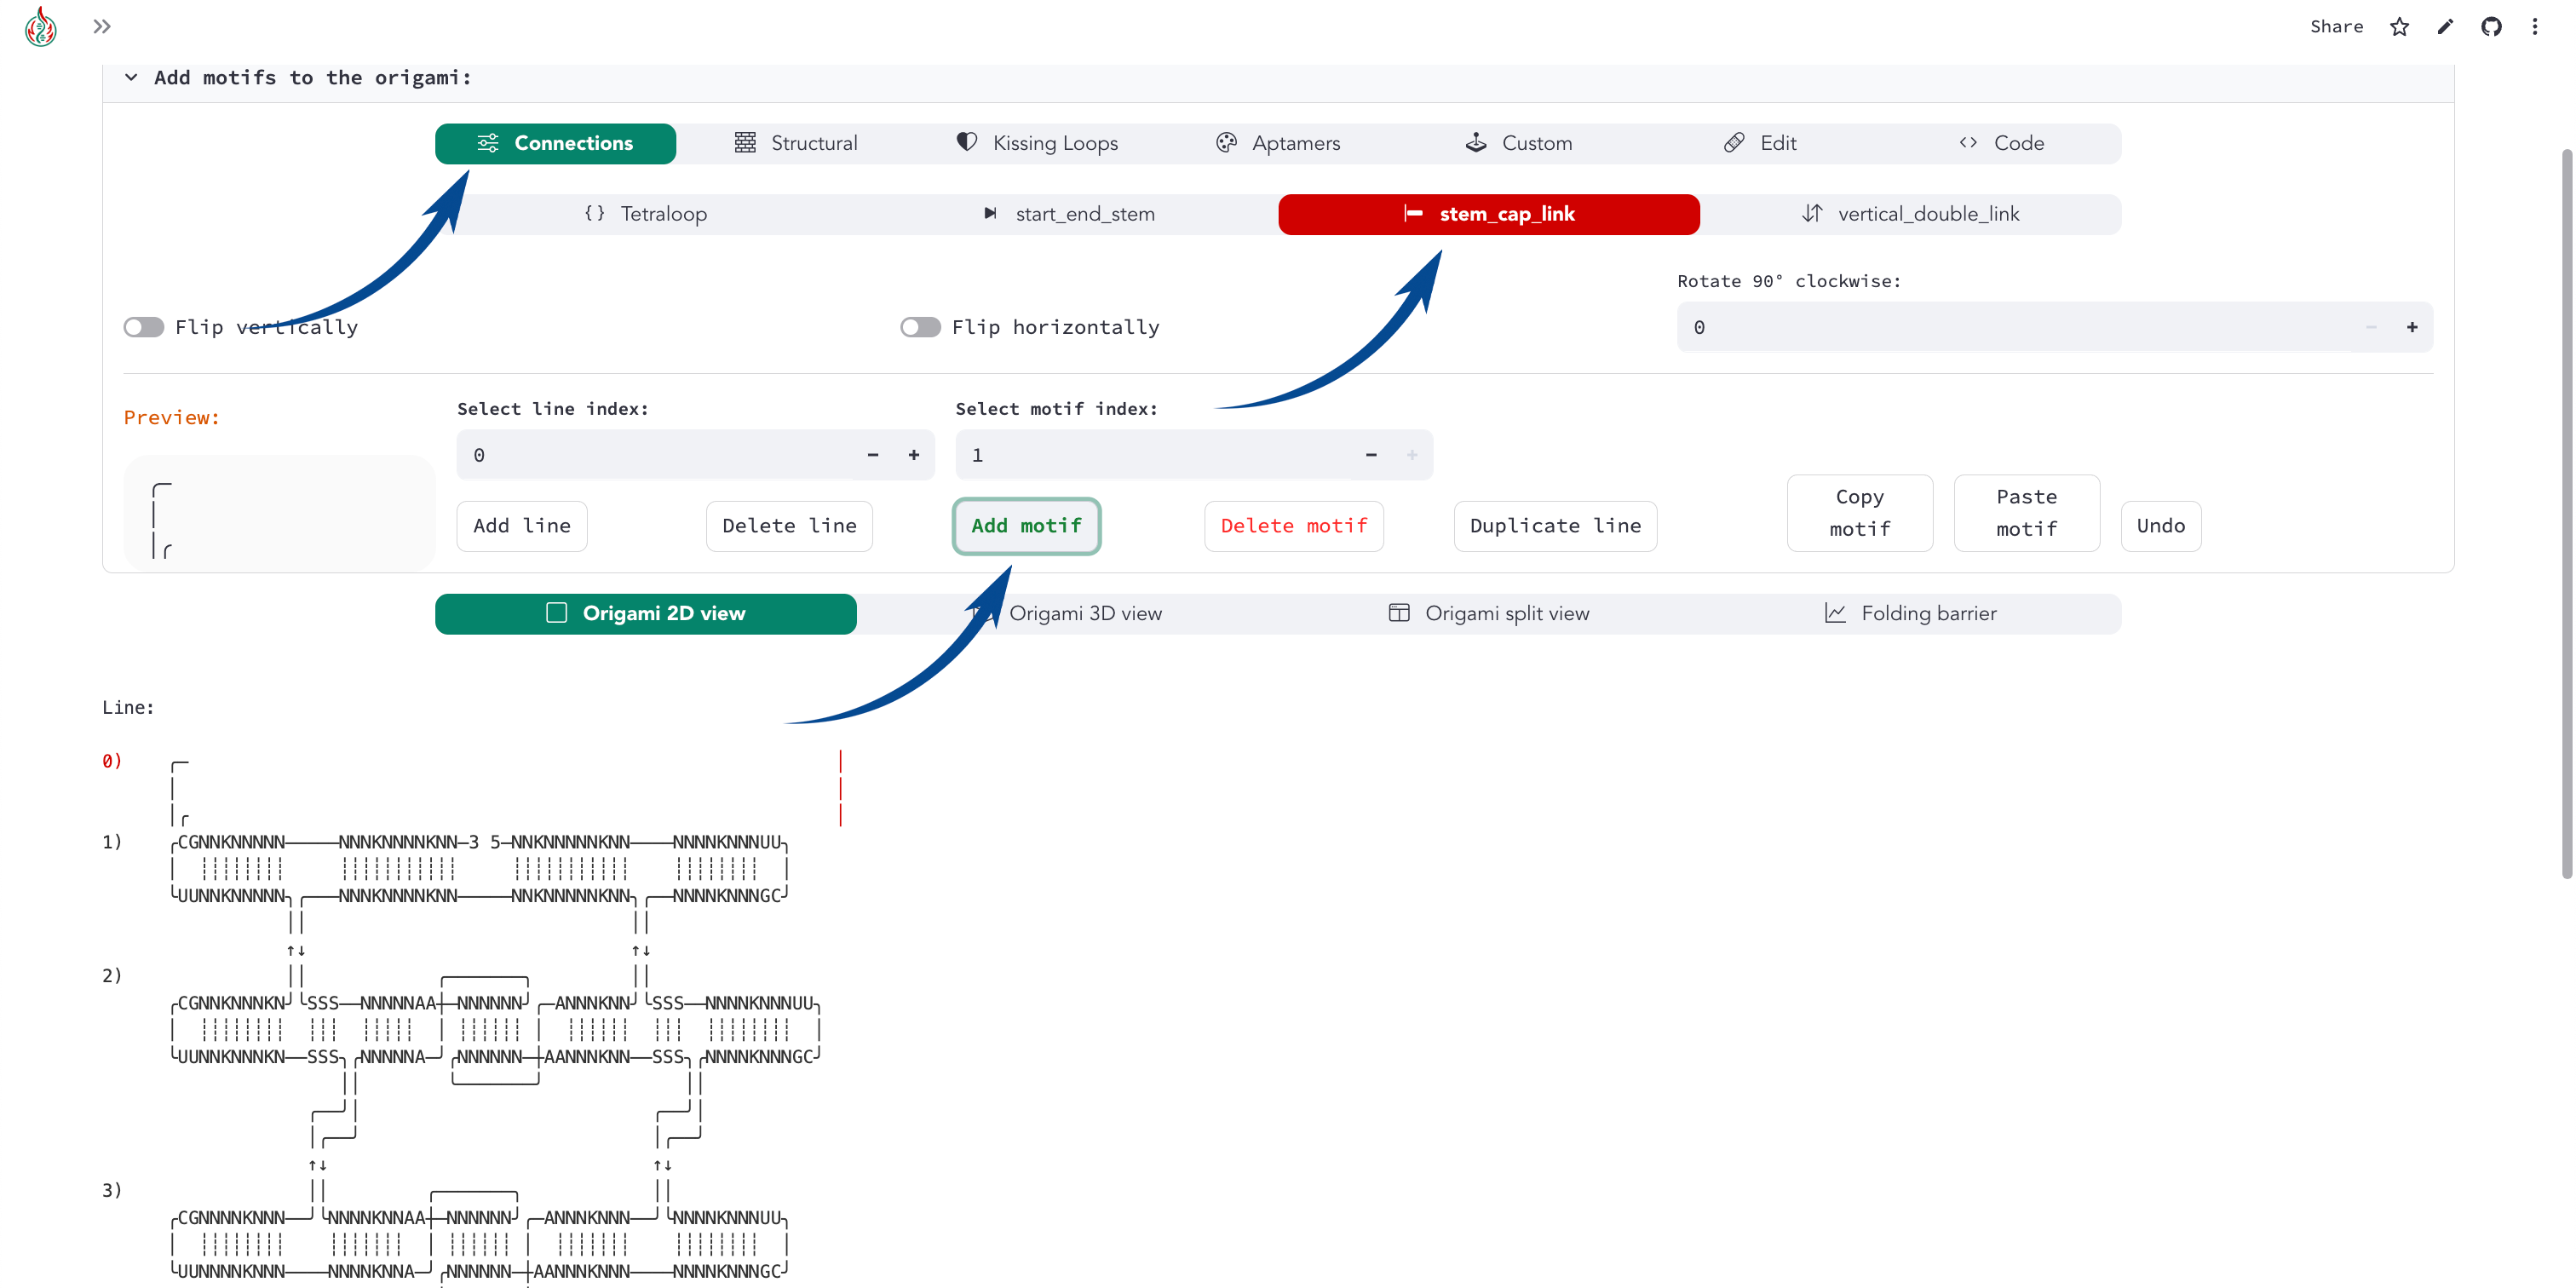
We want to add a vertical connection for the single-stranded regions. In the motif menu, select Connections, stem_cap_link, and add it to the line.
3) Create and add the single-stranded motif
We can finally go to the Custom motif menu and create our simple single-stranded motif, adding the structure and sequence (with 5’ to 3’ directionality)
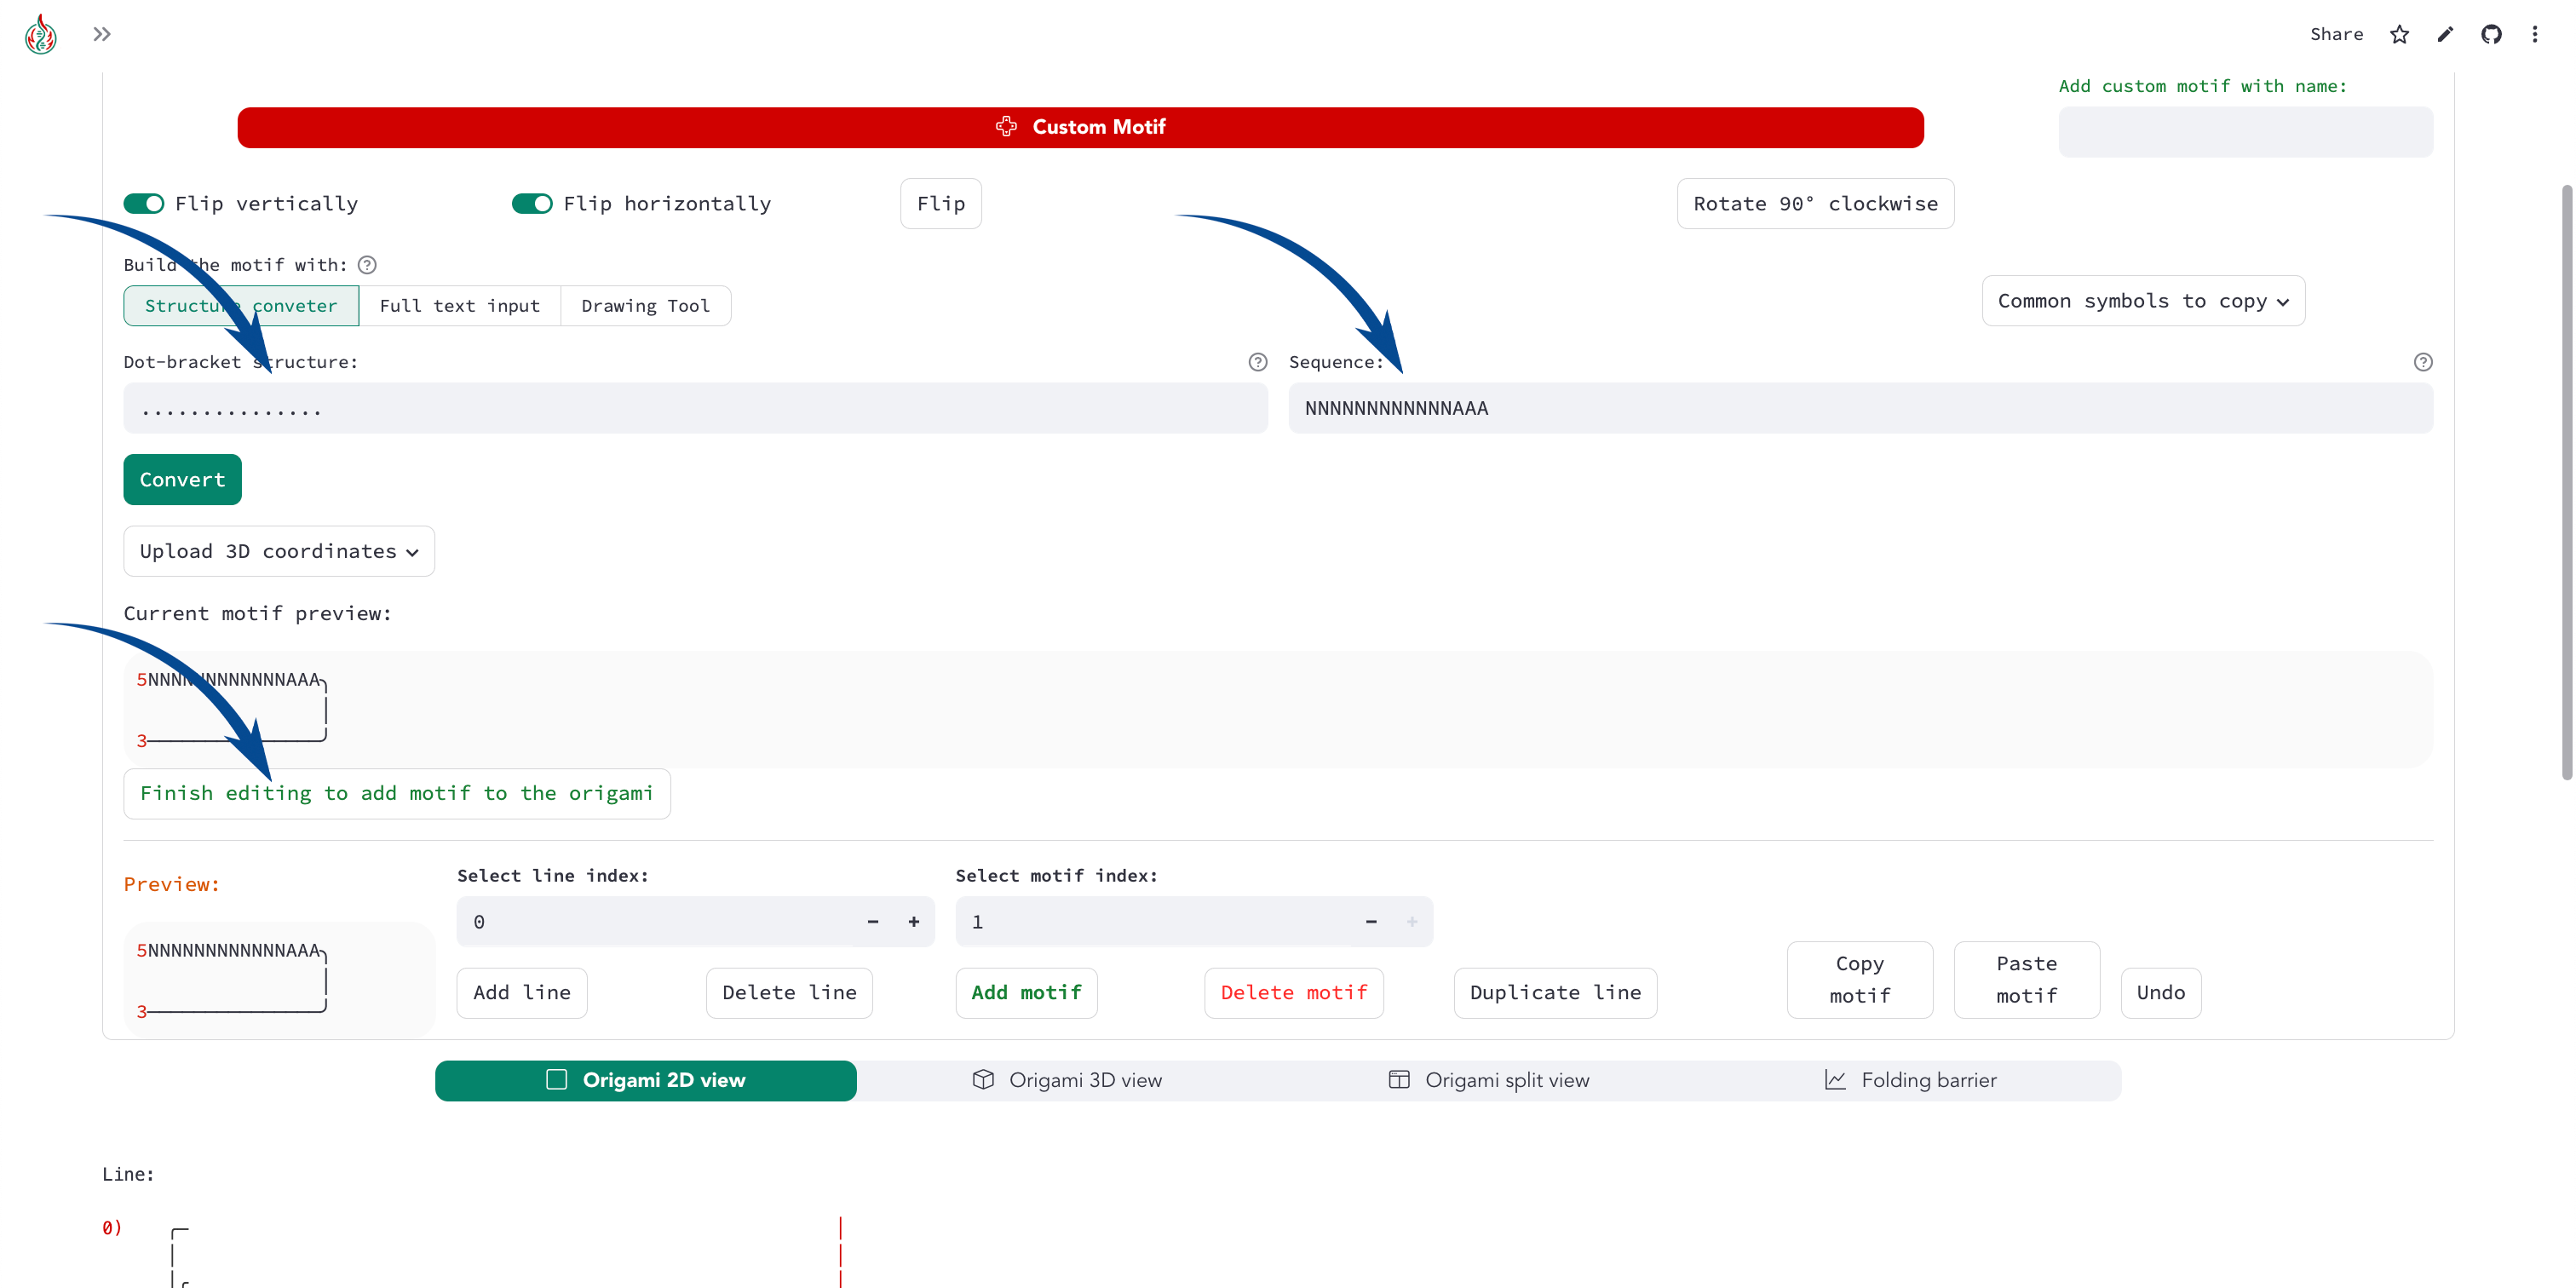
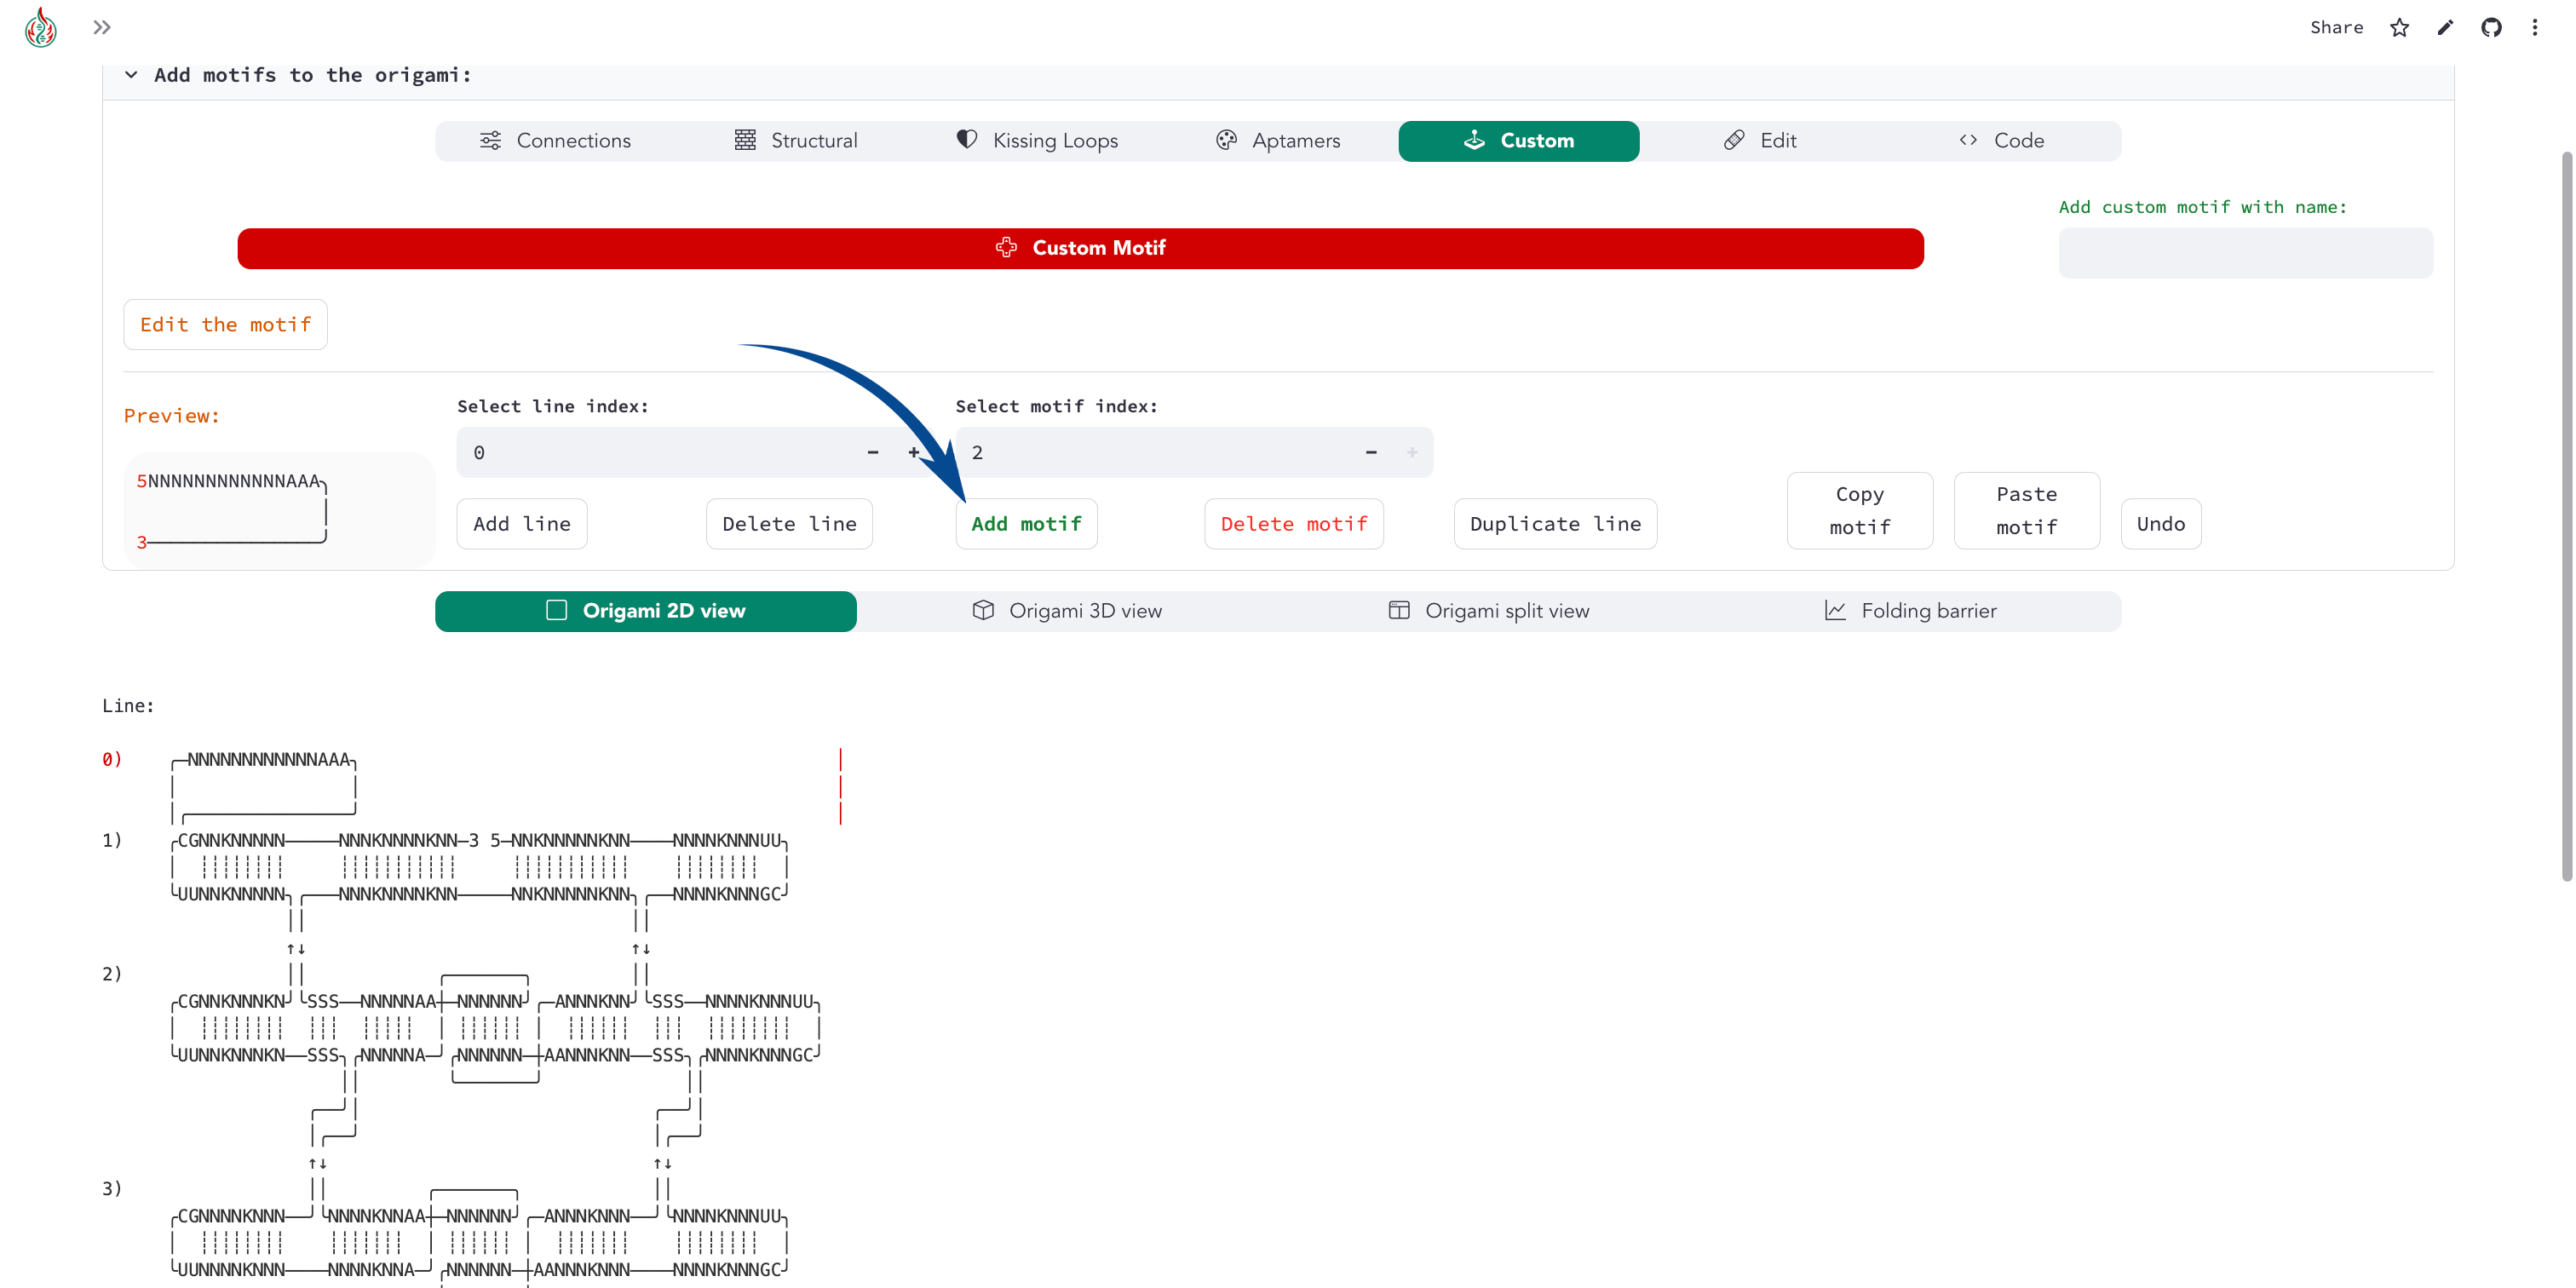
Once created, we can add the motif to the origami:
4) Connect the single-stranded motif
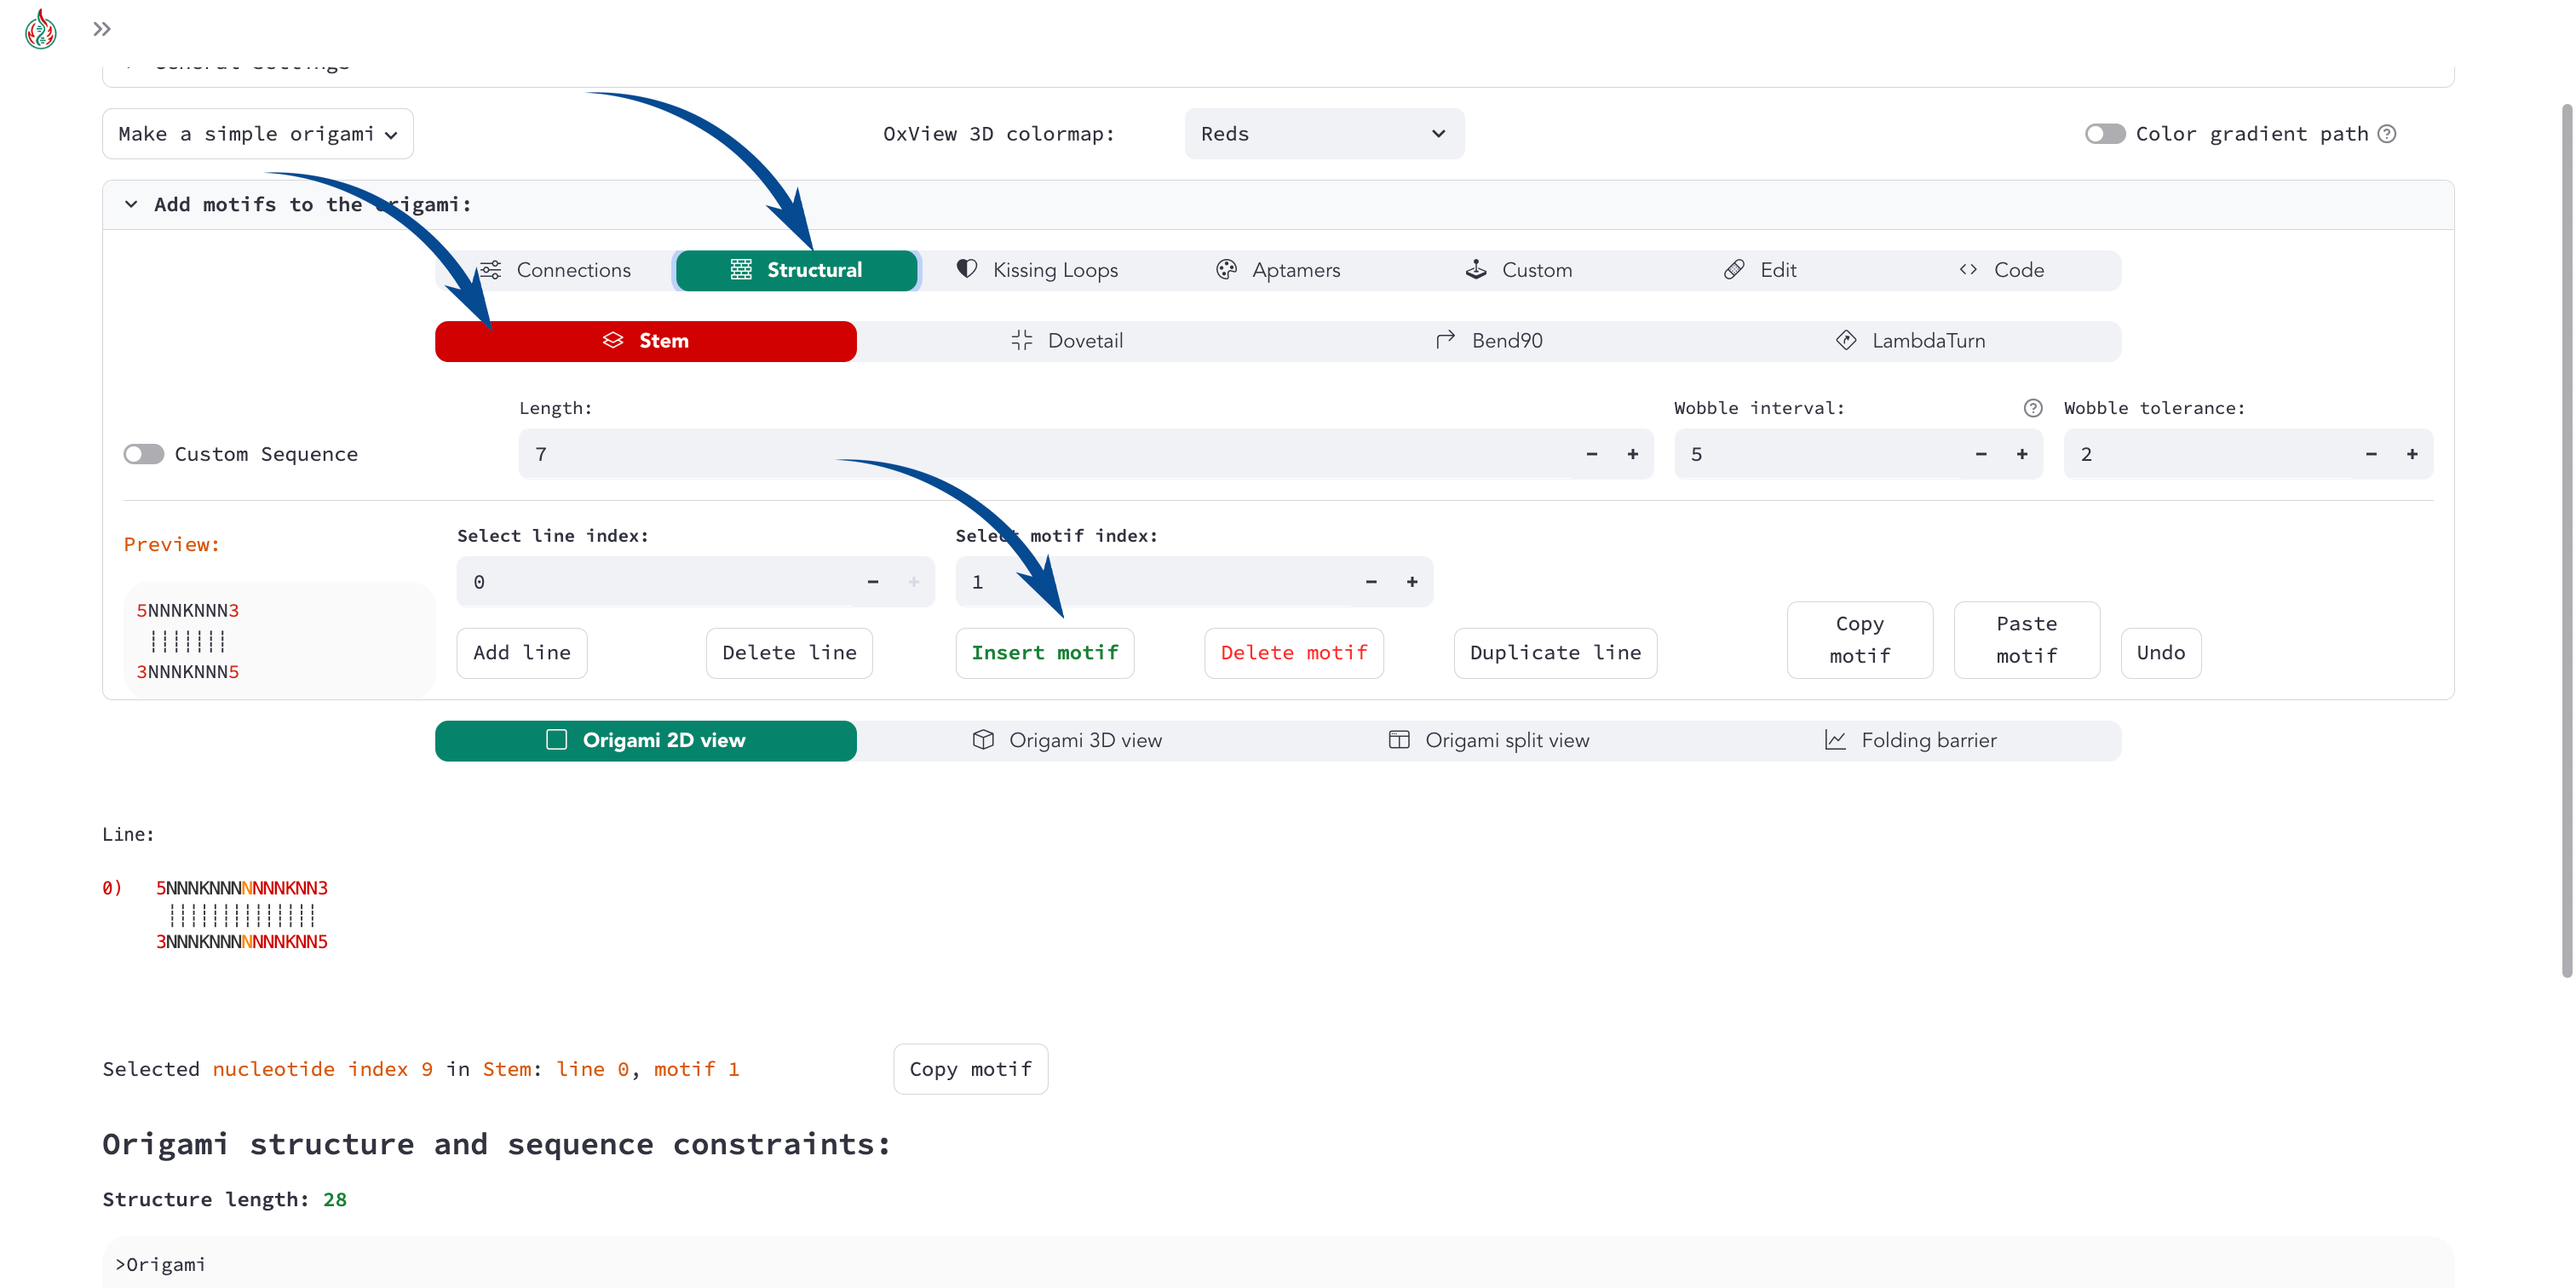
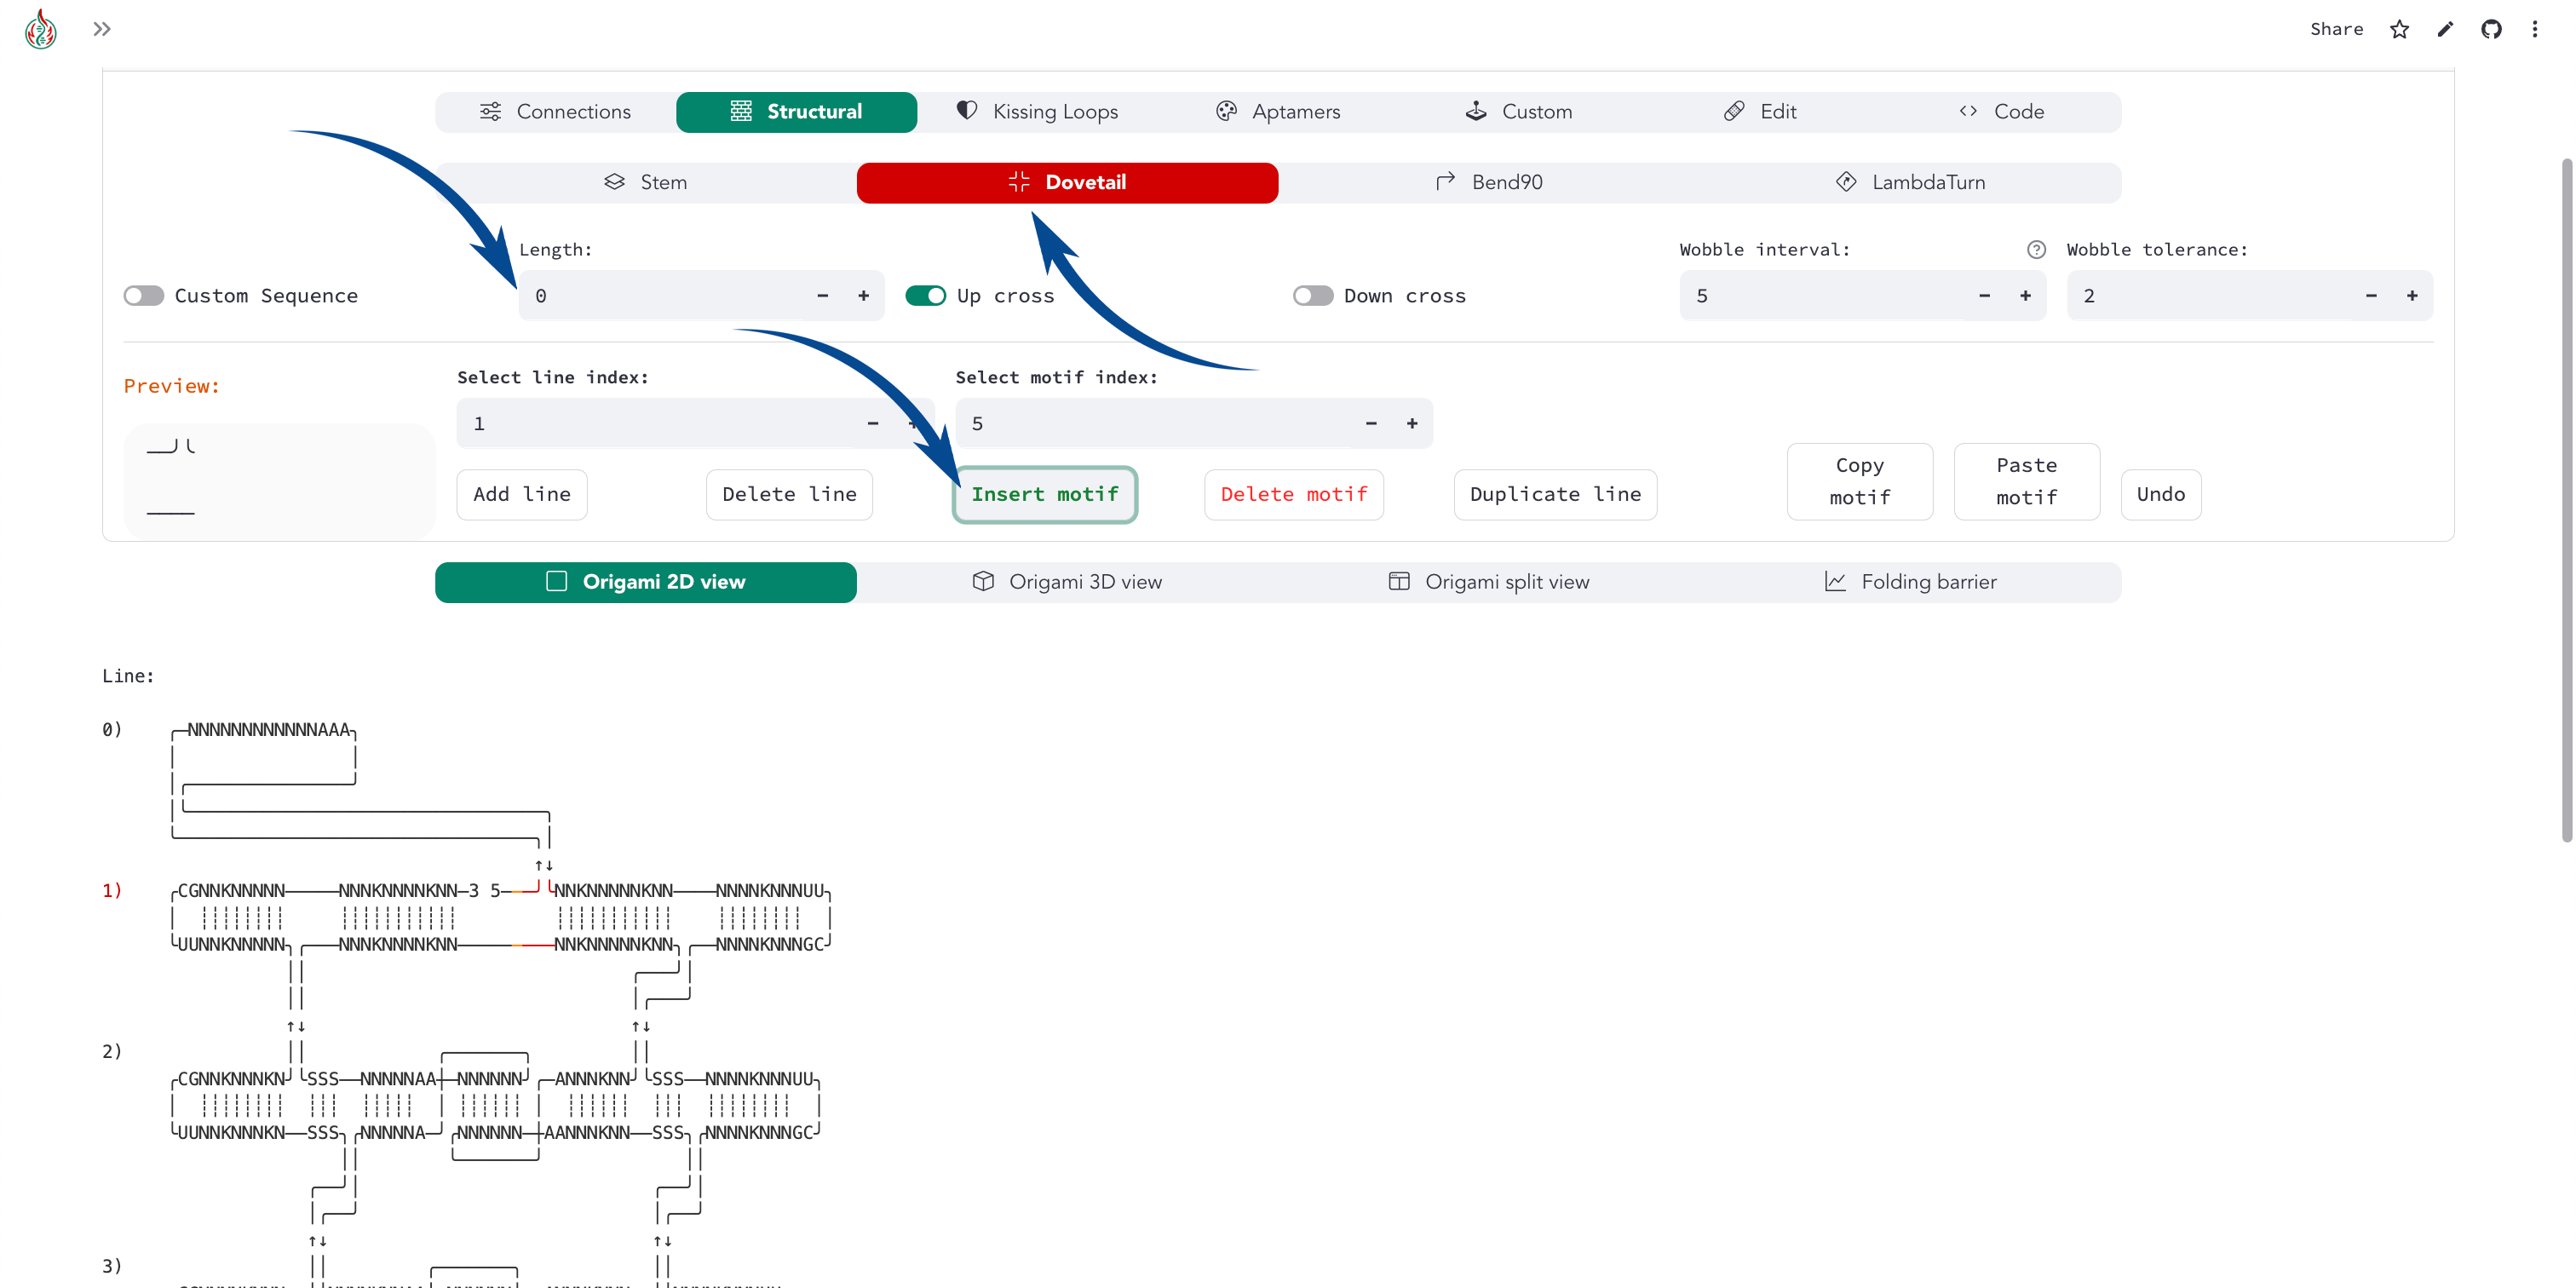
Almost done! Now you can add a zero-length dovetail (in the Structural motif menu) to the origami to connect the single-stranded motif.
A zero-length dovetail is just a connector without any nucleotide. The 3D structure of the dovetail ensures that the line is joined as an adjacent helix.
To add it at the 5’ end, insert the dovetail after the start_end_motif (insert it before to add the motif to the 3’ end).
And tadaaaa! You have added an ssRNA to the 5’/3’ end.
You can see an example of extending the 3’ end when loading the rna_filament_ispinach template in the pyFuRNAce homepage.
You can use this approach (adding a line with stem_cap_link) also to add motifs to a branched kissing loop.